C# DLL에서 Win32 C/C++처럼 dllexport 함수를 제공하는 방법 - 두 번째 이야기
예전에 다뤘던 방법은,
C# DLL에서 Win32 C/C++처럼 dllexport 함수를 제공하는 방법
; https://www.sysnet.pe.kr/2/0/11052
UnmanagedExports라는 NuGet 패키지를 통해 가능했는데, 이번에 설명할 방법은 Microsoft.DotNet.ILCompiler에서 제공합니다.
Building Native Libraries with CoreRT
; https://github.com/dotnet/corert/tree/master/samples/NativeLibrary

Writing Native Libraries in C# and using them in other languages
; https://dev.to/encrypt0r/writing-native-libraries-in-c-3kl
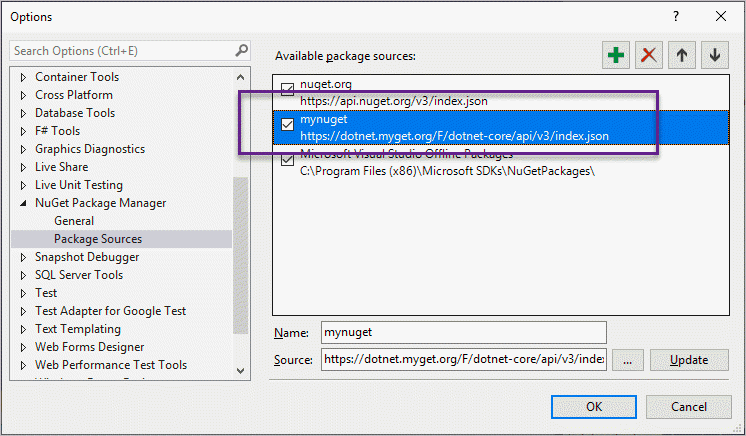
현재 ILCompiler는 정규 nuget.org가 아닌 myget.org에서 배포하므로,
Microsoft.DotNet.ILCompiler v1.0.0-alpha-27527-01
; https://dotnet.myget.org/feed/dotnet-core/package/nuget/Microsoft.DotNet.ILCompiler
다음의 글에 설명했던 데로,
Visual Studio 없이 최신 C# (8.0) 컴파일러를 사용하는 방법
; https://www.sysnet.pe.kr/2/0/11834
feed 소스를 "
https://dotnet.myget.org/F/dotnet-core/api/v3/index.json"로 설정한 항목을 추가해야 합니다.
그럼 예제를 다뤄볼까요? ^^
우선 .NET Core 라이브러리 프로젝트를 만들고 소스 코드를 다음과 같이 입력합니다.
using System;
using System.Runtime.InteropServices;

public class Class1
{
    [NativeCallable(EntryPoint = "add", CallingConvention = CallingConvention.StdCall)]
    public static int Add(int a, int b)
    {
        return a + b;
    }
}

namespace System.Runtime.InteropServices
{
    [AttributeUsage(AttributeTargets.Method)]
    public sealed class NativeCallableAttribute : Attribute
    {
        public string EntryPoint;
        public CallingConvention CallingConvention;
        public NativeCallableAttribute() { }
    }
}
NativeCallable 특성은 ILCompiler가 인식만 하면 되기 때문에 위와 같이 임의로 정의해서 포함하면 됩니다. 그다음, 현재의 라이브러리 프로젝트에 이전에 추가했던 "Pakcage source"로부터 Microsoft.DotNet.ILCompiler 패키지를 추가합니다.
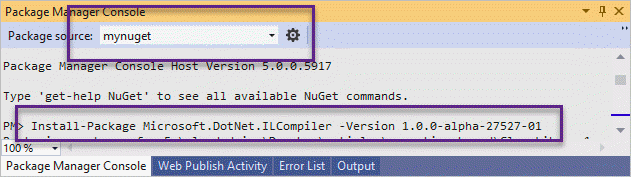
Install-Package Microsoft.DotNet.ILCompiler -Version 1.0.0-alpha-27527-01
그럼, csproj에 다음의 설정이 추가됩니다.
<Project Sdk="Microsoft.NET.Sdk">

  <PropertyGroup>
    <TargetFramework>netcoreapp2.1</TargetFramework>
    <Platforms>x64</Platforms>
  </PropertyGroup>

  <ItemGroup>
    <PackageReference Include="Microsoft.DotNet.ILCompiler" Version="1.0.0-alpha-27527-01" />
  </ItemGroup>

</Project>
위의 글은 더 이상 유효하지 않고, 이제 다음의 글에 따라 실습하시면 됩니다.
.NET 5 / .NET Core - UnmanagedCallersOnly 특성을 사용한 함수 내보내기
; https://www.sysnet.pe.kr/2/0/12413
끝입니다. 이제 (비주얼 스튜디오가 아닌) 명령행에서 다음과 같이 빌드해 주면,
dotnet.exe publish /p:NativeLib=Shared -r win-x64 -c Release
x64 DLL이 다음의 경로에 생성됩니다.
...[project_path]...\bin\x64\Release\netcoreapp2.1\win-x64\native
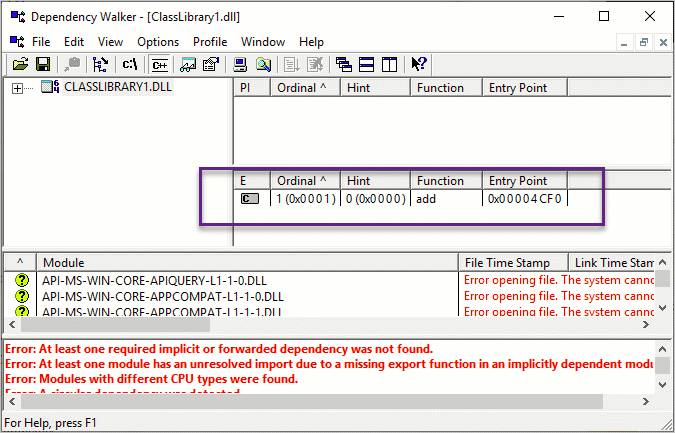
그리고 이것을 depends.exe로 확인하면 다음과 같이 add 함수가 export 된 것을 확인할 수 있습니다.
그런데, 사실 많이 사용할 것 같지는 않습니다. 왜냐하면 이전에 설명한
UnmanagedExports는 비주얼 스튜디오에서 빌드하는 것만으로 DLL 생성이 되었던 반면 Microsoft.DotNet.ILCompiler의 경우에는 명령행에서 dotnet publish를 해야 하기 때문입니다. (게다가 비주얼 스튜디오에서의
publish 명령도 일반적인 managed DLL을 생성할 뿐입니다.) 따라서 매우 번거로운 절차로 인해 차라리 UnmanagedExports를 사용하게 될 것입니다.
참고로, 현재 64비트 DLL만 제공할 뿐 32비트 DLL을 생성하려는 경우 다음과 같이 오류 메시지가 발생합니다.
C:\temp>
dotnet publish /p:NativeLib=Shared -r win-x86 -c Release
Microsoft (R) Build Engine version 16.0.385-preview+g966cdf2ac6 for .NET Core
Copyright (C) Microsoft Corporation. All rights reserved.
Restoring packages for C:\temp\ClassLibrary1\ClassLibrary1.csproj...
Installing runtime.win-x86.Microsoft.NETCore.DotNetAppHost 2.1.0.
Installing runtime.win-x86.Microsoft.NETCore.DotNetHostResolver 2.1.0.
Installing runtime.win-x86.Microsoft.NETCore.DotNetHostPolicy 2.1.0.
Installing runtime.win-x86.Microsoft.NETCore.App 2.1.0.
Restore completed in 14.69 sec for C:\temp\ClassLibrary1\ClassLibrary1.csproj.
C:\Program Files (x86)\dotnet\sdk\3.0.100-preview-010184\Sdks\Microsoft.NET.Sdk\targets\Microsoft.NET.RuntimeIdentifierInference.targets(151,5): message NETSDK1057: You are using a preview version of .NET Core. See:
https://aka.ms/dotnet-core-preview [C:\temp\ClassLibrary1\ClassLibrary1.csproj]
ClassLibrary1 -> C:\temp\ClassLibrary1\bin\Release\netcoreapp2.1\win-x86\ClassLibrary1.dll
%USERPROFILE%\.nuget\packages\microsoft.dotnet.ilcompiler\1.0.0-alpha-27527-01\build\Microsoft.NETCore.Native.Publish.targets(76,5):
error : win-x86 not supported yet. https://github.com/dotnet/corert/issues/4589 [C:\temp\ClassLibrary1\ClassLibrary1.csproj]
또한, Microsoft.DotNet.ILCompiler의 경우 현재 명령행(cmd.exe)의 Visual C++ 빌드 환경을 사용하기 때문에 "Developer Command Prompt for VS 2019"라는 제목의 명령행 환경에서 빌드하면 다음과 같은 식의 오류가 발생합니다.
C:\temp> dotnet publish /p:NativeLib=Shared -r win-x64 -c Release
Microsoft (R) Build Engine version 16.0.385-preview+g966cdf2ac6 for .NET Core
Copyright (C) Microsoft Corporation. All rights reserved.

  Restore completed in 22.07 ms for C:\temp\ClassLibrary1\ClassLibrary1.csproj.
C:\Program Files\dotnet\sdk\3.0.100-preview-010184\Sdks\Microsoft.NET.Sdk\targets\Microsoft.NET.RuntimeIdentifierInference.targets(151,5): message NETSDK1057: You are using a preview version of .NET Core. See: https://aka.ms/dotnet-core-preview [C:\temp\ClassLibrary1\ClassLibrary1.csproj]
  ClassLibrary1 -> C:\temp\ClassLibrary1\bin\Release\netcoreapp2.1\win-x64\ClassLibrary1.dll
  Generating compatible native code. To optimize for size or speed, visit https://aka.ms/OptimizeCoreRT
libcpmt.lib(nothrow.obj) : fatal error LNK1112: module machine type 'x86' conflicts with target machine type 'x64' [C:\temp\ClassLibrary1\ClassLibrary1.csproj]
%USERPROFILE%\.nuget\packages\microsoft.dotnet.ilcompiler\1.0.0-alpha-27527-01\build\Microsoft.NETCore.Native.targets(333,5): error MSB3073: The command "link  @"obj\Release\netcoreapp2.1\win-x64\native\link.rsp"" exited with code 1112. [C:\temp\ClassLibrary1\ClassLibrary1.csproj]
왜냐하면 "Developer Command Prompt for VS 2019" 명령행 환경은 x86이기 때문인데,
이 문제를 해결하려면 "x64 Native Tools Command Prompot for VS 2019"라는 이름의 메뉴를 실행해 그 cmd.exe 환경에서 "dotnet publish ..." 명령을 실행해야 합니다. 아니면, x86 빌드 환경에서도 그냥 "x64 Native Tools Command Prompot for VS 2019"가 호출하는 배치 파일을 실행해 x64 환경으로 바꾸면 됩니다.
C:\temp\ClassLibrary1\ClassLibrary2> "C:\Program Files (x86)\Microsoft Visual Studio\2019\Enterprise\VC\Auxiliary\Build\vcvars64.bat"
**********************************************************************
** Visual Studio 2019 Developer Command Prompt v16.8.0
** Copyright (c) 2020 Microsoft Corporation
**********************************************************************
[vcvarsall.bat] Environment initialized for: 'x64'

C:\temp\ClassLibrary1\ClassLibrary2> dotnet publish /p:NativeLib=Shared -r win-x64 -c Release
Microsoft (R) Build Engine version 16.8.0+126527ff1 for .NET
Copyright (C) Microsoft Corporation. All rights reserved.

  Determining projects to restore...
  All projects are up-to-date for restore.
  ClassLibrary2 -> C:\temp\ClassLibrary1\ClassLibrary2\bin\x64\Release\netcoreapp3.1\win-x64\ClassLibrary2.dll
  Generating compatible native code. To optimize for size or speed, visit https://aka.ms/OptimizeCoreRT
     Creating library bin\x64\Release\netcoreapp3.1\win-x64\native\ClassLibrary2.lib and object bin\x64\Release\netcoreapp3.1\win-x64\native\ClassLibrary2.exp
  ClassLibrary2 -> C:\temp\ClassLibrary1\ClassLibrary2\bin\x64\Release\netcoreapp3.1\win-x64\publish\
마지막으로, 다음과 같이 오류가 발생할 수도 있습니다.
C:\temp\demo_code\nativeLib> dotnet publish /p:NativeLib=Shared -r win-x64 -c release -o win-x64-shared
Microsoft (R) Build Engine version 16.8.0+126527ff1 for .NET
Copyright (C) Microsoft Corporation. All rights reserved.

  Determining projects to restore...
  Restored C:\temp\demo_code\nativeLib\nativeLib.csproj (in 1.58 min).
  nativeLib -> C:\temp\demo_code\nativeLib\bin\release\net5.0\win-x64\nativeLib.dll
C:\Users\testusr\.nuget\packages\microsoft.dotnet.ilcompiler\1.0.0-alpha-29408-02\build\Microsoft.NETCore.Native.Windows.props(109,5): error : Platform linker not found. To fix this problem, download and install Visual Studio 2017 from http://visualstudio.com. Make sure to install the Desktop Development for C++ workload. [C:\temp\demo_code\nativeLib\nativeLib.csproj]
오류 메시지에 따라, 해당 컴퓨터에는 Visual C++ 개발환경이 설치되어 있지 않기 때문입니다. 만약 비주얼 스튜디오가 설치된 상태라면 C++ 쪽 구성 요소를 추가하면 되고, 그렇지 않다면
Build Tools for Visual Studio 2019를 다운로드하면 됩니다.
[이 글에 대해서 여러분들과 의견을 공유하고 싶습니다. 틀리거나 미흡한 부분 또는 의문 사항이 있으시면 언제든 댓글 남겨주십시오.]