WPF/WinForm에서 UWP의 기능을 이용해 Bluetooth 기기와 Pairing하는 방법
UWP의 도움을 받으면 일반 데스크톱 프로그램에서 Bluetooth 관련 기능을 쉽게 사용할 수 있습니다. 예를 들어, Windows Forms 프로젝트를 생성 후 다음의 어셈블리 2개를 참조 추가하면,
C:\Program Files (x86)\Windows Kits\10\UnionMetadata\...[version]...\Windows.winmd
C:\Program Files (x86)\Reference Assemblies\Microsoft\Framework\.NETCore\v4.5\System.Runtime.WindowsRuntime.dll
UWP 관련 유틸리티 클래스들을 데스크톱 프로그램에서도 사용할 수 있습니다. 블루투스 페어링 관련해서는 도움말에 따라,
Pair devices
; https://learn.microsoft.com/en-us/windows/uwp/devices-sensors/pair-devices
다음과 같이 (예를 들어 Winform 프로젝트에서) 코드로 작성할 수 있습니다.
using System;
using System.Diagnostics;
using System.Text;
using System.Windows.Forms;
using Windows.Devices.Bluetooth;
using Windows.Devices.Enumeration;

namespace DevicePickerWinFormAppSample
{
    public partial class Form1 : Form
    {
        public Form1()
        {
            InitializeComponent();
        }

        private async void Button1_Click(object sender, EventArgs e)
        {
            var picker = new DevicePicker();
            picker.DeviceSelected += Picker_DeviceSelected;
            picker.Filter.SupportedDeviceSelectors.Add(
                BluetoothDevice.GetDeviceSelectorFromPairingState(false));

            DeviceInformation di = await picker.PickSingleDeviceAsync(new Windows.Foundation.Rect(0, 0, 0, 0), Windows.UI.Popups.Placement.Default);
            if (di == null)
            {
                return;
            }

            if (di.Pairing.IsPaired == false)
            {
                di.Pairing.Custom.PairingRequested += Custom_PairingRequested;

                if (di.Pairing.CanPair == true)
                {
                    var pairResult = await di.Pairing.PairAsync();
                    if (pairResult.Status == DevicePairingResultStatus.Paired)
                    {
                        // do something
                    }
                }
                else
                {
                    var pairResult = await di.Pairing.Custom.PairAsync(DevicePairingKinds.ProvidePin);
                    if (pairResult.Status == DevicePairingResultStatus.Paired)
                    {
                        // do something
                    }
                }
            }
        }

        private void Custom_PairingRequested(DeviceInformationCustomPairing sender, DevicePairingRequestedEventArgs args)
        {
            if (args.PairingKind == DevicePairingKinds.ProvidePin)
            {
                // Microsoft.VisualBasic.dll 참조 필요
                string result = Microsoft.VisualBasic.Interaction.InputBox("Pin?", "Pairing...", "");
                if (string.IsNullOrEmpty(result) == false)
                {
                    args.Accept(result);
                }
            }
            else
            {
                args.Accept();
            }
        }

        private void Picker_DeviceSelected(DevicePicker sender, DeviceSelectedEventArgs args)
        {
            var di = args.SelectedDevice;

            StringBuilder sb = new StringBuilder();
            sb.AppendLine(di.Name);
            sb.AppendLine(di.Id);
            sb.AppendLine(di.Kind.ToString());
            sb.AppendLine(di.Pairing.IsPaired.ToString());
            sb.AppendLine(di.Pairing.CanPair.ToString());
            sb.AppendLine("");
            foreach (var item in di.Properties.Keys)
            {
                sb.Append(item);

                string[] props = di.Properties[item] as string[];
                if (props != null)
                {
                    sb.AppendLine(":");
                    foreach (var prop in props)
                    {
                        sb.AppendLine("    " + prop);
                    }
                }
                else
                {
                    sb.AppendLine(": " + di.Properties[item]);
                }
            }

            Trace.WriteLine(sb.ToString());
        }
    }
}
실제로 실행해 보면 블루투스 기기를 찾는 대화창이 뜹니다.
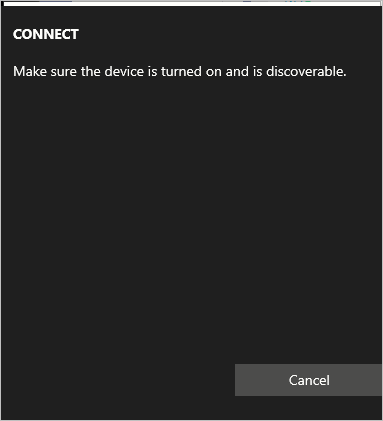
Make sure the device is turned on and is discoverable.
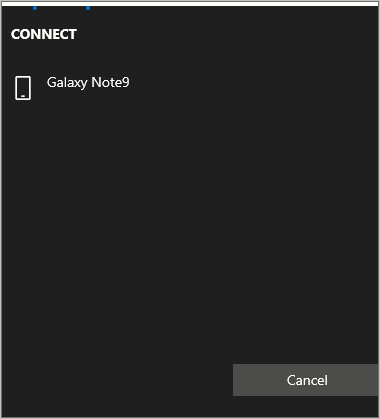
이 상태에서, 테스트를 위해 다른 블루투스 기기를(여기서는 페어링되지 않은 제 갤럭시 폰) 켜 블루투스 메뉴로 들어가면 다음과 같이 대화창 목록에 폰이 나옵니다.
해당 항목을 선택하면 Picker_DeviceSelected 이벤트 핸들러가 실행되고 갤럭시 노트 9의 경우 DeviceInformation 타입을 이용해 아래와 같은 정보를 구할 수 있습니다.
Galaxy Note9
Bluetooth#Bluetooth7c:6d:e5:da:19:0c-58:af:e9:b2:e3:5e
AssociationEndpoint
False
False

System.ItemNameDisplay: Galaxy Note9
System.Devices.DeviceInstanceId:
System.Devices.Icon: C:\Windows\System32\DDORes.dll,-2035
System.Devices.GlyphIcon: C:\Windows\System32\DDORes.dll,-3022
System.Devices.InterfaceEnabled:
System.Devices.IsDefault:
System.Devices.PhysicalDeviceLocation:
System.Devices.ContainerId:
System.Devices.DevObjectType: 5
System.Devices.CategoryIds:
System.Devices.Aep.ContainerId: 3984f580-ceb2-5030-9e71-10027efe5b76
System.Devices.Aep.Category:
    Communication.Phone
System.Devices.Aep.ProtocolId: e0cbf06c-cd8b-4647-bb8a-263b43f0f974
System.Devices.AepContainer.ContainerId:
System.Devices.AepContainer.Categories:
System.Devices.AepContainer.Children:
System.Devices.AepContainer.ProtocolIds:
System.Devices.AepContainer.SupportsAudio:
System.Devices.AepContainer.SupportsVideo:
System.Devices.AepContainer.SupportsImages:
System.Devices.AepContainer.SupportedUriSchemes:
System.Devices.AepService.ContainerId:
{C192D624-035A-4EA7-BD44-2A820C0D09FF} 3:
System.Devices.AepService.AepId:
System.Devices.AepService.ProtocolId: e0cbf06c-cd8b-4647-bb8a-263b43f0f974
위에서 강조된 "58:af:e9:b2:e3:5e" 값은 블루투스 기기의 MAC 주소입니다. 이후, DeviceInformation.Pairing 속성을 이용해 페어링되지 않은 기기를 PairAsync 메서드를 이용해 페어를 시도할 수 있습니다.
여기서 제가 한 가지 이해하지 못하고 있는 것이 있는데, DeviceInformation.Pairing.CanPair가 (적어도 제가 가지고 있는 블루투스 기기들은) 모두 false 값이 나온다는 점입니다.
if (di.Pairing.CanPair == true)
{
    // 이 코드로 진입하는 블루투스 기기는 거의 없고,
    var pairResult = await di.Pairing.PairAsync();
    if (pairResult.Status == DevicePairingResultStatus.Paired)
    {
        // do something
    }
}
else
{
    // 대개의 경우 이 코드로 진입하게 됨.
    var pairResult = await di.Pairing.Custom.PairAsync(DevicePairingKinds.ProvidePin);
    if (pairResult.Status == DevicePairingResultStatus.Paired)
    {
        // do something
    }
}
그래서 위의 코드에서 di.Pairing.CanPair == true인 상황은 테스트되지 않은 코드입니다. (혹시 어떤 블루투스 기기가 CanPair == true 인지 아시는 분은 덧글 부탁드립니다. ^^)
어쨌든 저렇게 해서 PairAsync를 호출하면 대상 블루투스 기기에 신호가 전달되고 (이런 경우에는 폰이 생성한) PIN 번호를 PairAsync를 호출한 기기에서 입력하라는 메시지가 뜹니다. 따라서 해당 값을, DeviceInformation.Pairing.Custom.PairingRequested 이벤트 핸들러에서 다음과 같은 식으로 처리해 주면 됩니다.
static private void Custom_PairingRequested(DeviceInformationCustomPairing sender, DevicePairingRequestedEventArgs args)
{
    if (args.PairingKind == DevicePairingKinds.ProvidePin)
    {
        // Microsoft.VisualBasic.dll 참조 필요
        string result = Microsoft.VisualBasic.Interaction.InputBox("Pin?", "Pairing...", "");
        if (string.IsNullOrEmpty(result) == false)
        {
            args.Accept(result);
        }
    }
    else
    {
        args.Accept();
    }
}
사실, 블루투스 페어링을 이런 식으로 프로그래밍할 필요는 없습니다. 왜냐하면 이미 윈도우나 여타 블루투스 기기에서 별도의 페어링 방법을 제공하기 때문에 그걸로 미리 해두면 되기 때문입니다.
(
이 글의 예제 코드는 github - DevicePickerWinFormAppSample에서 제공합니다.)
참고로, 이 코드를 Console 프로젝트 유형에서 사용하는 경우에는 PickSingleDeviceAsync 메서드 호출 시에 "Invalid window handle" 예외가 발생합니다.
System.Exception
  HResult=0x80070578
  Message=Invalid window handle. (Exception from HRESULT: 0x80070578)
  Source=mscorlib
  StackTrace:
   at System.Runtime.ExceptionServices.ExceptionDispatchInfo.Throw() in f:\dd\ndp\clr\src\BCL\system\runtime\exceptionservices\exceptionservicescommon.cs:line 133
   at System.Runtime.CompilerServices.TaskAwaiter.HandleNonSuccessAndDebuggerNotification(Task task) in f:\dd\ndp\clr\src\BCL\system\runtime\compilerservices\TaskAwaiter.cs:line 156
   at System.Runtime.CompilerServices.TaskAwaiter`1.GetResult() in f:\dd\ndp\clr\src\BCL\system\runtime\compilerservices\TaskAwaiter.cs:line 352
   at Program.<Main>d__0.MoveNext() in F:\test\ConsoleApp1\ConsoleApp1\Program.cs:line 23
   at System.Runtime.ExceptionServices.ExceptionDispatchInfo.Throw() in f:\dd\ndp\clr\src\BCL\system\runtime\exceptionservices\exceptionservicescommon.cs:line 133
   at System.Runtime.CompilerServices.TaskAwaiter.HandleNonSuccessAndDebuggerNotification(Task task) in f:\dd\ndp\clr\src\BCL\system\runtime\compilerservices\TaskAwaiter.cs:line 156
   at System.Runtime.CompilerServices.TaskAwaiter.GetResult() in f:\dd\ndp\clr\src\BCL\system\runtime\compilerservices\TaskAwaiter.cs:line 114
   at Program.<Main>(String[] args)
어쩔 수 없습니다. 동일하게 Window 하나 만들어 주고 그 안에서 코드 실행을 해야 하는데, 그럴 거면 애당초 WinForm/WPF 프로젝트로 시작하는 것이 더 좋을 것입니다.
[이 글에 대해서 여러분들과 의견을 공유하고 싶습니다. 틀리거나 미흡한 부분 또는 의문 사항이 있으시면 언제든 댓글 남겨주십시오.]