Microsoft MVP성태의 닷넷 이야기
사물인터넷: 65. C# - Arduino IDE의 Serial Monitor 기능 구현 [링크 복사], [링크+제목 복사],
조회: 15583
글쓴 사람
정성태 (techsharer at outlook.com)
홈페이지
첨부 파일
(연관된 글이 1개 있습니다.)

C# - Arduino IDE의 Serial Monitor 기능 구현

Arduino IDE의 "Tools" / "Serial Monitor (Ctrl+Shift+M)" 메뉴를 선택하면 Serial Monitor 화면이 열리면서, Sketch 프로그램에서 Serial.print...로 출력하는 내용을 확인할 수 있습니다.

해당 기능을 C#으로 한 번 구현해 볼까요? ^^ 사실, 단순한 직렬 포트 통신에 불과하기 때문에 이에 관한 예제 코드는 지난 글에서 사용한 것을 재사용하는 것도 가능합니다.

PC에 연결해 동작하는 자신만의 USB 장치 만들어 보기
; https://www.sysnet.pe.kr/2/0/11606

일례로, ESP8266 장치를 USB 케이블로 PC에 연결하면 (전원도 공급하면서) 다음과 같이 장치 관리자에서 COM 포트 및 UART 통신 파라미터를 확인할 수 있습니다.
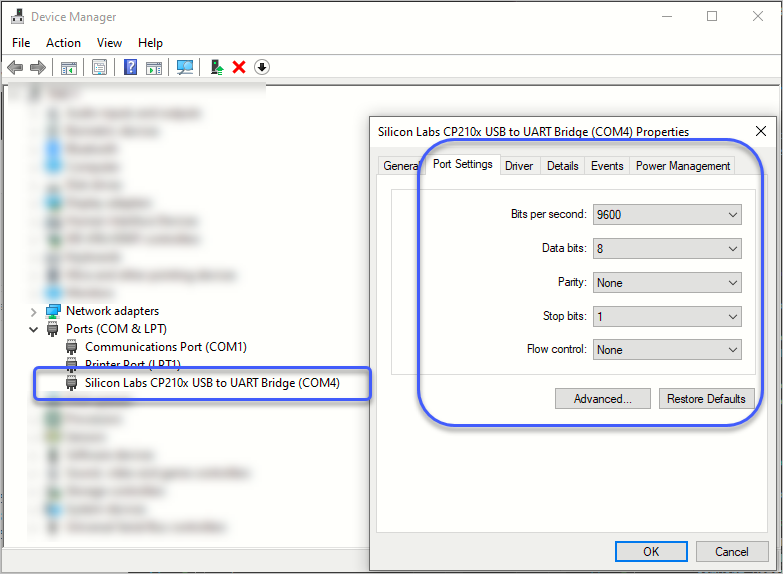
esp8266_uart_comm_with_cs_1.png

Port: COM4
Bits per seconds: 9600
Data bits: 8
Parity: None
Stop bits: 1
Flow control: None

그리고, 이 정도의 정보만으로도 이제 Arduino IDE의 "Serial Monitor"를 C#으로 다음과 같이 간단하게 구현할 수 있습니다.

using System;
using System.IO.Ports;
using System.Text;

class Program
{
    static void Main(string[] args)
    {
        foreach (string portName in SerialPort.GetPortNames())
        {
            Console.WriteLine(portName);
        }

        SerialPort comPort = OpenCOM(4, 115200);
        Console.WriteLine(comPort.IsOpen); // True
        comPort.DataReceived += ComPort_DataReceived;

        Console.WriteLine("Press any key to exit...");
        Console.ReadLine();

        comPort.Close();
        Console.WriteLine(comPort.IsOpen); // False
    }

    private static void ComPort_DataReceived(object sender, SerialDataReceivedEventArgs e)
    {
        SerialPort comPort = sender as SerialPort;

        switch (e.EventType)
        {
            case SerialData.Chars:
                PrintInputBuffers(comPort);
                break;

            case SerialData.Eof:
                break;
        }
    }

    private static void PrintInputBuffers(SerialPort comPort)
    {
        int len = comPort.BytesToRead;
        byte[] buf = new byte[len];

        comPort.Read(buf, 0, len);

        Console.Write(Encoding.UTF8.GetString(buf));
    }

    private static SerialPort OpenCOM(int portNumber, int bps)
    {
        SerialPort comPort = new SerialPort();

        // 장치 관리자의 Port Settings에 따라,
        comPort.PortName = $"COM{portNumber}";
        comPort.BaudRate = bps;
        comPort.DataBits = 8;
        comPort.StopBits = StopBits.One;
        comPort.Handshake = Handshake.None;
        comPort.Parity = Parity.None;
        comPort.Open();

        return comPort;
    }
}

그런데, OpenCOM의 인자에 9600이 아닌 115200을 주고 있는데요, 그 이유는 해당 기기에서 동작하는 sketch 프로그램의 setup에서 그 속도를 변경한 경우에는 그에 맞춰져야 하기 때문입니다. 즉, 현재 기기는 다음과 같이 초기화를 시켰기 때문에,

void setup()
{
    Serial.begin(115200);
}

그에 접속하는 직렬 통신 클라이언트 프로그램도 115200을 사용한 것입니다.

이렇게 해서 프로그램을 실행하면, Sketch 프로그램에서 Serial.print...로 출력하는 내용이 C# 콘솔 프로그램 화면에 나옵니다.


출력 내용만 보면 재미없으니 ^^ 입력도 수행해 보겠습니다. 실제로 Arduino IDE의 Serial Monitor 창에는 상단에 텍스트 입력 상자가 있어 전송하는 기능도 제공합니다.

이를 테스트하기 위해 다음과 같이 간단한 Sketch 프로그램을 기기에 업로드하고,

void setup()
{
    Serial.begin(115200);
}

int _loopCount;

void loop()
{
    _loopCount ++;

    if (Serial.available())
    {
        String cmd = Serial.readStringUntil('\n');
        if (cmd == "get_count")
        {
            Serial.write(_loopCount);
            Serial.flush();            
        }
        else if (cmd == "reset")
        {
            _loopCount = 0;
            Serial.write(_loopCount);
            Serial.flush();
        }
    }

    delay(1000);
}

C# 프로그램은 다음과 같이 입력을 받아 전송하는 부분을 넣어주면,

using System;
using System.IO.Ports;
using System.Text;

class Program
{
    static EventWaitHandle _cmdExecuted = new EventWaitHandle(false, EventResetMode.AutoReset);

    static void Main(string[] args)
    {
        SerialPort comPort = OpenCOM(4, 115200);
        Console.WriteLine(comPort.IsOpen); // True
        comPort.DataReceived += ComPort_DataReceived;

        while (true)
        {
            Console.Write("serial> ");
            string cmd = Console.ReadLine();
            if (cmd == "quit" || cmd == "q")
            {
                break;
            }

            comPort.Write(cmd);

            _cmdExecuted.WaitOne(1000 * 5);
        }

        comPort.Close();
        Console.WriteLine(comPort.IsOpen); // False
    }

    private static void ComPort_DataReceived(object sender, SerialDataReceivedEventArgs e)
    {
        SerialPort comPort = sender as SerialPort;

        switch (e.EventType)
        {
            case SerialData.Chars:
                PrintInputBuffers(comPort);
                _cmdExecuted.Set();
                break;

            case SerialData.Eof:
                break;
        }
    }

    // ...[생략]...
}

다음과 같은 식으로 get_count, reset 명령어를 기기에 전송해 상호 작용할 수 있게 됩니다.

serial> get_count
_loopCount: 95

serial> reset
_loopCount: 0

serial> get_count
_loopCount: 5

(첨부 파일은 이 글의 예제 코드를 포함합니다.)


[이 글에 대해서 여러분들과 의견을 공유하고 싶습니다. 틀리거나 미흡한 부분 또는 의문 사항이 있으시면 언제든 댓글 남겨주십시오.]

[연관 글]


[최초 등록일: ]
[최종 수정일: 9/8/2023]

Creative Commons License
이 저작물은 크리에이티브 커먼즈 코리아 저작자표시-비영리-변경금지 2.0 대한민국 라이센스에 따라 이용하실 수 있습니다.
by SeongTae Jeong, mailto:techsharer at outlook.com

비밀번호

댓글 작성자


... 91  92  93  94  95  96  97  98  99  100  101  [102]  103  104  105  ...
NoWriterDateCnt.TitleFile(s)
11382정성태12/4/201721859오류 유형: 436. System.Data.SqlClient.SqlException (0x80131904): Connection Timeout Expired 예외 발생 시 "[Pre-Login] initialization=48; handshake=1944;" 값의 의미
11381정성태11/30/201718243.NET Framework: 702. 한글이 포함된 바이트 배열을 나눈 경우 한글이 깨지지 않도록 다시 조합하는 방법(두 번째 이야기)파일 다운로드1
11380정성태11/30/201718294디버깅 기술: 109. windbg - (x64에서의 인자 값 추적을 이용한) Thread.Abort 시 대상이 되는 스레드를 식별하는 방법
11379정성태11/30/201719026오류 유형: 435. System.Web.HttpException - Session state has created a session id, but cannot save it because the response was already flushed by the application.
11378정성태11/29/201720485.NET Framework: 701. 한글이 포함된 바이트 배열을 나눈 경우 한글이 깨지지 않도록 다시 조합하는 방법 [1]파일 다운로드1
11377정성태11/29/201719768.NET Framework: 700. CommonOpenFileDialog 사용 시 사용자가 선택한 파일 목록을 구하는 방법 [3]파일 다운로드1
11376정성태11/28/201724107VS.NET IDE: 123. Visual Studio 편집기의 \r\n (crlf) 개행을 \n으로 폴더 단위로 설정하는 방법
11375정성태11/28/201718935오류 유형: 434. Visual Studio로 ASP.NET 디버깅 중 System.Web.HttpException - Could not load type 오류
11374정성태11/27/201724027사물인터넷: 14. 라즈베리 파이 - (윈도우의 NT 서비스처럼) 부팅 시 시작하는 프로그램 설정 [1]
11373정성태11/27/201723013오류 유형: 433. Raspberry Pi/Windows 다중 플랫폼 지원 컴파일 관련 오류 기록
11372정성태11/25/201726060사물인터넷: 13. 윈도우즈 사용자를 위한 라즈베리 파이 제로 W 모델을 설정하는 방법 [4]
11371정성태11/25/201719677오류 유형: 432. Hyper-V 가상 스위치 생성 시 Failed to connect Ethernet switch port 0x80070002 오류 발생
11370정성태11/25/201719559오류 유형: 431. Hyper-V의 Virtual Switch 생성 시 "External network" 목록에 특정 네트워크 어댑터 항목이 없는 경우
11369정성태11/25/201721687사물인터넷: 12. Raspberry Pi Zero(OTG)를 다른 컴퓨터에 연결해 가상 키보드 및 마우스로 쓰는 방법 (절대 좌표, 상대 좌표, 휠) [1]
11368정성태11/25/201727273.NET Framework: 699. UDP 브로드캐스트 주소 255.255.255.255와 192.168.0.255의 차이점과 이를 고려한 C# UDP 서버/클라이언트 예제 [2]파일 다운로드1
11367정성태11/25/201727340개발 환경 구성: 337. 윈도우 운영체제의 route 명령어 사용법
11366정성태11/25/201718994오류 유형: 430. 이벤트 로그 - Cryptographic Services failed while processing the OnIdentity() call in the System Writer Object.
11365정성태11/25/201721250오류 유형: 429. 이벤트 로그 - User Policy could not be updated successfully
11364정성태11/24/201723146사물인터넷: 11. Raspberry Pi Zero(OTG)를 다른 컴퓨터에 연결해 가상 마우스로 쓰는 방법 (절대 좌표) [2]
11363정성태11/23/201723089사물인터넷: 10. Raspberry Pi Zero(OTG)를 다른 컴퓨터에 연결해 가상 마우스 + 키보드로 쓰는 방법 (두 번째 이야기)
11362정성태11/22/201719648오류 유형: 428. 윈도우 업데이트 KB4048953 - 0x800705b4 [2]
11361정성태11/22/201722422오류 유형: 427. 이벤트 로그 - Filter Manager failed to attach to volume '\Device\HarddiskVolume??' 0xC03A001C
11360정성태11/22/201722231오류 유형: 426. 이벤트 로그 - The kernel power manager has initiated a shutdown transition.
11359정성태11/16/201721715오류 유형: 425. 윈도우 10 Version 1709 (OS Build 16299.64) 업그레이드 시 발생한 문제 2가지
11358정성태11/15/201726487사물인터넷: 9. Visual Studio 2017에서 Raspberry Pi C++ 응용 프로그램 제작 [1]
11357정성태11/15/201726954개발 환경 구성: 336. 윈도우 10 Bash 쉘에서 C++ 컴파일하는 방법
... 91  92  93  94  95  96  97  98  99  100  101  [102]  103  104  105  ...