C# - Arduino IDE의 Serial Monitor 기능 구현
Arduino IDE의 "Tools" / "Serial Monitor (Ctrl+Shift+M)" 메뉴를 선택하면 Serial Monitor 화면이 열리면서, Sketch 프로그램에서 Serial.print...로 출력하는 내용을 확인할 수 있습니다.
해당 기능을 C#으로 한 번 구현해 볼까요? ^^ 사실, 단순한 직렬 포트 통신에 불과하기 때문에 이에 관한 예제 코드는 지난 글에서 사용한 것을 재사용하는 것도 가능합니다.
PC에 연결해 동작하는 자신만의 USB 장치 만들어 보기
; https://www.sysnet.pe.kr/2/0/11606
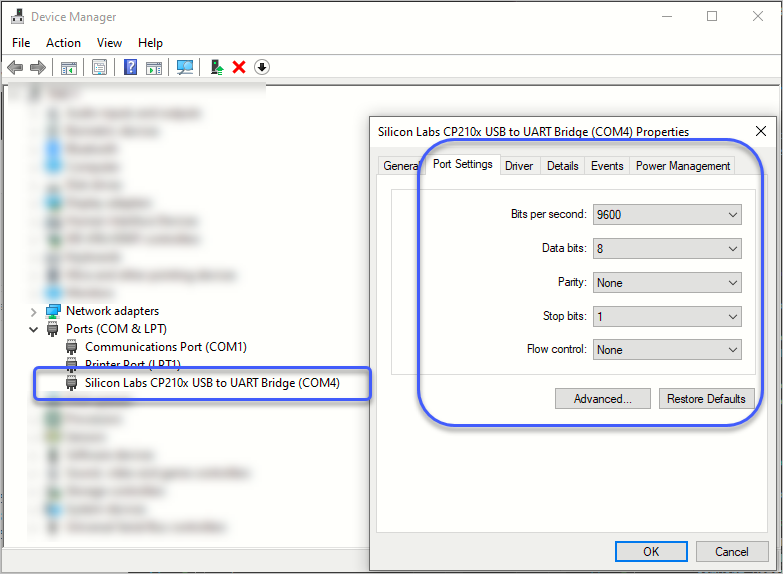
일례로, ESP8266 장치를 USB 케이블로 PC에 연결하면 (전원도 공급하면서) 다음과 같이 장치 관리자에서 COM 포트 및 UART 통신 파라미터를 확인할 수 있습니다.

Port: COM4
Bits per seconds: 9600
Data bits: 8
Parity: None
Stop bits: 1
Flow control: None
그리고, 이 정도의 정보만으로도 이제 Arduino IDE의 "Serial Monitor"를 C#으로 다음과 같이 간단하게 구현할 수 있습니다.
using System;
using System.IO.Ports;
using System.Text;

class Program
{
    static void Main(string[] args)
    {
        foreach (string portName in SerialPort.GetPortNames())
        {
            Console.WriteLine(portName);
        }

        SerialPort comPort = OpenCOM(4, 115200);
        Console.WriteLine(comPort.IsOpen); // True
        comPort.DataReceived += ComPort_DataReceived;

        Console.WriteLine("Press any key to exit...");
        Console.ReadLine();

        comPort.Close();
        Console.WriteLine(comPort.IsOpen); // False
    }

    private static void ComPort_DataReceived(object sender, SerialDataReceivedEventArgs e)
    {
        SerialPort comPort = sender as SerialPort;

        switch (e.EventType)
        {
            case SerialData.Chars:
                PrintInputBuffers(comPort);
                break;

            case SerialData.Eof:
                break;
        }
    }

    private static void PrintInputBuffers(SerialPort comPort)
    {
        int len = comPort.BytesToRead;
        byte[] buf = new byte[len];

        comPort.Read(buf, 0, len);

        Console.Write(Encoding.UTF8.GetString(buf));
    }

    private static SerialPort OpenCOM(int portNumber, int bps)
    {
        SerialPort comPort = new SerialPort();

        // 장치 관리자의 Port Settings에 따라,
        comPort.PortName = $"COM{portNumber}";
        comPort.BaudRate = bps;
        comPort.DataBits = 8;
        comPort.StopBits = StopBits.One;
        comPort.Handshake = Handshake.None;
        comPort.Parity = Parity.None;
        comPort.Open();

        return comPort;
    }
}
그런데, OpenCOM의 인자에 9600이 아닌 115200을 주고 있는데요, 그 이유는 해당 기기에서 동작하는 sketch 프로그램의 setup에서 그 속도를 변경한 경우에는 그에 맞춰져야 하기 때문입니다. 즉, 현재 기기는 다음과 같이 초기화를 시켰기 때문에,
void setup()
{
    Serial.begin(115200);
}
그에 접속하는 직렬 통신 클라이언트 프로그램도 115200을 사용한 것입니다.
이렇게 해서 프로그램을 실행하면, Sketch 프로그램에서 Serial.print...로 출력하는 내용이 C# 콘솔 프로그램 화면에 나옵니다.
출력 내용만 보면 재미없으니 ^^ 입력도 수행해 보겠습니다. 실제로 Arduino IDE의 Serial Monitor 창에는 상단에 텍스트 입력 상자가 있어 전송하는 기능도 제공합니다.
이를 테스트하기 위해 다음과 같이 간단한 Sketch 프로그램을 기기에 업로드하고,
void setup()
{
    Serial.begin(115200);
}

int _loopCount;

void loop()
{
    _loopCount ++;

    if (Serial.available())
    {
        String cmd = Serial.readStringUntil('\n');
        if (cmd == "get_count")
        {
            Serial.write(_loopCount);
            Serial.flush();
        }
        else if (cmd == "reset")
        {
            _loopCount = 0;
            Serial.write(_loopCount);
            Serial.flush();
        }
    }

    delay(1000);
}
C# 프로그램은 다음과 같이 입력을 받아 전송하는 부분을 넣어주면,
using System;
using System.IO.Ports;
using System.Text;

class Program
{
    static EventWaitHandle _cmdExecuted = new EventWaitHandle(false, EventResetMode.AutoReset);

    static void Main(string[] args)
    {
        SerialPort comPort = OpenCOM(4, 115200);
        Console.WriteLine(comPort.IsOpen); // True
        comPort.DataReceived += ComPort_DataReceived;

        while (true)
        {
            Console.Write("serial> ");
            string cmd = Console.ReadLine();
            if (cmd == "quit" || cmd == "q")
            {
                break;
            }

            comPort.Write(cmd);

            _cmdExecuted.WaitOne(1000 * 5);
        }

        comPort.Close();
        Console.WriteLine(comPort.IsOpen); // False
    }

    private static void ComPort_DataReceived(object sender, SerialDataReceivedEventArgs e)
    {
        SerialPort comPort = sender as SerialPort;

        switch (e.EventType)
        {
            case SerialData.Chars:
                PrintInputBuffers(comPort);
                _cmdExecuted.Set();
                break;

            case SerialData.Eof:
                break;
        }
    }

    // ...[생략]...
}
다음과 같은 식으로 get_count, reset 명령어를 기기에 전송해 상호 작용할 수 있게 됩니다.
serial> get_count
_loopCount: 95

serial> reset
_loopCount: 0

serial> get_count
_loopCount: 5
(첨부 파일은 이 글의 예제 코드를 포함합니다.)
[이 글에 대해서 여러분들과 의견을 공유하고 싶습니다. 틀리거나 미흡한 부분 또는 의문 사항이 있으시면 언제든 댓글 남겨주십시오.]