Microsoft MVP성태의 닷넷 이야기
사물인터넷: 65. C# - Arduino IDE의 Serial Monitor 기능 구현 [링크 복사], [링크+제목 복사],
조회: 15514
글쓴 사람
정성태 (techsharer at outlook.com)
홈페이지
첨부 파일
(연관된 글이 1개 있습니다.)

C# - Arduino IDE의 Serial Monitor 기능 구현

Arduino IDE의 "Tools" / "Serial Monitor (Ctrl+Shift+M)" 메뉴를 선택하면 Serial Monitor 화면이 열리면서, Sketch 프로그램에서 Serial.print...로 출력하는 내용을 확인할 수 있습니다.

해당 기능을 C#으로 한 번 구현해 볼까요? ^^ 사실, 단순한 직렬 포트 통신에 불과하기 때문에 이에 관한 예제 코드는 지난 글에서 사용한 것을 재사용하는 것도 가능합니다.

PC에 연결해 동작하는 자신만의 USB 장치 만들어 보기
; https://www.sysnet.pe.kr/2/0/11606

일례로, ESP8266 장치를 USB 케이블로 PC에 연결하면 (전원도 공급하면서) 다음과 같이 장치 관리자에서 COM 포트 및 UART 통신 파라미터를 확인할 수 있습니다.
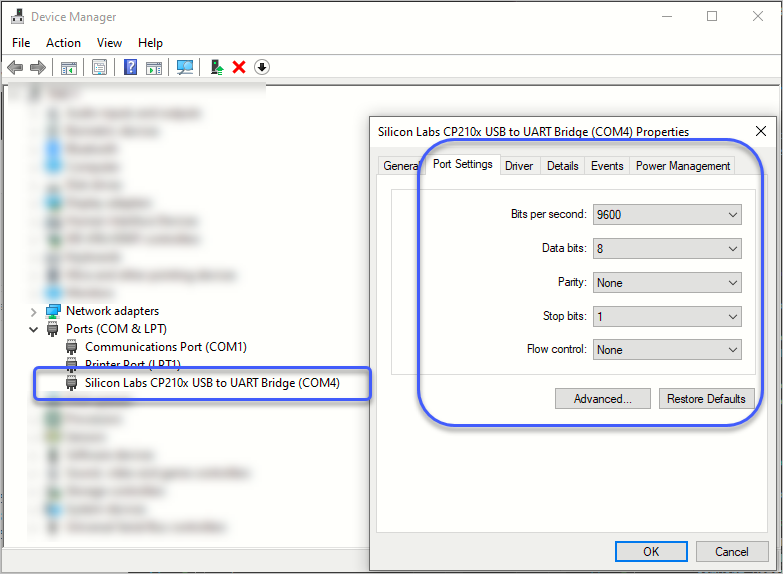
esp8266_uart_comm_with_cs_1.png

Port: COM4
Bits per seconds: 9600
Data bits: 8
Parity: None
Stop bits: 1
Flow control: None

그리고, 이 정도의 정보만으로도 이제 Arduino IDE의 "Serial Monitor"를 C#으로 다음과 같이 간단하게 구현할 수 있습니다.

using System;
using System.IO.Ports;
using System.Text;

class Program
{
    static void Main(string[] args)
    {
        foreach (string portName in SerialPort.GetPortNames())
        {
            Console.WriteLine(portName);
        }

        SerialPort comPort = OpenCOM(4, 115200);
        Console.WriteLine(comPort.IsOpen); // True
        comPort.DataReceived += ComPort_DataReceived;

        Console.WriteLine("Press any key to exit...");
        Console.ReadLine();

        comPort.Close();
        Console.WriteLine(comPort.IsOpen); // False
    }

    private static void ComPort_DataReceived(object sender, SerialDataReceivedEventArgs e)
    {
        SerialPort comPort = sender as SerialPort;

        switch (e.EventType)
        {
            case SerialData.Chars:
                PrintInputBuffers(comPort);
                break;

            case SerialData.Eof:
                break;
        }
    }

    private static void PrintInputBuffers(SerialPort comPort)
    {
        int len = comPort.BytesToRead;
        byte[] buf = new byte[len];

        comPort.Read(buf, 0, len);

        Console.Write(Encoding.UTF8.GetString(buf));
    }

    private static SerialPort OpenCOM(int portNumber, int bps)
    {
        SerialPort comPort = new SerialPort();

        // 장치 관리자의 Port Settings에 따라,
        comPort.PortName = $"COM{portNumber}";
        comPort.BaudRate = bps;
        comPort.DataBits = 8;
        comPort.StopBits = StopBits.One;
        comPort.Handshake = Handshake.None;
        comPort.Parity = Parity.None;
        comPort.Open();

        return comPort;
    }
}

그런데, OpenCOM의 인자에 9600이 아닌 115200을 주고 있는데요, 그 이유는 해당 기기에서 동작하는 sketch 프로그램의 setup에서 그 속도를 변경한 경우에는 그에 맞춰져야 하기 때문입니다. 즉, 현재 기기는 다음과 같이 초기화를 시켰기 때문에,

void setup()
{
    Serial.begin(115200);
}

그에 접속하는 직렬 통신 클라이언트 프로그램도 115200을 사용한 것입니다.

이렇게 해서 프로그램을 실행하면, Sketch 프로그램에서 Serial.print...로 출력하는 내용이 C# 콘솔 프로그램 화면에 나옵니다.


출력 내용만 보면 재미없으니 ^^ 입력도 수행해 보겠습니다. 실제로 Arduino IDE의 Serial Monitor 창에는 상단에 텍스트 입력 상자가 있어 전송하는 기능도 제공합니다.

이를 테스트하기 위해 다음과 같이 간단한 Sketch 프로그램을 기기에 업로드하고,

void setup()
{
    Serial.begin(115200);
}

int _loopCount;

void loop()
{
    _loopCount ++;

    if (Serial.available())
    {
        String cmd = Serial.readStringUntil('\n');
        if (cmd == "get_count")
        {
            Serial.write(_loopCount);
            Serial.flush();            
        }
        else if (cmd == "reset")
        {
            _loopCount = 0;
            Serial.write(_loopCount);
            Serial.flush();
        }
    }

    delay(1000);
}

C# 프로그램은 다음과 같이 입력을 받아 전송하는 부분을 넣어주면,

using System;
using System.IO.Ports;
using System.Text;

class Program
{
    static EventWaitHandle _cmdExecuted = new EventWaitHandle(false, EventResetMode.AutoReset);

    static void Main(string[] args)
    {
        SerialPort comPort = OpenCOM(4, 115200);
        Console.WriteLine(comPort.IsOpen); // True
        comPort.DataReceived += ComPort_DataReceived;

        while (true)
        {
            Console.Write("serial> ");
            string cmd = Console.ReadLine();
            if (cmd == "quit" || cmd == "q")
            {
                break;
            }

            comPort.Write(cmd);

            _cmdExecuted.WaitOne(1000 * 5);
        }

        comPort.Close();
        Console.WriteLine(comPort.IsOpen); // False
    }

    private static void ComPort_DataReceived(object sender, SerialDataReceivedEventArgs e)
    {
        SerialPort comPort = sender as SerialPort;

        switch (e.EventType)
        {
            case SerialData.Chars:
                PrintInputBuffers(comPort);
                _cmdExecuted.Set();
                break;

            case SerialData.Eof:
                break;
        }
    }

    // ...[생략]...
}

다음과 같은 식으로 get_count, reset 명령어를 기기에 전송해 상호 작용할 수 있게 됩니다.

serial> get_count
_loopCount: 95

serial> reset
_loopCount: 0

serial> get_count
_loopCount: 5

(첨부 파일은 이 글의 예제 코드를 포함합니다.)


[이 글에 대해서 여러분들과 의견을 공유하고 싶습니다. 틀리거나 미흡한 부분 또는 의문 사항이 있으시면 언제든 댓글 남겨주십시오.]

[연관 글]


[최초 등록일: ]
[최종 수정일: 9/8/2023]

Creative Commons License
이 저작물은 크리에이티브 커먼즈 코리아 저작자표시-비영리-변경금지 2.0 대한민국 라이센스에 따라 이용하실 수 있습니다.
by SeongTae Jeong, mailto:techsharer at outlook.com

비밀번호

댓글 작성자


... 76  77  78  79  80  81  82  83  84  85  86  [87]  88  89  90  ...
NoWriterDateCnt.TitleFile(s)
11759정성태10/24/201818331개발 환경 구성: 417. Azure - Runbook에서 사용할 수 있는 다양한 메서드를 위한 부가 Module 추가
11758정성태10/23/201820650.NET Framework: 800. C# - Azure REST API 사용을 위한 인증 획득 [3]파일 다운로드1
11757정성태10/19/201817099개발 환경 구성: 416. Visual Studio 2017을 이용한 아두이노 프로그램 개발(및 디버깅)
11756정성태10/19/201820376오류 유형: 500. Visual Studio Code의 아두이노 프로그램 개발 시 인텔리센스가 안 된다면?
11755정성태10/19/201821419오류 유형: 499. Visual Studio Code extension for Arduino - #include errors detected. [1]
11754정성태10/19/201818228개발 환경 구성: 415. Visual Studio Code를 이용한 아두이노 프로그램 개발 - 새 프로젝트
11753정성태10/19/201825681개발 환경 구성: 414. Visual Studio Code를 이용한 아두이노 프로그램 개발
11752정성태10/18/201818288오류 유형: 498. SQL 서버 - Database source is not a supported version of SQL Server
11751정성태10/18/201818511오류 유형: 497. Visual Studio 실행 시 그래픽이 투명해진다거나, 깨진다면?
11750정성태10/18/201816856오류 유형: 496. 비주얼 스튜디오 - One or more projects in the solution were not loaded correctly.
11749정성태10/18/201818933개발 환경 구성: 413. 비주얼 스튜디오에서 작성한 프로그램을 빌드하는 가장 쉬운 방법
11748정성태10/18/201819168개발 환경 구성: 412. Arduino IDE를 Store App으로 설치한 경우 컴파일만 되고 배포가 안 되는 문제
11747정성태10/17/201819827.NET Framework: 799. C# - DLL에도 EXE처럼 Main 메서드를 넣어 실행할 수 있도록 만드는 방법파일 다운로드1
11746정성태10/15/201819385개발 환경 구성: 411. Bitvise SSH Client의 인증서 모드에서 자동 로그인 방법파일 다운로드1
11745정성태10/15/201817245오류 유형: 495. TFS 파일/폴더 삭제 - The item [...] could not be found in your workspace, or you do not have permission to access it.
11744정성태10/15/201818088개발 환경 구성: 410. msbuild로 .pubxml 설정에 따른 배포 파일을 만드는 방법
11743정성태10/15/201819279웹: 37. Bootstrap의 dl/dt/dd 조합에서 문자열이 잘리지 않도록 CSS 설정
11742정성태10/15/201825102스크립트: 13. 윈도우 배치(Batch) 스크립트에서 날짜/시간 문자열을 구하는 방법
11741정성태10/15/201818906Phone: 13. Android - LinearLayout 간략 설명
11740정성태10/15/201820888사물인터넷: 51. Synology NAS(DS216+II)를 이용한 원격 컴퓨터의 전원 스위치 제어
11739정성태10/15/201822550Windows: 151. 윈도우 10의 전원 관리가 "균형 조정(Balanced)"으로 바뀌는 문제
11738정성태10/15/201820821오류 유형: 494. docker - 윈도우에서 실행 시 "unknown shorthand flag" 오류 [1]
11737정성태10/13/201816731오류 유형: 493. Azure Kudu - There are ... items in this directory, but maxViewItems is set to 299
11736정성태10/12/201818344오류 유형: 492. Visual Studio 로딩 시 오류 - The 'Scc Display Information' package did not load correctly.
11735정성태10/12/201824115VS.NET IDE: 129. Visual Studio - 특정 문자(열)를 개행 문자로 바꾸는 방법
11734정성태10/10/201818516Linux: 4. Synology NAS(DS216+II)에 FTDI 장치 연결 후 C#(.NET Core)으로 DTR 제어파일 다운로드1
... 76  77  78  79  80  81  82  83  84  85  86  [87]  88  89  90  ...