윈도우 환경에서 Visual Studio Code + Go (Zip) 개발 환경 구성
예전에 Go 언어를 위한 LiteIDE에서의 개발 환경을 다뤘었는데요,
go install: no install location for directory [...경로...] outside GOPATH
; https://www.sysnet.pe.kr/2/0/11097
대세가 Visual Studio Code인 것 같군요. ^^ 그래서 다시 처음부터 구성해 보겠습니다.
우선, Go 언어를 (msi도 좋겠지만) zip 파일 버전으로 다운로드하고,
Go - Downloads
; https://golang.org/dl/

go1.15.14.windows-amd64.zip
; https://golang.org/dl/go1.15.14.windows-amd64.zip
"D:\go" 디렉터리에 풀어놓겠습니다. 이후 PATH 환경 변수에 해당 디렉터리를 추가합니다.
PATH 환경 변수에 경로 추가: d:\go\bin
자, 이제 프로젝트 경로를 정하고,
프로젝트 경로: d:\mywork
해당 디렉터리에 hello.go 파일을 다음의 내용으로 채워준 다음,
package main

import "fmt"

func main() {
    fmt.Println("Hello World!")
}
Visual Studio Code를 실행시켜 "d:\mywork" 디렉터리를 "File" / "Open Folder... (Ctrl+K, Ctrl+O)" 메뉴로 엽니다.
일단 위의 단계까지 끝냈으면, 이제 Visual Studio Code에 Go 언어를 위한 확장(
Go for Visual Studio Code)을 설치해야 합니다. 이 과정은 단순하게, hello.go 파일을 Code 내에서 열면 자동으로 "Do you want to install the recommended extensions for Go?"라는 메시지와 함께 설치 여부를 묻는 창이 뜹니다.
"Install"을 선택해 주면 이어서 다음의 메시지와 함께,
The "gopls" command is not available. Run "go get -v golang.org/x/tools/gopls" to install.
다시 설치 여부를 묻는데요, 역시 "Install"을 선택하면 아래와 같은 식의 메시지와 함께 정상적으로 설치가 됩니다.
Tools environment: GOPATH=%USERPROFILE%\go
Installing 1 tool at %USERPROFILE%\go\bin in module mode.
  gopls

Installing golang.org/x/tools/gopls (%USERPROFILE%\go\bin\gopls.exe) SUCCEEDED

All tools successfully installed. You are ready to Go :).
자, 그럼 이제 hello.go 파일을 실행하기 위해 "F5" 키를 눌러 봅니다. 그럼 다시 아래와 같은 메시지가 뜨고,
The "dlv" command is not available. Run "go get -v github.com/go-delve/delve/cmd/dlv" to install.
"Install"을 누르면 아래의 메시지와 함께,
Tools environment: GOPATH=%USERPROFILE%\go
Installing 1 tool at %USERPROFILE%\go\bin in module mode.
  dlv

Installing github.com/go-delve/delve/cmd/dlv (%USERPROFILE%\go\bin\dlv.exe) SUCCEEDED

All tools successfully installed. You are ready to Go :).
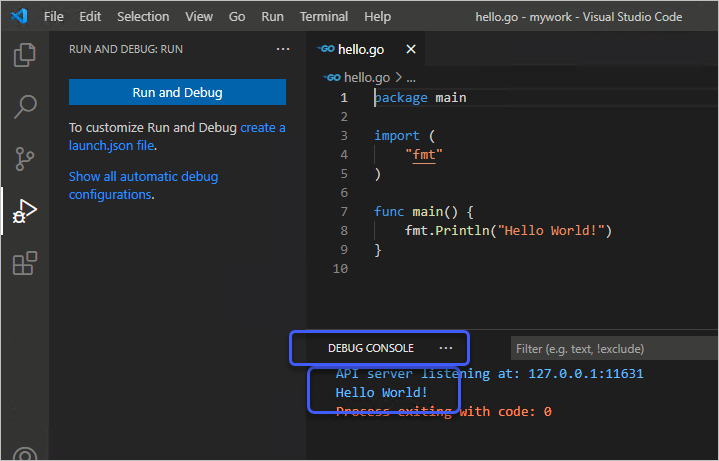
환경 구성이 완료됩니다. 다시 한번 F5 키를 눌러 실행하면 잠시 후 "DEBUG CONSOLE" 화면에 "Hello World!"가 출력되는 것을 확인할 수 있습니다.
참고로, Visual Studio Code의 Go 확장이 "F5" 키를 눌렀을 때 (윈도우의 경우) EXE를 생성해 실행하는 구조는 아닙니다. 임시로 프로젝트 디렉터리("d:\mywork") 하위에 "__debug_bin" 파일을 생성하고 그것을 실행해 주는데요.
따라서 대충 개발이 완료되고 나면 EXE 파일은 별도로 생성해야 하는데, 이를 위해 단순하게 "Ctrl + `" 키를 눌러 TERMIANL 창을 열어 "go build" 명령어를 실행하면 됩니다.
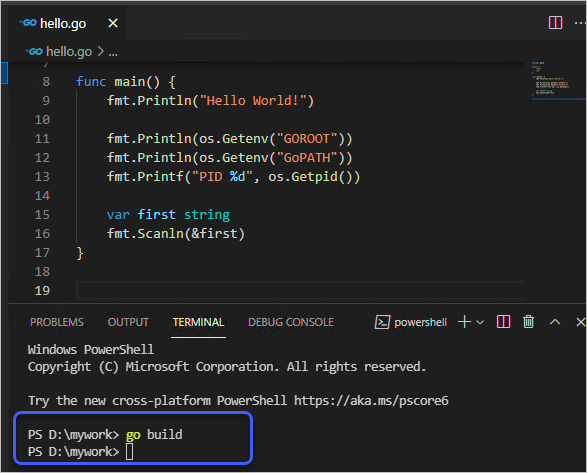
그럼, "d:\mywork" 디렉터리 내에 "mywork.exe" 파일이 생성됩니다. 당연히 이렇게 생성한 파일은 다른 컴퓨터에 그대로 복사해 실행할 수 있습니다.
만약 "d:\mywork"에 exe 파일이 생성되는 것이 영 탐탁지 않다면 go build 명령어에 다음과 같이 옵션을 추가해도 좋습니다.
// 명령을 실행하기 전 반드시 bin 디렉터리를 만들어 둠
// 그렇지 않으면 "bin"이라는 파일명으로 출력

PS D:\mywork> go build -o bin
그리고 이런 작업을 "Ctrl+Shift+B" 키로 수행하고 싶다면, "Build Task(.vscode\tasks.json)"에 다음과 같이 명령을 입력해 두면 됩니다.
{
    // Build and run Golang projects in VS Code
    // https://robertbasic.com/blog/build-and-run-golang-projects-in-vs-code/
    // 명령을 실행하기 전, 반드시 하위에 bin 디렉터리를 만듭니다.
    "version": "2.0.0",
    "tasks": [
        {
            "label": "Go Build",
            "type": "shell",
            "command": "go build -o bin",
            "problemMatcher": [],
            "group": {
                "kind": "build",
                "isDefault": true
            }
        }
    ]
}
(물론 F5 키로 __debug_bin 실행이 가능하지만) 만약 빌드된 EXE 결과물을 Ctrl+Shift+B 키로 (빌드와 함께) 실행까지 하고 싶다면 "command"를 다음과 같은 식으로 변경하면 될 텐데,
"command": "go build -o bin && .\\bin\\mywork",
아마 잘 되는 분도 있는 반면 경우에 따라 아래와 같은 오류가 발생하는 분도 있을 것입니다.
> Executing task: go build -o bin && ./bin/mywork <

At line:1 char:17
+ go build -o bin && ./bin/mywork
+                 ~~
The token '&&' is not a valid statement separator in this version.
    + CategoryInfo          : ParserError: (:) [], ParentContainsErrorRecordEx
   ception
    + FullyQualifiedErrorId : InvalidEndOfLine

The terminal process "C:\WINDOWS\System32\WindowsPowerShell\v1.0\powershell.exe -Command go build -o bin && ./bin/mywork" terminated with exit code: 1.

Terminal will be reused by tasks, press any key to close it.
왜냐하면 위의 화면을 보면 해당 명령어를 실행하는 환경이 powershell.exe로 되어 있기 때문에 && 구문에 오류가 발생하는 것입니다. 따라서, 이럴 때는 "command"를 이렇게 변경해야 합니다.
// Can I get "&&" or "-and" to work in PowerShell?
// https://stackoverflow.com/questions/563600/can-i-get-or-and-to-work-in-powershell

"command": "(go build -o bin); if ($?) { ./bin/mywork }",
이후 Ctrl+Shift+B 키를 누르면 "Build and Run"의 동작이 수행됩니다.
그나저나 그동안 변경 사항이 좀 있었군요. ^^
예전에는 "GOROOT" 환경 변수를 정의해 Go 설치 경로(위의 글에서는 d:\go)를 설정하지 않으면 "go version" 같은 명령어 수행 시 오류가 발생했는데,
C:\temp> go version
go: cannot find GOROOT directory: c:\go
이제는 GOROOT 없이도 잘 동작합니다. 실제로 "go env" 명령을 내려 보면 예전에는 비어 있던 GOROOT, GOPATH 같은 환경 변수들이 이제는 다음과 같이 기본값으로 채워져 있습니다.
c:\temp> go env
set GO111MODULE=
set GOARCH=amd64
set GOBIN=
set GOCACHE=%USERPROFILE%\AppData\Local\go-build
set GOENV=%USERPROFILE%\AppData\Roaming\go\env
set GOEXE=.exe
set GOFLAGS=
set GOHOSTARCH=amd64
set GOHOSTOS=windows
set GOINSECURE=
set GOMODCACHE=%USERPROFILE%\go\pkg\mod
set GONOPROXY=
set GONOSUMDB=
set GOOS=windows
set GOPATH=%USERPROFILE%\go
set GOPRIVATE=
set GOPROXY=https://proxy.golang.org,direct
set GOROOT=D:\go
set GOSUMDB=sum.golang.org
set GOTMPDIR=
set GOTOOLDIR=D:\go\pkg\tool\windows_amd64
set GCCGO=gccgo
set AR=ar
set CC=gcc
set CXX=g++
set CGO_ENABLED=1
set GOMOD=
set CGO_CFLAGS=-g -O2
set CGO_CPPFLAGS=
set CGO_CXXFLAGS=-g -O2
set CGO_FFLAGS=-g -O2
set CGO_LDFLAGS=-g -O2
set PKG_CONFIG=pkg-config
set GOGCCFLAGS=-m64 -mthreads -fno-caret-diagnostics -Qunused-arguments -fmessage-length=0 -fdebug-prefix-map=%USERPROFILE%\AppData\Local\Temp\go-build014406382=/tmp/go-build -gno-record-gcc-switches
진작에 저랬어야죠. ^^;
이런 상태에서 Go 컴파일을 하면 전역적으로 GOPATH(%USERPROFILE%\go) 하위에 bin, pkg 디렉터리가 생성됩니다. 만약 저렇게 전역 관리가 싫다면 GOPATH를 별도로 프로젝트 단위로 설정해,
SET GOPATH=d:\mywork
d:\mywork 하위에 bin, pkg 디렉터리를 구성하게 둘 수도 있습니다.
Go 컴파일러는 윈도우에서 리눅스용, 리눅스에서 윈도우용 바이너리를 쉽게 만들 수가 있군요. ^^
D:\mywork> set GOOS=linux // MacOS: darwin
D:\mywork> set GOARCH=amd64 // 32비트: 386,  M1 chip: arm64
D:\mywork> go build // 리눅스용 실행 파일 생성
D:\mywork> wsl // 윈도우 -> WSL 전환

/mnt/d/mywork# ./mywork // 생성된 ELF 파일 실행

/mnt/d/mywork# export GOOS=windows
/mnt/d/mywork# export GOARCH=amd64
/mnt/d/mywork# export go build // 윈도우용 실행 파일 생성
/mnt/d/mywork# exit // WSL -> 윈도우 전환
D:\mywork> mywork.exe // 생성된 EXE 실행

D:\mywork> go tool dist list
aix/ppc64
android/386
android/amd64
android/arm
android/arm64
darwin/amd64
darwin/arm64
dragonfly/amd64
freebsd/386
freebsd/amd64
freebsd/arm
freebsd/arm64
illumos/amd64
js/wasm
linux/386
linux/amd64
linux/arm
linux/arm64
linux/mips
linux/mips64
linux/mips64le
linux/mipsle
linux/ppc64
linux/ppc64le
linux/riscv64
linux/s390x
netbsd/386
netbsd/amd64
netbsd/arm
netbsd/arm64
openbsd/386
openbsd/amd64
openbsd/arm
openbsd/arm64
plan9/386
plan9/amd64
plan9/arm
solaris/amd64
windows/386
windows/amd64
windows/arm
[이 글에 대해서 여러분들과 의견을 공유하고 싶습니다. 틀리거나 미흡한 부분 또는 의문 사항이 있으시면 언제든 댓글 남겨주십시오.]