.NET Conf Mini 21.08 - WinUI 3 따라해 보기
마침 .NET Conf에서 정세일 님의 강좌도 있고 하니, ^^
.NET Conf Mini 21.08 - WinUI 3 소개
; https://www.youtube.com/watch?v=i9zw6x6zQLI&t=205s
자, 그럼 따라 해 봅시다. ^^
우선, Microsoft Store에서 여러 가지 컨트롤 사용 예제를 제공하므로 다운로드하고,
Micorosoft Store - WinUI 3 Controls Gallery
; https://www.microsoft.com/en-us/p/winui-3-controls-gallery/9p3jfpwwdzrc
그다음, Visual Studio 2019의 "Extensions" / "Manage Extensions" 메뉴를 선택해 다음의 2가지 확장을 추가합니다.
- Project Reunion
- Windows Template Studio
전자의 것만 추가하면 새 프로젝트에 "Blank App, Packaged (WinUI 3 in Desktop)" 템플릿이 보이고, 후자의 것도 함께 추가하면 "App, Packaged (WinUI 3 in Desktop)" 템플릿까지 보일 것입니다.
강의에서는 "App (WinUI 3 in Desktop)" 템플릿으로 다음의 설정과 함께 시작하는데,
프로젝트 유형: MenuBar
Design Pattern: MVVM Toolkit
페이지: Settings, WebView, Content Grid
기능: MSIX Packaging
저는 그냥 "Blank App, Packaged (WinUI 3 in Desktop)" 템플릿을 선택하겠습니다. 아래 화면은, 기본 구조의 솔루션 탐색기 상태와 실행 모습을 보여줍니다.

특이한 것은, "시작 프로젝트" 설정이 "App1"이 아니라 "App1 (Package)"라는 점인데요, 만약 "Set as Startup Project" 메뉴를 이용해 "App1" 프로젝트로 설정을 바꾸면 다음과 같은 예외가 발생합니다.
System.DllNotFoundException: 'Unable to load DLL 'Microsoft.UI.Xaml.dll' or one of its dependencies: The specified module could not be found. (0x8007007E)'
그러니까, 꼭 "... (Package)" 프로젝트로 Run/Debug 실행을 해야 합니다.
이 상태에서 App.xaml과 MainWindow.xaml을 보면 WPF 응용 프로그램과 거의 다를 바가 없습니다.
<Application
    x:Class="App1.App"
    xmlns="http://schemas.microsoft.com/winfx/2006/xaml/presentation"
    xmlns:x="http://schemas.microsoft.com/winfx/2006/xaml"
    xmlns:local="using:App1">
    <Application.Resources>
        <ResourceDictionary>
            <ResourceDictionary.MergedDictionaries>
                <XamlControlsResources xmlns="using:Microsoft.UI.Xaml.Controls" />
                <!-- Other merged dictionaries here -->
            </ResourceDictionary.MergedDictionaries>
            <!-- Other app resources here -->
        </ResourceDictionary>
    </Application.Resources>
</Application>
<Window
    x:Class="App1.MainWindow"
    xmlns="http://schemas.microsoft.com/winfx/2006/xaml/presentation"
    xmlns:x="http://schemas.microsoft.com/winfx/2006/xaml"
    xmlns:local="using:App1"
    xmlns:d="http://schemas.microsoft.com/expression/blend/2008"
    xmlns:mc="http://schemas.openxmlformats.org/markup-compatibility/2006"
    mc:Ignorable="d">

    <StackPanel Orientation="Horizontal" HorizontalAlignment="Center" VerticalAlignment="Center">
        <Button x:Name="myButton" Click="myButton_Click">Click Me</Button>
    </StackPanel>
</Window>
단지, 이렇게 만든 WinUI 앱은 Windows 10 1809 이상의 버전에서만 동작한다는 차이가 있습니다. 자, 그럼 강의에서처럼 "
Microsoft.Graphics.Win2D" 라이브러리를 설치해 주고,
Install-Package Microsoft.Graphics.Win2D
도움말에 따라,
Introduction
; https://microsoft.github.io/Win2D/WinUI3/html/Introduction.htm

CanvasControl Class
; https://microsoft.github.io/Win2D/WinUI3/html/T_Microsoft_Graphics_Canvas_UI_Xaml_CanvasControl.htm
CanvasControl과 함께,
<Window
    x:Class="App1.MainWindow"
    xmlns="http://schemas.microsoft.com/winfx/2006/xaml/presentation"
    xmlns:x="http://schemas.microsoft.com/winfx/2006/xaml"
    xmlns:local="using:App1"
    xmlns:d="http://schemas.microsoft.com/expression/blend/2008"
    xmlns:mc="http://schemas.openxmlformats.org/markup-compatibility/2006"
    xmlns:canvas="using:Microsoft.Graphics.Canvas.UI.Xaml"
    mc:Ignorable="d">

    <!--<StackPanel Orientation="Horizontal" HorizontalAlignment="Center" VerticalAlignment="Center">
        <Button x:Name="myButton" Click="myButton_Click">Click Me</Button>
    </StackPanel>-->

    <Grid>
        <canvas:CanvasControl x:Name="canvas" Draw="canvas_Draw" ClearColor="CornflowerBlue"  />
    </Grid>
</Window>
코드도 함께 추가합니다.
private void myButton_Click(object sender, RoutedEventArgs e)
{
    // myButton.Content = "Clicked";
}

private void canvas_Draw(Microsoft.Graphics.Canvas.UI.Xaml.CanvasControl sender, Microsoft.Graphics.Canvas.UI.Xaml.CanvasDrawEventArgs args)
{
    var g = args.DrawingSession;

    g.DrawEllipse(155, 115, 80, 30, Colors.Black, 3);
    g.DrawText("Hello, world!", 100, 100, Colors.Yellow);
}
이후 실행하면 다음과 같은 화면을 볼 수 있습니다.
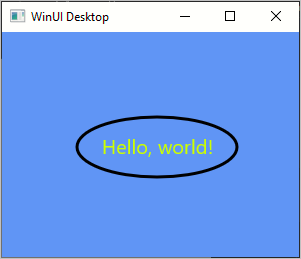
거의 WPF 경험을 유사하게 가져갈 수가 있군요. ^^
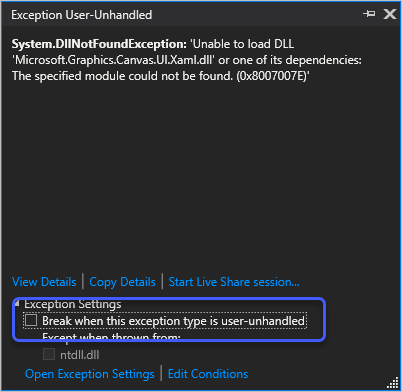
Microsoft.Graphics.Win2D 참조 추가 후 실행 시 다음과 같은 오류가 발생한다면?
System.DllNotFoundException
  HResult=0x80131524
  Message=Unable to load DLL 'Microsoft.Graphics.Canvas.UI.Xaml.dll' or one of its dependencies: The specified module could not be found. (0x8007007E)
  Source=<Cannot evaluate the exception source>
  StackTrace:
<Cannot evaluate the exception stack trace>
이유는 알 수 없지만 그냥 무시하고 계속 실행하면 됩니다. 하지만, 번번이 뜨는 것이 귀찮으므로 다음 화면처럼 "Break when this exception type is user-unhandled" 옵션을 끄면 됩니다.
이후로 계속 다음의 오류도 뜰 수 있는데 역시 무시하시면 결국 실행까지 됩니다.
System.Runtime.InteropServices.COMException
  HResult=0x80070000
  Message=The operation completed successfully. (0x80070000)
  Source=System.Private.CoreLib
  StackTrace:
   at System.Runtime.InteropServices.Marshal.ThrowExceptionForHR(Int32 errorCode) in /_/src/libraries/System.Private.CoreLib/src/System/Runtime/InteropServices/Marshal.cs:line 601
   at WinRT.DllModule..ctor(String fileName)
   at WinRT.DllModule.Load(String fileName)
   at WinRT.BaseActivationFactory..ctor(String typeNamespace, String typeFullName)
System.IO.FileNotFoundException
  HResult=0x8007007E
  Message=The specified module could not be found. (0x8007007E)
  Source=System.Private.CoreLib
  StackTrace:
   at System.Runtime.InteropServices.Marshal.ThrowExceptionForHR(Int32 errorCode) in /_/src/libraries/System.Private.CoreLib/src/System/Runtime/InteropServices/Marshal.cs:line 601
   at WinRT.DllModule..ctor(String fileName)
   at WinRT.DllModule.Load(String fileName)
   at WinRT.BaseActivationFactory..ctor(String typeNamespace, String typeFullName)
[이 글에 대해서 여러분들과 의견을 공유하고 싶습니다. 틀리거나 미흡한 부분 또는 의문 사항이 있으시면 언제든 댓글 남겨주십시오.]