파이썬 - PyPI 패키지 만들기
닷넷의 NuGet처럼, 파이썬에는 PyPI 저장소가 있는데요, 바로 그곳에 파이썬으로 만든 패키지(흔한 말로 라이브러리)를 올리는 실습을 해보겠습니다.
Find, install and publish Python packages with the Python Package Index
; https://pypi.org/
등록할 패키지는 테스트 삼아 간단하게 다음의 코드로 합니다.
# iputil.py

import requests


def get():
    """
    Get my Public IP in Python
    ; https://pytutorial.com/python-get-public-ip
    :return:
    """
    endpoint = 'https://ipinfo.io/json'
    response = requests.get(endpoint, verify=True)

    if response.status_code != 200:
        return 'Status:', response.status_code, 'Problem with the request. Exiting.'
        exit()

    data = response.json()

    return data['ip']


if __name__ == '__main__':
    print(get())
그리고 편의상 위의 코드를 담은 파일을 프로젝트 루트의 하위에 디렉터리를 하나 만들어 그 안에 패키지로 묶일 파일들을 담아 둘 텐데요, 가령 "netutil" 이름의 디렉터리를 만들고 그 안에 위의 코드를 담은 "iputil.py" 파일과, 패키지임을 알리는 __init__.py를 위치시킵니다.
# __init__.py

from netutil import iputil

__version__ = '1.0.0.1'
__author__ = 'techshare'
이와 함께 setup.py를 프로젝트의 루트 디렉터리에 생성하는데요, 따라서 대략 다음과 같은 구조가 됩니다.
.
├── netutil
│   ├── __init__.py
│   └── iputil.py
└── setup.py
그리고 setup.py는 다음의 코드를 담습니다.
from setuptools import setup, find_packages
import netutil


setup(
    name="net-util",
    description="utility functions for networking",
    version=netutil.__version__,
    author=netutil.__author__,
    author_email="techsharer@outlook.com",
    url="https://www.sysnet.pe.kr",
    license="Ms-PL",
    packages=find_packages(exclude=[]),
    install_requires=["requests>=2.22.0"],
)
자, 그럼 여기까지 해서 오류가 없음을 다음의 명령어로 테스트해 줍니다.
c:\temp> python setup.py
usage: setup.py [global_opts] cmd1 [cmd1_opts] [cmd2 [cmd2_opts] ...]
   or: setup.py --help [cmd1 cmd2 ...]
   or: setup.py --help-commands
   or: setup.py cmd --help

error: no commands supplied
setup.py에 문제가 없다면 위와 같은 식의 출력이 나와야 합니다.
"python setup.py" 명령어의 출력에도 나오지만, 필요한 cmd 인자가 하나 더 있습니다. 이것은 "--help-commands"를 주면 알 수 있는데, 여러 가지 명령어 중에 여기서는 bdist_wheel을 사용합니다.
c:\temp> python setup.py bdist_wheel
running bdist_wheel
running build
running build_py
creating build
creating build\lib
creating build\lib\netutil
copying netutil\iputil.py -> build\lib\netutil
copying netutil\__init__.py -> build\lib\netutil
installing to build\bdist.win-amd64\wheel
running install
running install_lib
creating build\bdist.win-amd64
creating build\bdist.win-amd64\wheel
creating build\bdist.win-amd64\wheel\netutil
copying build\lib\netutil\iputil.py -> build\bdist.win-amd64\wheel\.\netutil
copying build\lib\netutil\__init__.py -> build\bdist.win-amd64\wheel\.\netutil
running install_egg_info
running egg_info
creating net_util.egg-info
writing net_util.egg-info\PKG-INFO
writing dependency_links to net_util.egg-info\dependency_links.txt
writing top-level names to net_util.egg-info\top_level.txt
writing manifest file 'net_util.egg-info\SOURCES.txt'
reading manifest file 'net_util.egg-info\SOURCES.txt'
writing manifest file 'net_util.egg-info\SOURCES.txt'
Copying net_util.egg-info to build\bdist.win-amd64\wheel\.\net_util-1.0.0.0-py3.7.egg-info
running install_scripts
creating build\bdist.win-amd64\wheel\net_util-1.0.0.0.dist-info\WHEEL
creating 'dist\net_util-1.0.0.0-py3-none-any.whl' and adding 'build\bdist.win-amd64\wheel' to it
adding 'netutil/__init__.py'
adding 'netutil/iputil.py'
adding 'net_util-1.0.0.0.dist-info/METADATA'
adding 'net_util-1.0.0.0.dist-info/WHEEL'
adding 'net_util-1.0.0.0.dist-info/top_level.txt'
adding 'net_util-1.0.0.0.dist-info/RECORD'
removing build\bdist.win-amd64\wheel
그럼, 현재 디렉터리 기준으로 하위에 "build", "dist", "[setup.py에 지정한 name].egg-info" 디렉터리가 생성이 되는데 최종 결과물은 "dist" 하위에 생성되고, 예제의 경우 "net_util-1.0.0.0-py3-none-any.whl"이 됩니다. (그동안, 패키지 관리자를 사용해 보셨다면 whl 파일도 결국 zip 파일임을 예상할 수 있을 것입니다. ^^)
whl 파일(
PEP 427 The Wheel Binary Package Format 1.0)은 최종 패키징 파일이기 때문에 이것 자체로 pip을 이용한 설치가 가능합니다.
c:\temp\dist> pip install net_util-1.0.0.0-py3-none-any.whl
Processing c:\temp\dist\net_util-1.0.0.0-py3-none-any.whl
Requirement already satisfied: requests>=2.22.0 in e:\python37\lib\site-packages (from net-util==1.0.0.0) (2.26.0)
Requirement already satisfied: urllib3<1.27,>=1.21.1 in e:\python37\lib\site-packages (from requests>=2.22.0->net-util==1.0.0.0) (1.26.6)
Requirement already satisfied: charset-normalizer~=2.0.0 in e:\python37\lib\site-packages (from requests>=2.22.0->net-util==1.0.0.0) (2.0.4)
Requirement already satisfied: certifi>=2017.4.17 in e:\python37\lib\site-packages (from requests>=2.22.0->net-util==1.0.0.0) (2021.5.30)
Requirement already satisfied: idna<4,>=2.5 in e:\python37\lib\site-packages (from requests>=2.22.0->net-util==1.0.0.0) (3.2)
Installing collected packages: net-util
Successfully installed net-util-1.0.0.0
이후, 다른 파이썬 프로젝트에서 다음과 같이 import시켜 사용할 수 있습니다.
import netutil

print(netutil.iputil.get_public_ip())
사실 로컬에서 사용할 거라면 (develop mode를 지원하는) "
pip install -e ." 등의 방법을 사용하는 것이 더 편리하지만, 그래도 복잡한 setup.py를 구성한 경우 정상적으로 동작하는지 저런 식으로 테스트하는 것도 좋겠습니다.
자, 그럼 제대로 setup.py가 동작했다면 이제 결과물을 PyPI에 올려야 할 텐데요, 재미있는 것은 PyPI의 경우 직접 패키징 파일을 업로드하는 기능이 사이트에서 제공하지 않습니다. (제가 못 찾은 걸 수도 있습니다. ^^;)
대신, twine과 같은 식의 도구를 사용해 다음과 같이 등록할 수 있습니다.
c:\temp> pip install twine

C:\temp> twine upload dist/net_util-1.0.0.0-py3-none-any.whl
Uploading distributions to https://upload.pypi.org/legacy/
Enter your username: techshare
Enter your password:
Uploading net_util-1.0.0.0-py3-none-any.whl
100%|███████████████████████████████████████████████| 4.51k/4.51k [00:01<00:00, 2.46kB/s]

View at:
https://pypi.org/project/net-util/1.0.0.0/
그런데, 저렇게 실행 시 계정 정보를 입력받는 것이 영 못마땅한데요, 다행히 별도 설정 파일을 이용하는 방법도 있습니다.
[윈도우]
%USERPROFILE%\.pypirc

[리눅스]
$HOME/.pypirc
환경에 따라 위의 경로로 ".pypirc" 파일을 만들고 그 안에 계정 정보를 넣어두면,
[pypi]
  username = ...사용자 계정...
  password = ...사용자 암호...
twine 실행 시 계정 정보를 묻지 않습니다. 하지만, 그래도 여전히 "사용자 암호"가 노출되는데, 이러한 문제는 PyPI 사이트로부터 "API 토큰"을 생성하는 것으로 해결할 수 있습니다.
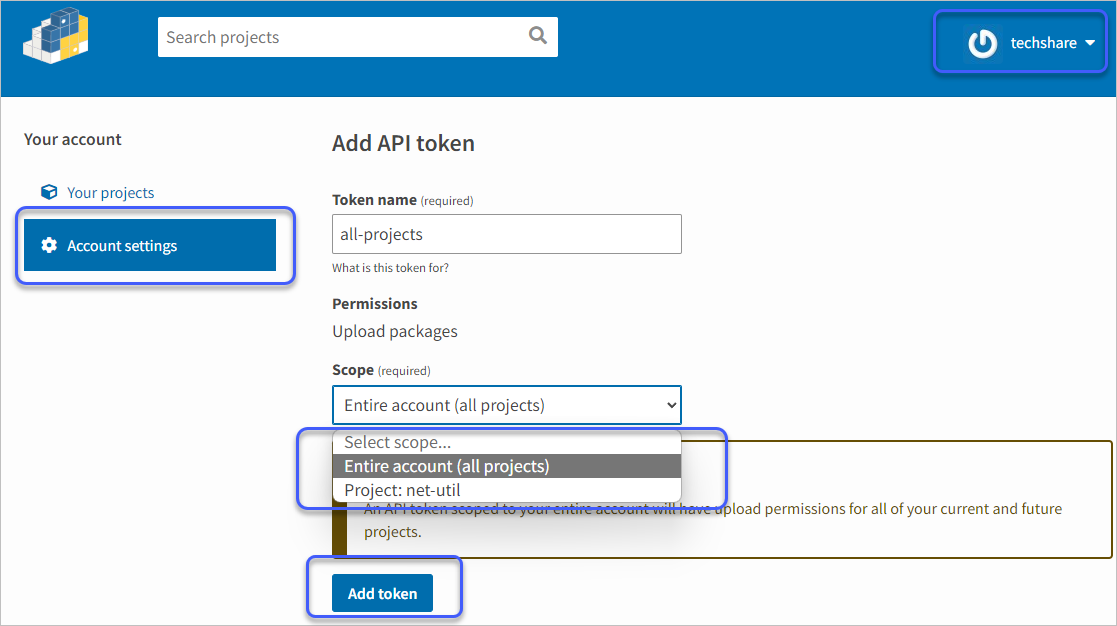
토큰 값은 한 번만 출력되므로 페이지를 벗어나기 전에 반드시 복사해 두어야 합니다. 그래서 여러분들의 .pypirc 파일에 다음과 같이 값을 채워주면 됩니다.
[pypi]
  username = __token__
  password = pypi-AgE...[생략]...bHMWc
혹은 여러 계정을 관리해야 한다면?
[distutils]
index-servers=
    mypypi
    testpypi

[mypypi]
  username = __token__
  password = pypi-AgE...[생략]...bHMWc

[testpypi]
  username = __token__
  password = pypi-AgE...[생략]...bHMWc
(다중 설정의 경우 twine 명령행에 "--repository testpypi"와 같은 식으로 선택할 수 있습니다.)
이 정도면 기본적인 사용법은 대충 마무리된 것 같습니다. 이후에는 낯선 옵션과 용어들을 좀 더 넓혀가는 것만 남았군요. ^^
개인적으로, 처음 setup.py를 봤을 때 직관적으로 잘 이해할 수 없었습니다. 보통 그동안의 경험상 setup이라고 하면 설치 파일(setup.exe)을 연상하게 되는데 이번 경우에는 "make_package"에 해당하기 때문에 혼란이 온 것입니다. (어쨌든, "set up a package"라는 의미였겠지만... ^^;)
참고로, 아래의 글도 읽어보시길 권장합니다.
Deep Dive into pip - 1
; https://suhwan.dev/2018/10/24/deep-dive-into-pip-1/

Deep Dive into pip - 2
; https://suhwan.dev/2018/10/30/deep-dive-into-pip-2/
The Pip Python Package Manager
; https://www.datacamp.com/community/tutorials/pip-python-package-manager
그나저나, setup.py를 이용한 방식도 이젠 legacy라고... ^^;
setup.py 멈춰!
; https://tech.buzzvil.com/blog/setup.py-%EB%A9%88%EC%B6%B0/
[이 글에 대해서 여러분들과 의견을 공유하고 싶습니다. 틀리거나 미흡한 부분 또는 의문 사항이 있으시면 언제든 댓글 남겨주십시오.]