C# - FFmpeg.AutoGen 라이브러리를 이용한 기본 프로젝트 구성
이와 관련한 동영상 강의를 마침 2022년 5월 6일에 진행된 ".NET Conf Mini"에서 했으니 참고하세요. ^^
C# 개발자를 위한 ffmpeg 라이브러리 사용법
; https://youtu.be/ERU9tXdtHLg
원래의 네이티브 ffmpeg 라이브러리를 단순히 API만 PInvoke 수준에 가깝게 래핑해서 제공하는 라이브러리가 있습니다.
Ruslan-B/FFmpeg.AutoGen
; https://github.com/Ruslan-B/FFmpeg.AutoGen
그렇다면 당연히 C# 라이브러리와 함께 네이티브 모듈들이 있어야 정상 동작할 텐데요, 윈도우용에 한해서는 친절하게 x64 DLL들을 빌드시켜 github repo에 포함하고 있으니 그것을 사용하면 됩니다.
FFmpeg.AutoGen/FFmpeg/bin/
; https://github.com/Ruslan-B/FFmpeg.AutoGen/tree/master/FFmpeg/bin/x64
혹은, vcpkg가 있으니,
오픈 소스 라이브러리를 쉽게 빌드해 주는 "C++ Package Manager for Windows: vcpkg"
; https://www.sysnet.pe.kr/2/0/11409
다음의 명령으로 빌드해,
c:\vcpkg> vcpkg install ffmpeg:x64-windows
.\vcpkg\packages\ffmpeg_x64-windows\bin 디렉터리에 빌드 완료된 DLL들을 사용해도 됩니다.
avcodec-58.dll
avdevice-58.dll
avfilter-7.dll
avformat-58.dll
avutil-56.dll
swresample-3.dll
swscale-5.dll
이를 기반으로 FFmpeg.AutoGen을 사용하기 위해서는 "
https://github.com/Ruslan-B/FFmpeg.AutoGen/tree/master/FFmpeg.AutoGen.Example" 예제 프로젝트의 소스 코드를 참고하면 됩니다.
그럼, 한번 구성해 볼까요? ^^
우선, 콘솔 프로젝트를 생성하고 FFmpeg.AutoGen 참조를 추가합니다.
// Install-Package FFmpeg.AutoGen -Version 4.4.1.1
// Install-Package FFmpeg.AutoGen -Version 5.0.0

Install-Package FFmpeg.AutoGen
그다음, "
예제 프로젝트"에서 FFmpegHelper.cs, FFmpegBinariesHelper.cs 2개의 파일을 복사해 콘솔 프로젝트에 "FFmpeg" 디렉터리를 만들어 추가한 후, Program.cs에 FFmpegBinariesHelper.cs의 메서드를 하나 호출합니다.
using FFmpeg.AutoGen.Example;
using System;

namespace ConsoleApp1
{
    internal class Program
    {
        static void Main(string[] args)
        {
            Console.WriteLine("Current directory: " + Environment.CurrentDirectory);
            Console.WriteLine("Running in {0}-bit mode.", Environment.Is64BitProcess ? "64" : "32");

            FFmpegBinariesHelper.RegisterFFmpegBinaries();

            Console.WriteLine($"FFmpeg version info: {ffmpeg.av_version_info()}");
        }
    }
}
그러니까, RegisterFFmpegBinaries 메서드의 역할은 (위에서 vcpkg로 빌드한) 네이티브 라이브러리를 찾는 경로를 지정합니다. 코드를 한번 볼까요?
using System;
using System.IO;
using System.Runtime.InteropServices;

namespace FFmpeg.AutoGen.Example
{
    public class FFmpegBinariesHelper
    {
        internal static void RegisterFFmpegBinaries()
        {
            if (RuntimeInformation.IsOSPlatform(OSPlatform.Windows))
            {
                var current = Environment.CurrentDirectory;
                var probe = Path.Combine("FFmpeg", "bin", Environment.Is64BitProcess ? "x64" : "x86");

                while (current != null)
                {
                    var ffmpegBinaryPath = Path.Combine(current, probe);

                    if (Directory.Exists(ffmpegBinaryPath))
                    {
                        Console.WriteLine($"FFmpeg binaries found in: {ffmpegBinaryPath}");
                        ffmpeg.RootPath = ffmpegBinaryPath;
                        return;
                    }

                    current = Directory.GetParent(current)?.FullName;
                }
            }
            else if (RuntimeInformation.IsOSPlatform(OSPlatform.Linux))
            {
                ffmpeg.RootPath = "/lib/x86_64-linux-gnu/";
            }
            else
            {
                throw new NotSupportedException(); // fell free add support for platform of your choose
            }
        }
    }
}
보는 바와 같이 윈도우를 대상으로 한다면, 실행 파일 위치를 기준으로 ./FFmpeg/bin/ 하위의 플랫폼에 따른 x64/x86 디렉터리에 ffmpeg 네이티브 라이브러리가 있다는 것을 가정하고 있습니다.
물론, 저 경로를 바꿔도 되겠지만 그냥 맞춰줘도 무방합니다. 혹은, 아예 저 코드를 통째로 날리고 다음과 같이 한 줄로 자신이 포함한 네이티브 라이브러리의 위치를 지정하면 됩니다.
ffmpeg.RootPath = Path.Combine(Environment.CurrentDirectory, "FFmpeg", "bin", "x64");
자, 그럼 위의 경로를 맞춰주기 위해 vcpkg로 빌드한(또는, github repo에서 다운로드한) DLL들을 콘솔 프로젝트의 "FFmpeg/bin/x64" 디렉터리에 복사합니다. 여기까지의 솔루션 구성은 다음과 같습니다.
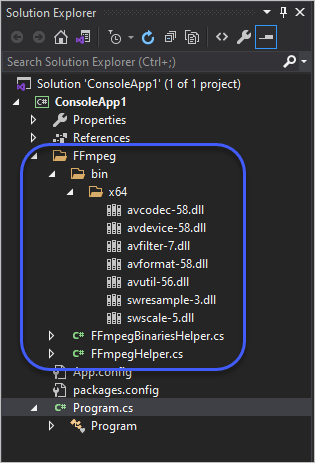
당연히 이렇게만 하면 안 되죠? ^^ 빌드 시에 위에서 포함한 DLL들이 복사가 되도록 각각의 DLL 파일에 대한 "Copy to Output Directory" 값을 "Copy if newer"로 바꿔줍니다. (그리고 잊지 말아야 할 것은, 위와 같이 x64용 DLL을 사용하는 경우라면 콘솔 프로젝트의 속성 창에서 "
Prefer 32-bit" 옵션을 꺼야 합니다.)
여기까지가 준비 과정의 끝입니다. 이후의 작업은 ffmpeg 라이브러리를 사용한 경험이 있다면 그에 따라 FFmpeg.AutoGen의 "ffempg" 정적 속성에서 제공하는 래퍼 API를 호출하는 식으로 작업을 진행하면 됩니다.
기왕에 하는 거, 그럼 기본 예제 프로젝트만이라도 포팅을 해볼까요? ^^ 해당 프로젝트에서 로그 설정과 Hardware Decoder를 조회하는 코드를 복사해 옵니다.
static void Main(string[] args)
{
    Console.WriteLine("Current directory: " + Environment.CurrentDirectory);
    Console.WriteLine("Running in {0}-bit mode.", Environment.Is64BitProcess ? "64" : "32");

    FFmpegBinariesHelper.RegisterFFmpegBinaries();

    Console.WriteLine($"FFmpeg version info: {ffmpeg.av_version_info()}");

    SetupLogging();

    ConfigureHWDecoder(out var deviceType);
}

private static void ConfigureHWDecoder(out AVHWDeviceType HWtype)
{
    HWtype = AVHWDeviceType.AV_HWDEVICE_TYPE_NONE;
    Console.WriteLine("Use hardware acceleration for decoding?[n]");
    var key = Console.ReadLine();
    var availableHWDecoders = new Dictionary<int, AVHWDeviceType>();

    if (key == "y")
    {
        Console.WriteLine("Select hardware decoder:");
        var type = AVHWDeviceType.AV_HWDEVICE_TYPE_NONE;
        var number = 0;

        while ((type = ffmpeg.av_hwdevice_iterate_types(type)) != AVHWDeviceType.AV_HWDEVICE_TYPE_NONE)
        {
            Console.WriteLine($"{++number}. {type}");
            availableHWDecoders.Add(number, type);
        }

        if (availableHWDecoders.Count == 0)
        {
            Console.WriteLine("Your system have no hardware decoders.");
            HWtype = AVHWDeviceType.AV_HWDEVICE_TYPE_NONE;
            return;
        }

        var decoderNumber = availableHWDecoders
            .SingleOrDefault(t => t.Value == AVHWDeviceType.AV_HWDEVICE_TYPE_DXVA2).Key;
        if (decoderNumber == 0)
            decoderNumber = availableHWDecoders.First().Key;
        Console.WriteLine($"Selected [{decoderNumber}]");
        int.TryParse(Console.ReadLine(), out var inputDecoderNumber);
        availableHWDecoders.TryGetValue(inputDecoderNumber == 0 ? decoderNumber : inputDecoderNumber,
            out HWtype);
    }
}

private static unsafe void SetupLogging()
{
    ffmpeg.av_log_set_level(ffmpeg.AV_LOG_VERBOSE);

    // do not convert to local function
    av_log_set_callback_callback logCallback = (p0, level, format, vl) =>
    {
        if (level > ffmpeg.av_log_get_level()) return;

        var lineSize = 1024;
        var lineBuffer = stackalloc byte[lineSize];
        var printPrefix = 1;
        ffmpeg.av_log_format_line(p0, level, format, vl, lineBuffer, lineSize, &printPrefix);
        var line = Marshal.PtrToStringAnsi((IntPtr)lineBuffer);
        Console.ForegroundColor = ConsoleColor.Yellow;
        Console.Write(line);
        Console.ResetColor();
    };

    ffmpeg.av_log_set_callback(logCallback);
}
제 컴퓨터에서 실행해 보면, "AV_HWDEVICE_TYPE_DXVA2", "AV_HWDEVICE_TYPE_D3D11VA" 2개의 decoder가 탐색되었는데요, 소스 코드를 보면 Console.ReadLine으로 묻는 과정이 있으므로 이를 생략해 그냥 적절하게 옵션 처리하거나 대중적으로 보이는 AV_HWDEVICE_TYPE_DXVA2 옵션을 기본값으로 시작하는 정도로 코드를 살짝 바꿔 응용하면 되겠습니다.
Hardware Decoder 유형이 선택되었으면, 이것으로 당연히 프레임을 디코딩할 수 있습니다.
Console.WriteLine("Decoding...");
DecodeAllFramesToImages(deviceType);

private static unsafe void DecodeAllFramesToImages(AVHWDeviceType HWDevice)
{
    // decode all frames from url, please not it might local resorce, e.g. string url = "../../sample_mpeg4.mp4";
    var url = "http://clips.vorwaerts-gmbh.de/big_buck_bunny.mp4"; // be advised this file holds 1440 frames
    using var vsd = new VideoStreamDecoder(url, HWDevice);

    Console.WriteLine($"codec name: {vsd.CodecName}");

    var info = vsd.GetContextInfo();
    info.ToList().ForEach(x => Console.WriteLine($"{x.Key} = {x.Value}"));

    var sourceSize = vsd.FrameSize;
    var sourcePixelFormat = HWDevice == AVHWDeviceType.AV_HWDEVICE_TYPE_NONE
        ? vsd.PixelFormat
        : GetHWPixelFormat(HWDevice);
    var destinationSize = sourceSize;
    var destinationPixelFormat = AVPixelFormat.AV_PIX_FMT_BGR24;
    using var vfc =
        new VideoFrameConverter(sourceSize, sourcePixelFormat, destinationSize, destinationPixelFormat);

    var frameNumber = 0;

    while (vsd.TryDecodeNextFrame(out var frame))
    {
        var convertedFrame = vfc.Convert(frame);

        using (var bitmap = new Bitmap(convertedFrame.width,
            convertedFrame.height,
            convertedFrame.linesize[0],
            PixelFormat.Format24bppRgb,
            (IntPtr) convertedFrame.data[0]))
            bitmap.Save($"frame.{frameNumber:D8}.jpg", ImageFormat.Jpeg);

        Console.WriteLine($"frame: {frameNumber}");
        frameNumber++;
    }
}
위에 사용한 VideoStreamDecoder는 예제 프로젝트에 포함돼 있으니 그걸 그대로 추가하면 됩니다. 그러니까, 결국 위의 소스 코드는 mp4 파일을 프레임 별로 Bitmap으로 변환 후 JPG 파일로 저장하는 역할을 합니다.
그리고 그다음 나오는 EncodeImagesToH264 메서드는, 위에서 저장했던 JPG 파일을 다시 "out.h264" 파일로 인코딩시킵니다. (해당 파일은 곰 플레이어나,
VLC를 이용해 재생할 수 있습니다.) 오호~~~ 간단한 예제 프로젝트 하나에서 동영상 디코딩/인코딩 과정을 모두 다루고 있었군요. ^^
Console.WriteLine("Encoding...");
EncodeImagesToH264();

private static unsafe void EncodeImagesToH264()
{
    var frameFiles = Directory.GetFiles(".", "frame.*.jpg").OrderBy(x => x).ToArray();
    var fistFrameImage = Image.FromFile(frameFiles.First());

    var outputFileName = "out.h264";
    var fps = 25;
    var sourceSize = fistFrameImage.Size;
    var sourcePixelFormat = AVPixelFormat.AV_PIX_FMT_BGR24;
    var destinationSize = sourceSize;
    var destinationPixelFormat = AVPixelFormat.AV_PIX_FMT_YUV420P;
    using var vfc =
        new VideoFrameConverter(sourceSize, sourcePixelFormat, destinationSize, destinationPixelFormat);

    using var fs = File.Open(outputFileName, FileMode.Create);

    using var vse = new H264VideoStreamEncoder(fs, fps, destinationSize);

    var frameNumber = 0;

    foreach (var frameFile in frameFiles)
    {
        byte[] bitmapData;

        using (var frameImage = Image.FromFile(frameFile))
        using (var frameBitmap = frameImage is Bitmap bitmap ? bitmap : new Bitmap(frameImage))
            bitmapData = GetBitmapData(frameBitmap);

        fixed (byte* pBitmapData = bitmapData)
        {
            var data = new byte_ptrArray8 { [0] = pBitmapData };
            var linesize = new int_array8 { [0] = bitmapData.Length / sourceSize.Height };
            var frame = new AVFrame
            {
                data = data,
                linesize = linesize,
                height = sourceSize.Height
            };
            var convertedFrame = vfc.Convert(frame);
            convertedFrame.pts = frameNumber * fps;
            vse.Encode(convertedFrame);
        }

        Console.WriteLine($"frame: {frameNumber}");
        frameNumber++;
    }
}
처음엔 막막했는데, 초보인 저도 예제 프로젝트 하나만으로 대충 ffmpeg를 사용할 수 있을 것만 같은 자신감이 생기는군요. ^^
(
첨부 파일은 이 글의 예제 코드를 포함합니다. 단지, 압축 파일 크기를 줄이기 위해 ./FFmpeg/bin/x64 하위의 DLL은 제거했습니다.)
[이 글에 대해서 여러분들과 의견을 공유하고 싶습니다. 틀리거나 미흡한 부분 또는 의문 사항이 있으시면 언제든 댓글 남겨주십시오.]