C# - Azure OpenAI API를 이용해 ChatGPT처럼 동작하는 콘솔 응용 프로그램 제작
(2025-06-22 업데이트) 아래의 내용은 Preview 버전을 기반으로 작성한 것이라, 현재는 코드가 변경되었습니다. 대충 이런 식의 예제로 바뀌었으니 참고하세요.
using Azure;
using Azure.AI.OpenAI;
using OpenAI;
using OpenAI.Chat;
using System.ClientModel;

namespace ConsoleApp1;

// https://github.com/Azure/azure-sdk-for-net/blob/Azure.AI.OpenAI_2.1.0/sdk/openai/Azure.AI.OpenAI/README.md
// Install-Package Azure.AI.OpenAI
internal class Program
{
    static void Main(string[] args)
    {
        string azureOpenAIKey = "...[azure openai key]...";
        string azureOpenAIEndpoint = "...[azure openai endpoint]...";

        string chatDeployment = "my_gpt35_turbo";

        AzureOpenAIClient azureClient = new(
            new Uri(azureOpenAIEndpoint),
            new ApiKeyCredential(azureOpenAIKey));

        ChatClient chatClient = azureClient.GetChatClient(chatDeployment);

        ChatCompletion completion = chatClient.CompleteChat(
            [
                // System messages represent instructions or other guidance about how the assistant should behave
                new SystemChatMessage("You are a helpful assistant that talks like a pirate."),
                // User messages represent user input, whether historical or the most recent input
                new UserChatMessage("Hi, can you help me?"),
                // Assistant messages in a request represent conversation history for responses
                new AssistantChatMessage("Arrr! Of course, me hearty! What can I do for ye?"),
                new UserChatMessage("What's the best way to train a parrot?"),
            ]);

        Console.WriteLine($"{completion.Role}: {completion.Content[0].Text}");
    }
}
이번 글도, .NET Conf 2023에서 다 나온 내용입니다. ^^
Build Intelligent Apps with .NET and Azure
; https://youtu.be/xEFO1sQ2bUc?t=27190
정리하는 차원에서 ^^ 그대로 베껴 보겠습니다. 이번 글은 사전 작업이 필요한데요, 동영상에 나온 소스 코드를 그대로 따라 하려면 "Azure OpenAI" 서비스를 생성해 두어야 합니다.
Azure OpenAI 서비스 신청 방법
; https://www.sysnet.pe.kr/2/0/13449
그런 다음, "Model deployments" 메뉴로 들어가,
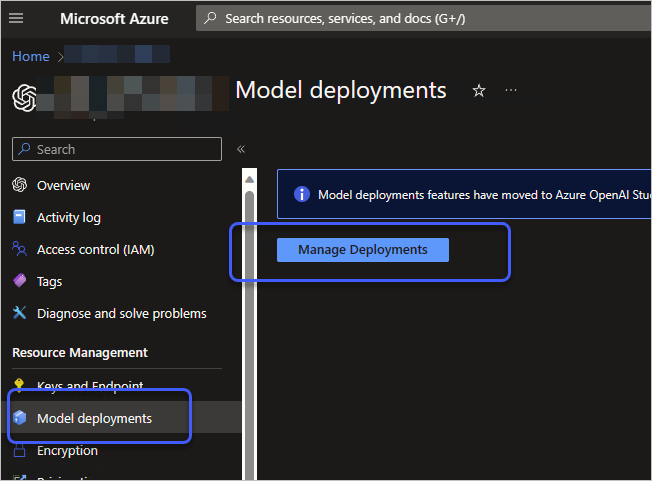
"Manage Deployments" 버튼을 눌러 "
https://oai.azure.com/portal" 페이지로 이동한 후, "배포"를 하나 만들어 둡니다.
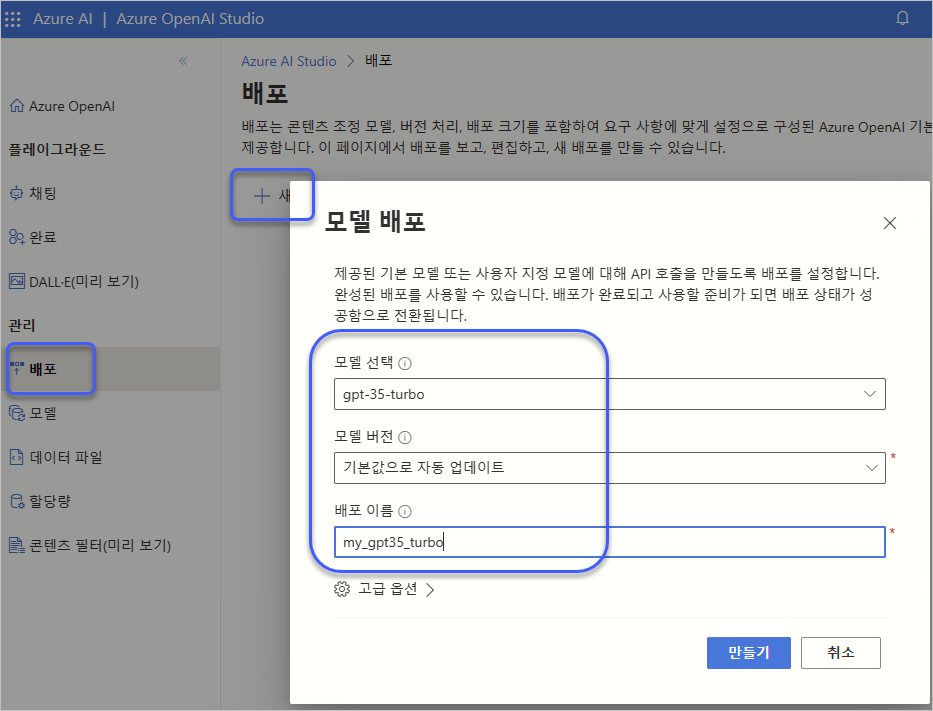
(이때 입력한 이름을 나중에 코드로 사용할 것입니다.)
참고로, 위의 모델 선택에 GPT-4가 없는데요, 현재(2023-11-22) Sweden Central, Canada East, Switzerland North 3개의 Region만 지원한다고 합니다. 다른 지역은 기다려야 할 듯! ^^
아마도 다들 한 번쯤은 openai 홈페이지에서 GPT 챗 서비스를 이용해 본 적이 있을 텐데요,
ChatGPT
; https://chat.openai.com/
사실, 저 과정을 OpenAI API를 이용해 그대로 구현할 수 있습니다. 여기서는 "
Build Intelligent Apps with .NET and Azure" 동영상에서 나온 코드를 따라 그대로 구현해 보겠습니다.
이를 위해 간단하게 .NET 8 Console 프로젝트를 생성하고, 패키지 관리자를 이용해
Azure.AI.OpenAI를 참조 추가합니다.
Install-Package Azure.AI.OpenAI -Pre
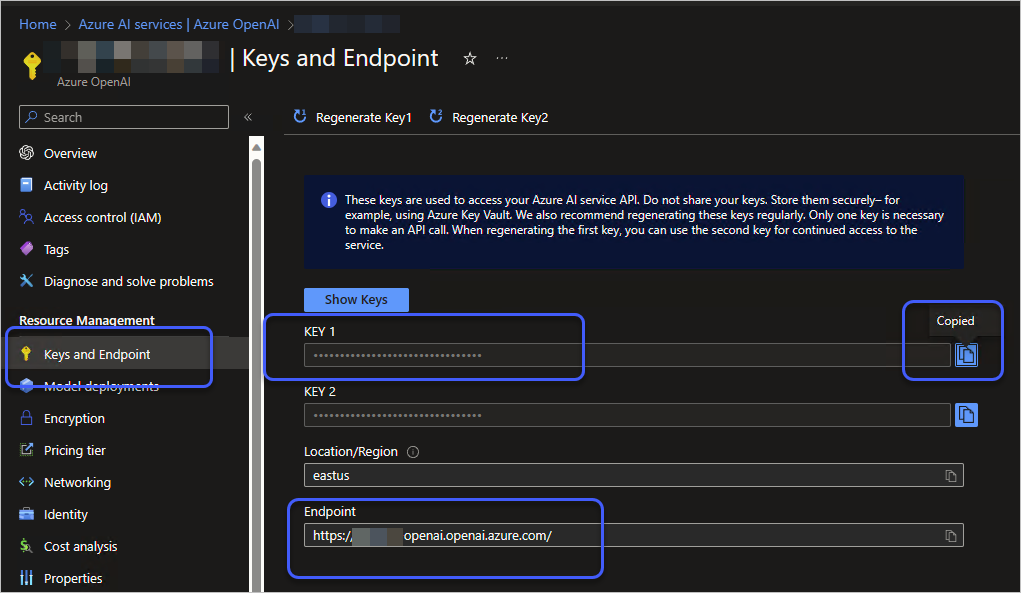
그다음 소스 코드에서 OpenAIClient 인스턴스를 생성해야 하는데요, 이를 위해서는 Azure OpenAI 서비스의 Endpoint 정보와 Key가 필요한데, 이것은 Azure Portal 화면에서 구할 수 있습니다.
그리하여 다음과 같이 초기화할 수 있고,
namespace ConsoleApp1;

using Azure;
using Azure.AI.OpenAI;
using System;

internal class Program
{
    // Install-Package Azure.AI.OpenAI -Pre
    static async Task Main(string[] args)
    {
        string azureOpenAIKey = "...[azure openai key]...";
        string azureOpenAIEndpoint = "...[azure openai endpoint]...";

        OpenAIClient openAIClient = new OpenAIClient(new System.Uri(azureOpenAIEndpoint), new AzureKeyCredential(azureOpenAIKey));
    }
}
이전에 기록했던 "Deployment" 이름과 몇 가지 옵션으로 ChatCompletionsOptions 인스턴스를 만든 후,
string chatDeployment = "my_gpt35_turbo"; // replace your deployment name here

var options = new ChatCompletionsOptions
{
    DeploymentName = chatDeployment,
    MaxTokens = 400,
    Temperature = 0.2f,  // Precise <-> Creativity
    FrequencyPenalty = 0.0f, //
    PresencePenalty = 0.0f,
    NucleusSamplingFactor = 0.95f // Top P
};
ChatGPT 서비스와 유사하게 동작하도록 System 프롬프트를 설정합니다.
string systemMessage = "Assistant is a large language model trained by OpenAI";

options.Messages.Clear();
options.Messages.Add(new ChatMessage(ChatRole.System, systemPrompt));
이후부터는, ChatGPT 채팅창에서 했던 대화 작업을 반복 루프로 처리하고, 또한 그 과정에서 대화 문맥을 options.Messages에 유지하면 됩니다. (물론, 토큰 한계까지만 가능합니다.)
Console.WriteLine($"System: {systemPrompt}");

while (true)
{
    Console.Write("Your prompt: ");
    var userPrompt = Console.ReadLine();
    if (userPrompt?.ToLowerInvariant() == "q")
    {
        break;
    }

    Console.WriteLine($"User: {userPrompt}");
    options.Messages.Add(new ChatMessage(ChatRole.User, userPrompt));

    var assistantResponse = await openAIClient.GetChatCompletionsAsync(options);
    var response = assistantResponse.Value.Choices[0].Message.Content;
    Console.WriteLine($"Assistant: {response}");
    options.Messages.Add(new ChatMessage(ChatRole.Assistant, response));
}
즉, 대화 주제 하나마다 저렇게 options 하나로 대응하면 (또는 options.Messages.Clear() 하거나) 그게 바로 ChatGPT 홈페이지의 서비스가 되는 것입니다. 간단하죠? ^^
(
첨부 파일은 이 글의 예제 코드를 포함합니다.)
[이 글에 대해서 여러분들과 의견을 공유하고 싶습니다. 틀리거나 미흡한 부분 또는 의문 사항이 있으시면 언제든 댓글 남겨주십시오.]