C# - WAV 파일 포맷 + LIST 헤더
ffmpeg를 이용하면 미디어 파일의 포맷을 다양하게 바꿀 수 있습니다. 일례로 오디오 파일의 경우, 다채널 오디오에서 특정 채널의 음을 제거하는 것도 가능한데요,
Manipulating audio channels with ffmpeg
; https://img.sauf.ca/pictures/2017-11-08/dba6fb7be0442f4a76742978fa21766a.pdf

Manipulating audio channels
; https://trac.ffmpeg.org/wiki/AudioChannelManipulation
가령 이전에 소개한 글에서
Octave를 이용해 생성한 Stereo wav 파일을 다음과 같은 명령으로 한쪽 채널의 음을 소거할 수 있습니다.
// Left 채널 음 소거
ffmpeg -i test_stereo.wav -map_channel -1 -map_channel 0.0.1 left_mute.wav
그런데 Right 채널 음 소거가 어렵군요. ^^; 단순히 map_channel 인자로는 잘 안되고 pan 인자로 했더니 만들어집니다. (혹시 이유를 아시는 분은 덧글 부탁드립니다. ^^)
// 이렇게 하면 안 되고,
ffmpeg -i test_stereo.wav -map_channel -1 -map_channel 0.0.0 right_mute.wav

// 이렇게 해야 Stereo로 Right 채널 음 소거가 된 출력 파일이 만들어집니다.
ffmpeg -i test_stereo.wav -af pan="stereo|c0=c0" right_mute.wav
암튼 이렇게 ffmpeg로 출력한 wav 파일을
지난번에 만든 프로그램으로 출력해 보면 데이터가 비정상적으로 나옵니다.
ChunkId: RIFF, FileSize: 1411302, TypeHeader: WAVE, FormatMarker: fmt , SubChunkSize: 16, AudioFormat: 1,
Channels: 2, SampleRate: 44100, ByteRate: 176400, BlockAlign: 4, BitsPerSample: 16, DataChunkHeader: LIST, DataSize: 26
생뚱맞게 LIST chunk가 나오는 바람에 이하 DataSize가 틀린 값이 나오는데요, 이에 대해 검색해 보면 다음과 같은 글이 나옵니다.
List chunk (of a RIFF file)
; https://www.recordingblogs.com/wiki/list-chunk-of-a-wave-file

Wave file format
; https://www.recordingblogs.com/wiki/wave-file-format
그러니까, 그 간단한 wav 포맷이 fmt, data 이외에도 Silent, Wave, list, Fact, Cue, Playlist, List, Sample, Instrument와 같은 서브 헤더들의 확장이 있었던 것입니다. ^^;
자, 그러면 정리해 볼까요? 우선 RIFF 헤더는 "Resource Interchange File Format"라는 말에서 의미하는 것처럼 Wave 파일을 위한 헤더는 아닙니다. 즉, Wave 이외에 다른 리소스도 포함할 수 있는 것인데, 이번 글에서는 RIFF 하위에 Wave만 있는 파일을 가정하고 설명하는 것입니다.
그리고 Wave 하위에는 일반적으로 fmt, data 헤더가 있지만 기타 다른 헤더들도 나올 수 있습니다. 따라서 다음과 같이 구조가 이뤄집니다.
// WAVE 하위의 포맷은 순서 없음

RIFF - WAVE - fmt
            + data
            + Silent
            + Wave list
            + Fact
            + Cue
            + Playlist
            + List
            + Sample
            - Instrument
이번 글에서는 저 모든 포맷을 해석할 수는 없고 이전에 해석한 fmt, data와 함께 List 헤더 해석을 추가하고 기타 헤더들은 포함됐어도 해석하지 않고 넘어가도록 만들겠습니다.
위의 설명을 이해했다면, 이제 더 이상
Marshal.PtrToStructure을 이용한 파일 읽기가 불가능하다는 것을 알 수 있을 것입니다.
그래서 지난 글에서 작성한 읽기 및 클래스 구조를 모두 뜯어고쳐야 하는데요, 우선, RIFF/WAVE 구조에 맞게 WAVE에 포함되는 하위 헤더 중 우리가 해석할 List, Format, Data에 대해 각각 필드로 포함하도록 만듭니다.
public class WaveFile
{
    ListChunk _list;
    FormatChunk _format;
    DataChunk _data;

    // ...[생략]...
}
이후, 헤더의 Id에 따라 각각 하위 헤더에 읽기를 맡기는 식으로, 그리고 필요 없는 헤더는 그냥 넘어가는 식으로 해석하면 됩니다.
public class WaveFile
{
    // ...[생략]...

    public static WaveFile Read(string filePath)
    {
        WaveFile wave = new WaveFile();

        using (FileStream fs = File.OpenRead(filePath))
        using (BinaryReader br = new BinaryReader(fs, Encoding.ASCII))
        {
            string type = Encoding.ASCII.GetString(br.ReadBytes(4));
            if (type != "RIFF")
            {
                throw new ApplicationException("RIFF signature not found");
            }

            int remainSize = br.ReadInt32();

            while (remainSize > 0)
            {
                int chunkReadSize = 0;
                string? chunkTypeId = br.ForwardAnsi4(ref chunkReadSize)?.ToLower();

                switch (chunkTypeId)
                {
                    case "wave":
                        break;

                    case "fmt ":
                        wave._format = FormatChunk.Read(br, ref chunkReadSize);
                        break;

                    case "data":
                        wave._data = DataChunk.Read(br, ref chunkReadSize);
                        break;

                    case "list":
                        wave._list = ListChunk.Read(br, ref chunkReadSize);
                        break;

                    case "slnt": // Silent
                    case "wavl": // Wave list
                    case "fact":
                    case "cue ":
                    case "plst": // Playlist
                    case "smpl": // sample
                    case "inst": // Instrument
                        {
                            int chunkSize = br.ForwardInt32(ref chunkReadSize);
                            br.ForwardBytes(chunkSize, ref chunkReadSize);
                        }
                        break;

                    default:
                        throw new ApplicationException($"Not supported sub chunk: {chunkTypeId}");
                }

                remainSize -= chunkReadSize;
            }
        }

        return wave;
    }
}
남은 작업은, 자신의 헤더에 맞는 데이터를 읽어들이는 코드를 작성하면 됩니다. 가령 "fmt "에 해당하는 헤더는 이렇게 구현합니다.
class FormatChunk
{
    public CompressionCode CompressionCode; /* 1 is PCM */

    public short Channels;

    public int SampleRate;

    public int ByteRate; /* (Sample Rate * BitsPerSample * Channels) / 8 */

    public short BlockAlign; /* (BitsPerSample * Channels) / 8 */

    public short BitsPerSample;

    public static FormatChunk Read(BinaryReader br, ref int totalRead)
    {
        FormatChunk format = new FormatChunk();

        int chunkSize = br.ForwardInt32(ref totalRead);

        format.CompressionCode = (CompressionCode)br.ForwardUInt16(ref totalRead);

        if (format.CompressionCode != CompressionCode.Microsoft_PCM)
        {
            throw new Exception("Only supported for Microsoft PCM");
        }

        format.Channels = br.ForwardInt16(ref totalRead);
        format.SampleRate = br.ForwardInt32(ref totalRead);
        format.ByteRate = br.ForwardInt32(ref totalRead);
        format.BlockAlign = br.ForwardInt16(ref totalRead);
        format.BitsPerSample = br.ForwardInt16(ref totalRead);

        if (chunkSize > 16)
        {
            short extraFormatBytes = br.ForwardInt16(ref totalRead);
            br.ForwardBytes(extraFormatBytes, ref totalRead);
        }

        return format;
    }

    public override string ToString()
    {
        return $"{CompressionCode}, {SampleRate} Hz, {Channels} channels, {BitsPerSample}";
    }
}
어렵지 않죠? ^^ 헤더 파싱 중에 주의해야 할 점이 있다면 LIST 헤더의 경우 key=value 쌍에서 value는 반드시 word-aligned라는 점입니다. 만약 "kevin"이라는 값을 줬으면 5바이트를 차지하지만 word-aligned이어야 하므로 6바이트로 길이를 맞춰야 합니다. (그 외 "data", "list" 헤더를 읽어들이는 코드는 첨부 파일을 참고하세요.)
자, 이렇게 개선한 Read를 이용하면,
{
    string waveFilePath = @"C:\temp\right_mute.wav";
    WaveFile? wf = WaveFile.Read(waveFilePath);

    Console.WriteLine(wf);
}

/* 출력 결과
Metadata:
        ISFT    Lavf58.76.100
Microsoft_PCM, 44100 Hz, 2 channels, 16, duration: 00:00:08.00, 1411 kb/s
*/
보는 바와 같이 ffmpeg가 만든 파일을 잘 해석하고 있습니다. 물론, 쓰기 기능도 INFO 헤더를 쓰는 것도 구현했으므로 다음과 같이 작성하면,
{
    BinaryOctaveFile octave = BinaryOctaveFile.Read(@"test_stereo.pcm");
    short[] data = octave.PCMDataAsShorts();

    byte[] buffer = new byte[data.Length * 2];
    Buffer.BlockCopy(data, 0, buffer, 0, buffer.Length);

    Dictionary<string, string> info = new Dictionary<string, string>() {
        { InfoKeys.ISFT, "sysnet" },
        { InfoKeys.ICOP, "Copyright sysnet 2023" },
    };

    WaveFile.Write(@"C:\Temp\test_stereo.wav", 44100, 16, 2, buffer, info);
}
이제 저렇게 생성한 파일을 ffprobe로 다음과 같이 확인할 수 있습니다.
c:\temp> ffprobe -hide_banner test_stereo.wav
Input #0, wav, from 'test_stereo.wav':
  Metadata:
    encoder         : sysnet
    copyright       : Copyright sysnet 2023
  Duration: 00:00:08.00, bitrate: 1411 kb/s
  Stream #0:0: Audio: pcm_s16le ([1][0][0][0] / 0x0001), 44100 Hz, 2 channels, s16, 1411 kb/s
(
첨부 파일은 이 글의 예제 코드를 포함합니다.)
그런데, 위의 Sub Chunk 헤더 분석으로 "C:\Windows\Media\Alarm09.wav" 파일을 해보면 "cdif"라는 헤더가 나옵니다. 검색해 보면, 듣보잡 헤더인지 정보를 찾을 수가 없습니다.
아래의 문서에 보면,
Resource Interchange File Format (RIFF)
; https://learn.microsoft.com/en-us/windows/win32/xaudio2/resource-interchange-file-format--riff-
sub chunk의 규격이 "chunkID, chunkSize, data" 식으로 나온다고 하므로, chunkTypeId에 따른 코드를 단순히 default 처리해 넘어가도록 처리하는 것이 나을 수도 있습니다.
switch (chunkTypeId)
{
    case "wave":
        break;

    case "fmt ":
        wave._format = FormatChunk.Read(br, ref chunkReadSize);
        break;

    case "data":
        wave._data = DataChunk.Read(br, ref chunkReadSize, wave._loadAllData);
        break;

    case "list":
        wave._list = ListChunk.Read(br, ref chunkReadSize);
        break;

    default: //  "cdif", "slnt", "wavl", "fact", "cue ",  "plst", "smpl", "inst"
        {
            int chunkSize = br.ForwardInt32(ref chunkReadSize);
            br.ForwardBytes(chunkSize, ref chunkReadSize);
        }
        break;
}
가지고 있던 flac 파일을 ffmpeg를 이용해 wav 파일로 변환했더니 Microsoft_PCM이 아닌 포맷이 나옵니다. 바로 Extensible 포맷인데요, 다행히 아래의 문서를 보면 어렵지 않게 지원을 추가할 수 있습니다.
Extensible Wave-Format Descriptors
; https://learn.microsoft.com/en-us/windows-hardware/drivers/audio/extensible-wave-format-descriptors
문서에 포함된 한 장의 그림에서 잘 설명하고 있는데,
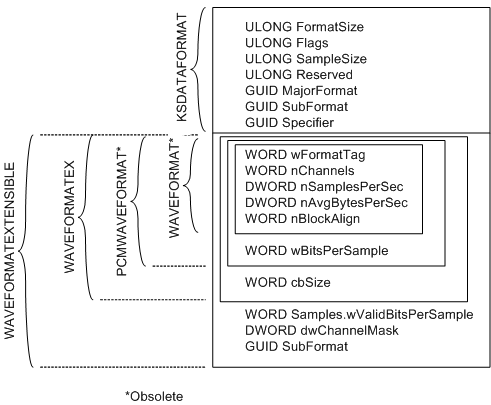
WAVEFORMATEXTENSIBLE은 기존 WAVEFORMATEX에서 3개의 필드가 더 추가된 유형입니다.
/*
WAVEFORMATEXTENSIBLE structure (ksmedia.h)
; https://learn.microsoft.com/en-us/windows-hardware/drivers/ddi/ksmedia/ns-ksmedia-waveformatextensible
*/

typedef struct {
  WAVEFORMATEX Format;
  union {
    WORD wValidBitsPerSample;
    WORD wSamplesPerBlock;
    WORD wReserved;
  } Samples;
  DWORD        dwChannelMask;
  GUID         SubFormat;
} WAVEFORMATEXTENSIBLE, *PWAVEFORMATEXTENSIBLE;
단지, 여기서 만들고 있는 것은 PCM 데이터로 제약이 있으므로 SubFormat 필드를 체크해,
Media Type Identifiers for the Windows Media Format SDK
; https://learn.microsoft.com/en-us/windows/win32/wmformat/media-type-identifiers
"00000001-0000-0010-8000-00AA00389B71" (WMMEDIASUBTYPE_PCM) 값 유형에 대해서만 재생할 수 있도록 해야 합니다. 따라서 이를 반영해 다음과 같이 FormatChunk.Read 코드를 완성할 수 있습니다.
public static FormatChunk Read(BinaryReader br, ref int totalRead)
{
    FormatChunk format = new FormatChunk();

    // ...[생략]...

    if (chunkSize > 16)
    {
        format.cbSize = br.ForwardInt16(ref totalRead);

        if (format.CompressionCode == CompressionCode.Extensible)
        {
            format.SamplesValidBitsPerSample = br.ForwardInt16(ref totalRead);
            format.ChannelMask = br.ForwardInt32(ref totalRead);
            format.SubFormat = br.ForwardGuid(ref totalRead);

            if (format.SubFormat != WMMEDIASUBTYPE_PCM)
            {
                throw new ApplicationException("Extensible format PCM is supported only");
            }
        }
        else
        {
            br.ForwardBytes(format.cbSize, ref totalRead);
        }
    }

    return format;
}
지난 글을 다룰 때만 해도 WAV 파일의 포맷이 우스워 보였는데... ^^;
[이 글에 대해서 여러분들과 의견을 공유하고 싶습니다. 틀리거나 미흡한 부분 또는 의문 사항이 있으시면 언제든 댓글 남겨주십시오.]