Microsoft MVP성태의 닷넷 이야기
닷넷: 2299. C# - Windows Hello 사용자 인증 다이얼로그 표시하기 [링크 복사], [링크+제목 복사],
조회: 6017
글쓴 사람
정성태 (seongtaejeong at gmail.com)
홈페이지
첨부 파일

(시리즈 글이 5개 있습니다.)
VC++: 84. CredUIPromptForWindowsCredentials Win32 API 사용법 정리
; https://www.sysnet.pe.kr/2/0/1827

VC++: 85. Windows Vista부터 바뀐 Credential Provider 예제 분석 (1)
; https://www.sysnet.pe.kr/2/0/1828

VC++: 86. Windows Vista부터 바뀐 Credential Provider 예제 분석 (2)
; https://www.sysnet.pe.kr/2/0/1829

.NET Framework: 927. C# - 윈도우 프로그램에서 Credential Manager를 이용한 보안 정보 저장
; https://www.sysnet.pe.kr/2/0/12267

닷넷: 2299. C# - Windows Hello 사용자 인증 다이얼로그 표시하기
; https://www.sysnet.pe.kr/2/0/13744


C# - Windows Hello 사용자 인증 다이얼로그 표시하기

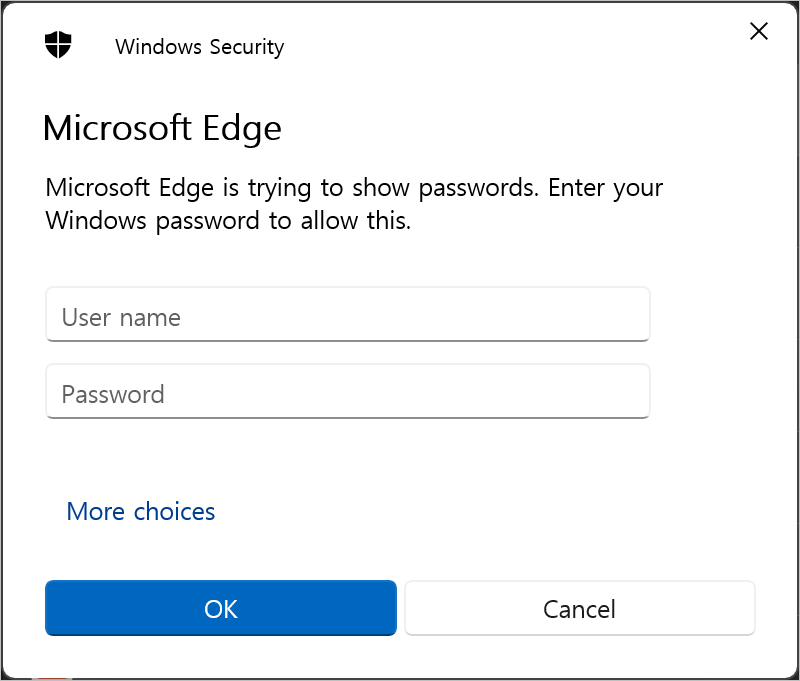
Edge 브라우저에서 "edge://settings/profiles" 화면을 통해 "Passwords" 링크로 특정 웹 사이트의 로그인 정보를 보고 싶다면, 아래의 화면처럼 윈도우 사용자 인증을 먼저 해야 합니다.

user_consent_dlg_2.png

이런 요청을, Windows Runtime에서 제공하는 UserConsentVerifier를 사용하면 쉽게 구현할 수 있는데요,

The UserConsentVerifier confirms that the user is there, but it doesn’t protect any data
; https://devblogs.microsoft.com/oldnewthing/20240924-00/?p=110308

Another example of the Windows Runtime interop pattern: Using the UserConsentVerifier from a Win32 program
; https://devblogs.microsoft.com/oldnewthing/20240925-00/?p=110312

따라서, .NET 응용 프로그램에서도 아래와 같이 UserConsentVerifier를 사용하여 사용자 인증 다이얼로그를 표시할 수 있습니다.

using System.Runtime.InteropServices;

class Program
{
    [DllImport("kernel32.dll")]
    static extern IntPtr GetConsoleWindow();

    // UserConsentVerifier Class - [Examples] Desktop apps using C#
    // https://learn.microsoft.com/en-us/uwp/api/windows.security.credentials.ui.userconsentverifier#desktop-apps-using-c

    static async Task Run()
    {
        IntPtr hwnd = GetConsoleWindow();

        string returnMessage = "";
        var consentResult =
            await Windows.Security.Credentials.UI.UserConsentVerifierInterop
                    .RequestVerificationForWindowAsync(hwnd, "auth...");

        switch (consentResult)
        {
            case Windows.Security.Credentials.UI.UserConsentVerificationResult.Verified:
                returnMessage = "User verified.";
                break;
            case Windows.Security.Credentials.UI.UserConsentVerificationResult.DeviceBusy:
                returnMessage = "Authentication device is busy.";
                break;
            case Windows.Security.Credentials.UI.UserConsentVerificationResult.DeviceNotPresent:
                returnMessage = "No authentication device found.";
                break;
            case Windows.Security.Credentials.UI.UserConsentVerificationResult.DisabledByPolicy:
                returnMessage = "Authentication device verification is disabled by policy.";
                break;
            case Windows.Security.Credentials.UI.UserConsentVerificationResult.NotConfiguredForUser:
                returnMessage = "Please go to Account Settings to set up PIN or other advanced authentication.";
                break;
            case Windows.Security.Credentials.UI.UserConsentVerificationResult.RetriesExhausted:
                returnMessage = "There have been too many failed attempts. Device authentication canceled.";
                break;
            case Windows.Security.Credentials.UI.UserConsentVerificationResult.Canceled:
                returnMessage = "Device authentication canceled.";
                break;
            default:
                returnMessage = "Authentication device is currently unavailable.";
                break;
        }

        Console.WriteLine(returnMessage);
    }

    [MTAThread]
    public static void Main()
    {
        Run().Wait();
    }
}

그리고, WinRT를 사용하는 것이기 때문에 위의 소스코드를 빌드하려면 TargetFramework에 "-windows..."를 추가해야 합니다.

<Project Sdk="Microsoft.NET.Sdk">

  <PropertyGroup>
    <OutputType>Exe</OutputType>
    <TargetFramework>net8.0-windows10.0.19041.0</TargetFramework>
    <ImplicitUsings>enable</ImplicitUsings>
    <Nullable>enable</Nullable>
  </PropertyGroup>

</Project>

당연히 저 기능은 Windows 10 이상에서만 동작합니다.


그런데, 이 예제가 정상적으로 동작하기 위해서는 선행 조건이 하나 있습니다. 바로 Windows Hello 인증, 보통 "Facial recognition", "Fingerprint recognition", "PIN" 3가지 방식이 제공되는데, 그중 하나는 반드시 활성화시켜야만 합니다.

이 설정은 "Settings"의 "Accounts" / "Sign-in options"에서 할 수 있는데요, 아래의 화면은 그 3가지 중 "PIN"을 설정한 상태를 보여줍니다.

user_consent_dlg_3.png

이런 상태에서 예제 코드를 실행하면 다음과 같은 PIN 인증을 요구하는 창이 뜹니다.

user_consent_dlg_1.png

(CredUIPromptForWindowsCredentials API 호출 결과로 보이는) Edge에서 뜬 창과 비교하면 모양도 약간 다른데요, 왜냐하면 Edge는 말 그대로 사용자 인증 창을 띄운 반면, UserConsentVerifier는 Windows Hello를 위한 인증 창을 띄울 뿐이기 때문입니다.

만약 그 어떤 Windows Hello 인증도 사용하지 않고 있다면 UserConsentVerifier.RequestVerificationForWindowAsync 메서드의 반환 값은 DeviceNotPresent가 됩니다.

사실, Windows Hello 인증 설정이 강제가 아니기 때문에 무심코 이걸 사용하지 않는 유저 층을 감안하면 일반적으로 쓸 수 있는 방법은 아닙니다. 게다가 Remote Desktop으로 접속한 화면에서는 (PIN을 설정했어도) "Windows Hello" 인증을 사용할 수 없기 때문에 무조건 DeviceNotPresent가 반환됩니다.

또 하나 아쉬운 점이 있다면, RequestVerificationForWindowAsync 메서드의 인자에는 "Making sure it's you"라는 (왠지 촌스러운) 문구를 수정할 수 있는 여지가 없다는 점입니다.

참고로, 정상적으로 인증을 하면 UserConsentVerificationResult.Verified를 반환하고, Cancel 버튼을 누르면UserConsentVerificationResult.Canceled를 반환합니다.

(첨부 파일은 이 글의 예제 코드를 포함합니다.)


[이 글에 대해서 여러분들과 의견을 공유하고 싶습니다. 틀리거나 미흡한 부분 또는 의문 사항이 있으시면 언제든 댓글 남겨주십시오.]


[최초 등록일: ]
[최종 수정일: 9/28/2024]

Creative Commons License
이 저작물은 크리에이티브 커먼즈 코리아 저작자표시-비영리-변경금지 2.0 대한민국 라이센스에 따라 이용하실 수 있습니다.
by SeongTae Jeong, mailto:techsharer at outlook.com

비밀번호

댓글 작성자


... 46  47  48  49  50  51  52  53  54  55  [56]  57  58  59  60  ...
NoWriterDateCnt.TitleFile(s)
12537정성태2/11/202119353.NET Framework: 1022. UI 요소의 접근은 반드시 그 UI를 만든 스레드에서! - 두 번째 이야기 [2]
12536정성태2/9/202118199개발 환경 구성: 542. BDP(Bandwidth-delay product)와 TCP Receive Window
12535정성태2/9/202117271개발 환경 구성: 541. Wireshark로 확인하는 LSO(Large Send Offload), RSC(Receive Segment Coalescing) 옵션
12534정성태2/8/202117788개발 환경 구성: 540. Wireshark + C/C++로 확인하는 TCP 연결에서의 closesocket 동작 [1]파일 다운로드1
12533정성태2/8/202116793개발 환경 구성: 539. Wireshark + C/C++로 확인하는 TCP 연결에서의 shutdown 동작파일 다운로드1
12532정성태2/6/202117990개발 환경 구성: 538. Wireshark + C#으로 확인하는 ReceiveBufferSize(SO_RCVBUF), SendBufferSize(SO_SNDBUF) [3]
12531정성태2/5/202116767개발 환경 구성: 537. Wireshark + C#으로 확인하는 PSH flag와 Nagle 알고리듬파일 다운로드1
12530정성태2/4/202120594개발 환경 구성: 536. Wireshark + C#으로 확인하는 TCP 통신의 Receive Window
12529정성태2/4/202118459개발 환경 구성: 535. Wireshark + C#으로 확인하는 TCP 통신의 MIN RTO [1]
12528정성태2/1/202118049개발 환경 구성: 534. Wireshark + C#으로 확인하는 TCP 통신의 MSS(Maximum Segment Size) - 윈도우 환경
12527정성태2/1/202118138개발 환경 구성: 533. Wireshark + C#으로 확인하는 TCP 통신의 MSS(Maximum Segment Size) - 리눅스 환경파일 다운로드1
12526정성태2/1/202114941개발 환경 구성: 532. Azure Devops의 파이프라인 빌드 시 snk 파일 다루는 방법 - Secure file
12525정성태2/1/202113926개발 환경 구성: 531. Azure Devops - 파이프라인 실행 시 빌드 이벤트를 생략하는 방법
12524정성태1/31/202115112개발 환경 구성: 530. 기존 github 프로젝트를 Azure Devops의 빌드 Pipeline에 연결하는 방법 [1]
12523정성태1/31/202116048개발 환경 구성: 529. 기존 github 프로젝트를 Azure Devops의 Board에 연결하는 방법
12522정성태1/31/202118240개발 환경 구성: 528. 오라클 클라우드의 리눅스 VM - 9000 MTU Jumbo Frame 테스트
12521정성태1/31/202117330개발 환경 구성: 527. 이더넷(Ethernet) 환경의 TCP 통신에서 MSS(Maximum Segment Size) 확인 [1]
12520정성태1/30/202116084개발 환경 구성: 526. 오라클 클라우드의 VM에 ping ICMP 여는 방법
12519정성태1/30/202114814개발 환경 구성: 525. 오라클 클라우드의 VM을 외부에서 접근하기 위해 포트 여는 방법
12518정성태1/30/202132910Linux: 37. Ubuntu에 Wireshark 설치 [2]
12517정성태1/30/202120612Linux: 36. 윈도우 클라이언트에서 X2Go를 이용한 원격 리눅스의 GUI 접속 - 우분투 20.04
12516정성태1/29/202117097Windows: 188. Windows - TCP default template 설정 방법
12515정성태1/28/202118748웹: 41. Microsoft Edge - localhost에 대해 http 접근 시 무조건 https로 바뀌는 문제 [3]
12514정성태1/28/202118883.NET Framework: 1021. C# - 일렉트론 닷넷(Electron.NET) 소개 [1]파일 다운로드1
12513정성태1/28/202116042오류 유형: 698. electronize - User Profile 디렉터리에 공백 문자가 있는 경우 빌드가 실패하는 문제 [1]
12512정성태1/28/202116429오류 유형: 697. The program can't start because VCRUNTIME140.dll is missing from your computer. Try reinstalling the program to fix this problem.
... 46  47  48  49  50  51  52  53  54  55  [56]  57  58  59  60  ...