MSBuild - 빌드 전/후, 배포 전/후 실행하고 싶은 Task 정의
msbuild도 다른 빌드 도구들처럼 사용자가 임의로 Task를 작성해 추가할 수 있습니다. 예를 들면서 설명해 보면!
예제를 위해 Console Application 프로젝트를 하나 만들고 .csproj 파일의 내용에 다음과 같이 추가해 줍니다.
<?xml version="1.0" encoding="utf-8"?>
<Project ToolsVersion="15.0" xmlns="http://schemas.microsoft.com/developer/msbuild/2003">
  <Import Project="$(MSBuildExtensionsPath)\$(MSBuildToolsVersion)\Microsoft.Common.props" Condition="Exists('$(MSBuildExtensionsPath)\$(MSBuildToolsVersion)\Microsoft.Common.props')" />
...[생략]...

  <ItemGroup>
    <None Include="App.config" />
  </ItemGroup>
  <Import Project="$(MSBuildToolsPath)\Microsoft.CSharp.targets" />

  <Target Name="BeforeBuild">
       <Message Importance="high" Text="BeforeBuild(high) - Message Task $(MSBuildProjectFile)" />
       <Message Importance="normal" Text="BeforeBuild(normal) - Message Task $(MSBuildProjectFile)" />
  </Target>

  <Target Name="AfterBuild">
       <Message Importance="high" Text="AfterBuild - Message Task $(MSBuildProjectFile)" />
  </Target>

</Project>
이후 해당 프로젝트를 빌드하면 출력 창에 다음과 같은 내용을 확인할 수 있습니다.
1>------ Rebuild All started: Project: ConsoleApp1, Configuration: Debug Any CPU ------
1>  BeforeBuild(high) - Message Task ConsoleApp1.csproj
1>  ConsoleApp1 -> E:\ConsoleApp1\ConsoleApp1\bin\Debug\ConsoleApp1.exe
1>  AfterBuild - Message Task ConsoleApp1.csproj
========== Rebuild All: 1 succeeded, 0 failed, 0 skipped ==========
msbuild는 Microsoft.CSharp.targets 파일 내에서 빌드의 전/후에 각각 BeforeBuild와 AfterBuild에 대한 Target이 정의되어 있으면 이를 호출하도록 하고 있기 때문에 저렇게 Message Task가 동작하게 되는 것입니다.
msbuild 스크립트 파일(C# 프로젝트인 경우 .csproj 파일)도 C++의 #include와 유사하게 다른 스크립트 파일을 import 노드를 이용해 포함할 수 있습니다. 일반적으로 비주얼 스튜디오에서 만든 C# 프로젝트는 다음의 스크립트 파일을 포함합니다.
<!-- %ProgramFiles(x86)%\Microsoft Visual Studio\2017\Enterprise\MSBuild\15.0\Bin\Microsoft.CSharp.targets -->
<Import Project="$(MSBuildToolsPath)\Microsoft.CSharp.targets" />
위의 Microsoft.CSharp.targets은 다시 .NET Framework이 설치된 폴더의 Microsoft.CSharp.targets을 import합니다.
<!-- C:\Windows\Microsoft.NET\Framework\v4.0.30319\Microsoft.CSharp.targets -->
<CSharpTargetsPath>$(MSBuildFrameworkToolsPath)\Microsoft.CSharp.targets</CSharpTargetsPath>
.NET 설치 폴더에 있는 Microsoft.CSharp.targets은 동일 폴더의 Microsoft.Common.targets을 import하는데,
<!-- C:\Windows\Microsoft.NET\Framework\v4.0.30319\Microsoft.Common.targets -->
<Import Project="Microsoft.Common.targets" />

(이 외에 프로젝트 유형에 따라 필요한 .targets 파일들이 import됩니다.)
바로 저 파일에 BeforeBuild와 AfterBuild가 이런 식으로 정의되어 있습니다.
  <PropertyGroup>
    <BuildDependsOn>
      BeforeBuild;
      CoreBuild;
      AfterBuild
    </BuildDependsOn>
  </PropertyGroup>

  <!--
    ============================================================
                                        BeforeBuild
    Redefine this target in your project in order to run tasks just before Build
    ============================================================
    -->
  <Target Name="BeforeBuild"/>

  <!--
    ============================================================
                                        AfterBuild
    Redefine this target in your project in order to run tasks just after Build
    ============================================================
    -->
  <Target Name="AfterBuild"/>
하지만, 저것은 로슬린 이전에 그랬고 Roslyn이 도입되면서 다음의 .targets 파일이 import 되고,
C:\Program Files (x86)\Microsoft Visual Studio\2017\Enterprise\MSBuild\15.0\Bin\Roslyn\Microsoft.CSharp.Core.targets
Microsoft.CSharp.Core.targets 파일에서 다시 import하는 아래의 파일에 BeforeBuild, AfterBuild가 정의되어 있습니다.
C:\Program Files (x86)\Microsoft Visual Studio\2017\Enterprise\MSBuild\15.0\Bin\Microsoft.Common.CurrentVersion.targets
로슬린 전/후에 상관없이 BeforeBuild/AfterBuild의 처리 방식은 본격적인 빌드 작업을 담당하는 CoreBuild의 전/후에 비어 있는 Target 작업을 하나씩 미리 정의해 둔 것으로 동일합니다. 그런데 여기서 주의할 점이 하나 있습니다. 주석에 써진 데로 이것은 "redefine"이기 때문에 동일한 Target Name을 갖는 작업이 2개 이상 정의되어 있으면 나중에 정의된 것이 덮어써서 동작하는 부작용이 있습니다. 가령, Microsoft.Common.CurrentVersion.targets 파일을 편집해 BeforeBuild를 다음과 같이 수정했다면,
<Target Name="BeforeBuild">
    <Message Importance="high" Text="===================" />
</Target>
이후 여러분들의 .csproj 파일에서 BeforeBuild Target을 재정의하지 않았다면 빌드 시 "===================" 메시지가 보이겠지만, 재정의하는 순간부터 저 메시지를 볼 수 없습니다.
이와 함께 또 다른 문제가 있는데요, msbuild의 모든 Target 작업들이 저런 식으로 Befoer, Core, After와 같은 식으로 정의된 것은 아니기 때문에 다른 작업의 전/후로 어떤 처리를 하고 싶다면 Core를 복사해서 Before/After를 처리하는 구조로 변경해야 하는 등의 번거로움이 있습니다.
그리고 바로 이런 2가지의 문제를 극복하기 위해 나온 것이 MSBuild 4.0 이후부터 제공되는 Target 노드의
BeforeTargets / AfterTargets 속성입니다. 이를 이용하면 기존 BeforeBuild와 AfterBuild를 다음과 같은 형식으로 정의할 수 있습니다.
<Target Name="MyBeforeBuild" BeforeTargets="CoreBuild">
    <Message Text="Project File Name: $(MSBuildProjectFile)" />
</Target>

<Target Name="MyAfterBuild" AfterTargets="CoreBuild">
    <Message Text="Project File Name: $(MSBuildProjectFile)" />
</Target>
CoreBuild가 BeforeBuild/AfterBuild를 제공하는 것처럼, Publish 작업 역시 BeforePublish, AfterPublish를 제공합니다. 따라서, 배포(Publish) 전/후에 Target Task를 추가하는 것은 .csproj 파일에 다음과 같이 추가만 해주면 됩니다.
<Target Name="BeforePublish">
    <Message Importance="high" Text="=BeforePublish=" />
</Target>

<Target Name="AfterPublish">
    <Message Importance="high" Text="=AfterPublish=" />
</Target>
그런데, BeforePublish, AfterPublish를 정의하기 보단 BeforeTargets/AfterTargets을 이용한 정의가 더 낫습니다. 왜냐하면 일부 (예: ASP.NET Core 웹 애플리케이션) 프로젝트의 경우 BeforePublish, AfterPublish를 정의하면 실행이 안되는 반면 BeforeTargets/AfterTargets으로 다음과 같이 정의하면 실행이 잘 됩니다.
<Target Name="MyBeforePublish" BeforeTargets="Publish">
    <Message Importance="high" Text="$(MSBuildProjectFile)" />
</Target>

<Target Name="MyAfterPublish" AfterTargets="Publish">
    <Message Importance="high" Text="$(MSBuildProjectFile)" />
</Target>
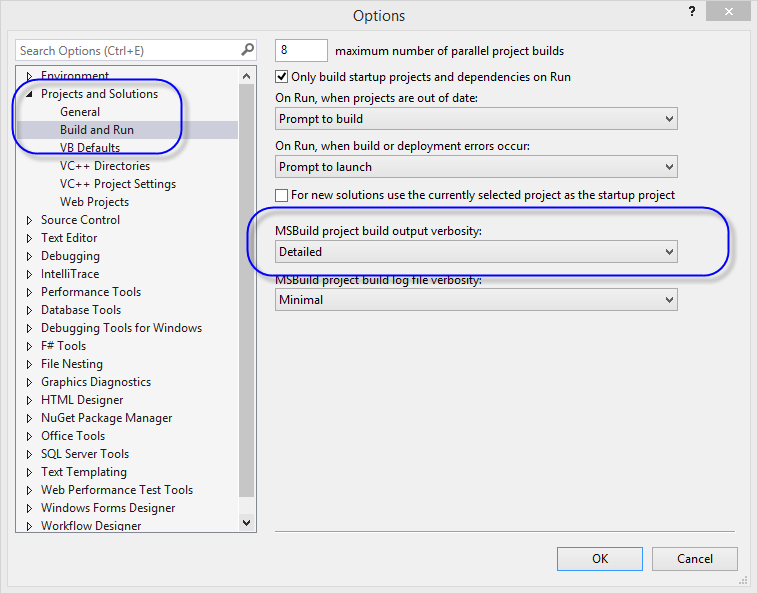
참고로, 여러분들의 빌드 작업에 어떤 target 작업들이 실행되고 있는지 보고 싶다면
비주얼 스튜디오의 "TOOLS" / "Options" 메뉴에서 "Projects and Solutions" / "Build and Run" 범주의 "MSBuild project build output verbosity" 항목을 "Minimal"에서 다른 세부 항목 값으로 설정하면 됩니다.
또한, 이 글의 예제에서 Message Task의 Importance 설정을 high로 했는데, 기본 값인 normal(또는 low)로 설정한 경우 위의 verbosity 설정 수준에 따라 출력 유무가 결정됩니다. (즉, 기본 verbosity 설정인 Minimal에서는 high로 설정한 메시지들만 Output 창에 보입니다.)
그 외에, msbuild 스크립트에서 사용 가능한 변수들의 목록은 다음의 글을 참고할 수 있습니다.
MSBuildToolsPath: C:\Program Files (x86)\Microsoft Visual Studio\2017\Enterprise\MSBuild\15.0\Bin
MSBuildFrameworkToolsPath: C:\WINDOWS\Microsoft.NET\Framework\v4.0.30319\

Team Build에 사용되는 각종 Property 값
; https://www.sysnet.pe.kr/2/0/508
[이 글에 대해서 여러분들과 의견을 공유하고 싶습니다. 틀리거나 미흡한 부분 또는 의문 사항이 있으시면 언제든 댓글 남겨주십시오.]