Hyper-V Internal 네트워크에 NAT을 이용한 인터넷 연결 제공
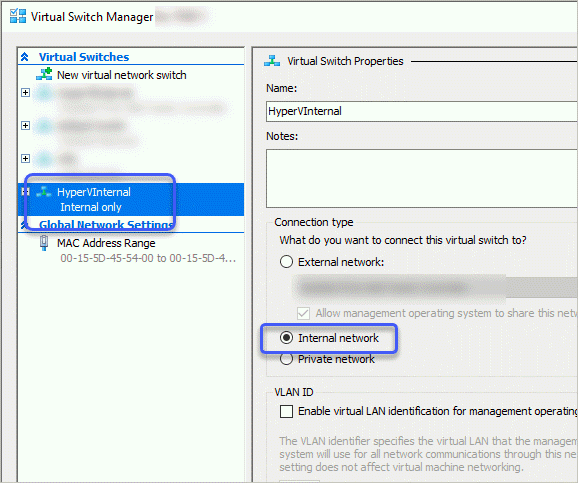
Hyper-V의 Internal network 유형은,
Hyper-V의 네트워크 유형 (1)
; https://www.sysnet.pe.kr/2/0/910#internal
VM끼리의 통신과, VM - Host 간의 통신은 제공하지만 인터넷으로의 연결은 안 됩니다. 이런 제약은 ICS(Internet Connection Sharing)를 Internal에 제공해 해결할 수 있지만,
Hyper-V의 네트워크 유형 (2)
; https://www.sysnet.pe.kr/2/0/915
개인적으로는, 그냥 VM에 External과 Internal을 동시에 제공하는 것을 선호합니다. (그래서 보통, External은 동적 IP로, Internal은 정적 IP로 설정해 둡니다.)
예전에 "Windows Virtual PC"를 사용하신 분은, Hyper-V에서는 제공하지 않는 "
NAT" 유형의 네트워크를 기억하실 텐데요,
Windows Virtual PC 의 네트워크 유형 (1)
; https://www.sysnet.pe.kr/2/0/906#nat
아쉽게도 이런 유형을 Hyper-V에서는 제공하지 않습니다. 그런데, "명시적"으로만 제공하지 않았을 뿐 원한다면 사용자가 직접 구성하는 것이 가능한데요,
Set up a NAT network
; https://learn.microsoft.com/en-us/virtualization/hyper-v-on-windows/user-guide/setup-nat-network

Hyper-V NAT w/ Linux VM
; https://medium.com/@mdavis332/hyper-v-nat-w-linux-vm-1d245be6ded1
예를 들어, 기존에 "HyperVInternal"이라는 Internal 유형의 네트워크가 있을 때,
호스트와 VM의 네트워크 설정이 각각 다음과 같다고 가정해 보겠습니다.
//////////////////// 호스트 측
C:\temp> ipconfig

...[생략]...

Ethernet adapter vEthernet (HyperVInternal):

   Connection-specific DNS Suffix  . :
   Link-local IPv6 Address . . . . . : fe80::e1cb:997b:a4a6:d7aa%61
   Autoconfiguration IPv4 Address. . : 169.254.215.170
   Subnet Mask . . . . . . . . . . . : 255.255.0.0
   Default Gateway . . . . . . . . . :

//////////////////// VM 측
C:\temp> ipconfig

...[생략]...

Ethernet adapter Ethernet:

   Connection-specific DNS Suffix  . : kornet
   Link-local IPv6 Address . . . . . : fe80::c564:42e0:8fb3:3d66%8
   Autoconfiguration IPv4 Address. . : 169.254.61.102
   Subnet Mask . . . . . . . . . . . : 255.255.0.0
   Default Gateway . . . . . . . . . :
그럼, 이 네트워크 영역을 NAT에 포함시킬 수 있습니다.
PS C:\temp> New-NetNat -Name "NATNetwork" -InternalIPInterfaceAddressPrefix 169.254.0.0/16

Name                             : NATNetwork
ExternalIPInterfaceAddressPrefix :
InternalIPInterfaceAddressPrefix : 169.254.0.0/16
IcmpQueryTimeout                 : 30
TcpEstablishedConnectionTimeout  : 1800
TcpTransientConnectionTimeout    : 120
TcpFilteringBehavior             : AddressDependentFiltering
UdpFilteringBehavior             : AddressDependentFiltering
UdpIdleSessionTimeout            : 120
UdpInboundRefresh                : False
Store                            : Local
Active                           : True
그런 다음, VM 측의 Default Gateway를 다음과 같이 호스트 측의 "vEthernet (HyperVInternal)" IP로 설정합니다.
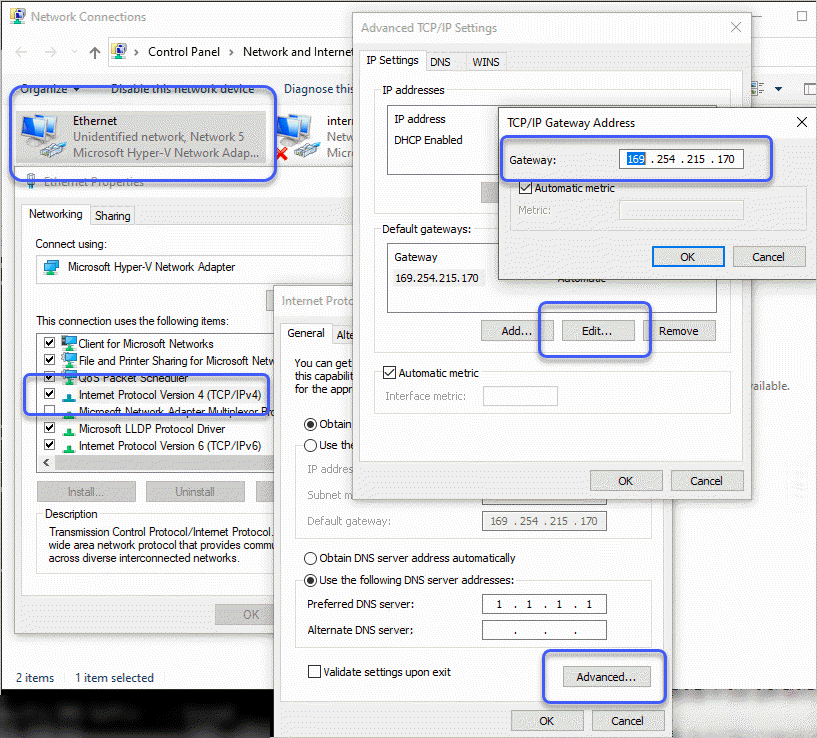
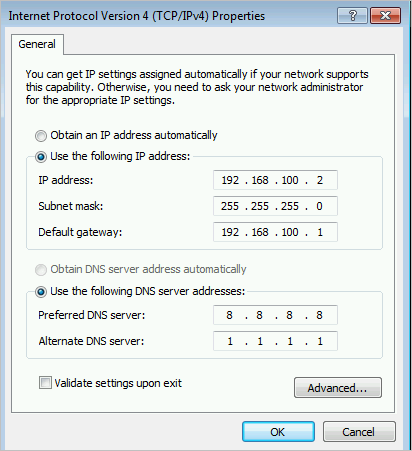
(위의 그림에서는, 고정 IP 할당 없이 default gateway를 설정하느라 "Advanced..." 기능을 통해 복잡하게 했지만, 고정 IP를 할당한다면 그냥 인터넷 속성 창에서 IP와 함께 Default gateway를 직접 지정해도 됩니다.)
이렇게 NAT으로 연결해 주면, 이제 VM의 Internal 네트워크는 호스트 측의 NAT 기능을 이용해 인터넷 영역으로 정상적으로 통신이 가능합니다. 게다가 일단 한 번 이렇게 설정해 두면, 이후의 VM들은 Default Gateway를 설정하는 것만으로 간단하게 Internal 유형으로 Internet 연결이 가능합니다.
참고로, "
Set up a NAT network" 글에서 다루는 PowerShell 명령어를 이번 기회에 익혀 보겠습니다. ^^
우선, Hyper-V의 가상 스위치를 관리 콘솔을 이용하지 않고도 다음과 같이 생성할 수 있습니다.
PS C:\Windows\System32> New-VMSwitch -SwitchName "HyperVInternal" -SwitchType Internal
그런 다음, 호스트 측의 (ipconfig을 이용해 알 수 있지만) vEthernet에 할당된 IP를 알아낼 수도 있고,
PS C:\Windows\System32> Get-NetIPAddress -InterfaceAlias "vEthernet (HyperVInternal)"

IPAddress         : fe80::e1cb:997b:a4a6:d7aa%61
InterfaceIndex    : 61
InterfaceAlias    : vEthernet (HyperVInternal)
AddressFamily     : IPv6
Type              : Unicast
PrefixLength      : 64
PrefixOrigin      : WellKnown
SuffixOrigin      : Link
AddressState      : Preferred
ValidLifetime     : Infinite ([TimeSpan]::MaxValue)
PreferredLifetime : Infinite ([TimeSpan]::MaxValue)
SkipAsSource      : False
PolicyStore       : ActiveStore

IPAddress         : 169.254.215.170
InterfaceIndex    : 61
InterfaceAlias    : vEthernet (HyperVInternal)
AddressFamily     : IPv4
Type              : Unicast
PrefixLength      : 16
PrefixOrigin      : WellKnown
SuffixOrigin      : Link
AddressState      : Preferred
ValidLifetime     : Infinite ([TimeSpan]::MaxValue)
PreferredLifetime : Infinite ([TimeSpan]::MaxValue)
SkipAsSource      : False
PolicyStore       : ActiveStore
혹은 강제로 설정할 수도 있습니다.
PS C:\Windows\System32> New-NetIPAddress -IPAddress 192.168.100.1 -PrefixLength 24 -InterfaceAlias "vEthernet (HyperVInternal)"

IPAddress         : 192.168.100.1
InterfaceIndex    : 65
InterfaceAlias    : vEthernet (NatTest)
AddressFamily     : IPv4
Type              : Unicast
PrefixLength      : 24
PrefixOrigin      : Manual
SuffixOrigin      : Manual
AddressState      : Tentative
ValidLifetime     : Infinite ([TimeSpan]::MaxValue)
PreferredLifetime : Infinite ([TimeSpan]::MaxValue)
SkipAsSource      : False
PolicyStore       : ActiveStore

IPAddress         : 192.168.100.1
InterfaceIndex    : 65
InterfaceAlias    : vEthernet (NatTest)
AddressFamily     : IPv4
Type              : Unicast
PrefixLength      : 24
PrefixOrigin      : Manual
SuffixOrigin      : Manual
AddressState      : Invalid
ValidLifetime     : Infinite ([TimeSpan]::MaxValue)
PreferredLifetime : Infinite ([TimeSpan]::MaxValue)
SkipAsSource      : False
PolicyStore       : PersistentStore

/*
또는, netsh을 이용해

netsh interface ip set address name="vEthernet (HyperVInternal)" static 192.168.100.1 255.255.255.0
*/
만약, 위와 같이 가상 스위치에 연결된 호스트 측의 어댑터 IP를 "192.168.100.1"로 지정한 Internal 네트워크에 대해 NAT 서비스를 제공하고 싶다면 New-NetNat 명령어를 다음과 같은 옵션으로 실행해야 합니다.
PS C:\Windows\System32> New-NetNat -Name "NATNetwork" -InternalIPInterfaceAddressPrefix 192.168.100.0/24

Name                             : NATNetwork
ExternalIPInterfaceAddressPrefix :
InternalIPInterfaceAddressPrefix : 192.168.100.0/24
IcmpQueryTimeout                 : 30
TcpEstablishedConnectionTimeout  : 1800
TcpTransientConnectionTimeout    : 120
TcpFilteringBehavior             : AddressDependentFiltering
UdpFilteringBehavior             : AddressDependentFiltering
UdpIdleSessionTimeout            : 120
UdpInboundRefresh                : False
Store                            : Local
Active                           : True
하지만 해당 LAN 어댑터가 DHCP 기능을 제공하는 것은 아니므로, VM은 여전히 "169.254.x.x" 등의 IP로 기본 설정되며 따라서 위와 같이 IP를 바꾼 경우에는 VM 측의 IP도 "192.168.100.x" 대역으로 직접 설정해야 합니다.
[이 글에 대해서 여러분들과 의견을 공유하고 싶습니다. 틀리거나 미흡한 부분 또는 의문 사항이 있으시면 언제든 댓글 남겨주십시오.]