Microsoft MVP성태의 닷넷 이야기
글쓴 사람
정성태 (techsharer at outlook.com)
홈페이지
첨부 파일
(연관된 글이 1개 있습니다.)

C# - FFmpeg.AutoGen 라이브러리를 이용한 기본 프로젝트 구성 - Windows Forms

지난 글에서는,

C# - FFmpeg.AutoGen 라이브러리를 이용한 기본 프로젝트 구성
; https://www.sysnet.pe.kr/2/0/12896

콘솔 프로젝트를 예로 들었으니, 이번에는 Windows Forms로 구성해 보겠습니다. 사실, 동일한 내용인데 그사이 뭔가 바뀐 것이 있을까 싶어 다시 정리합니다. ^^


우선 버전이 바뀌었군요. Windows Forms 기본 프로젝트를 생성하고 패키지 참조를 추가하면,

// https://www.nuget.org/packages/FFmpeg.AutoGen
Install-Package FFmpeg.AutoGen

현재(2023-04-20) 6.0 버전의 패키지가 참조됩니다. 이번에도 Native ffmpeg 바이너리는 포함돼 있지 않으므로 github repo에 있는 DLL들을 다운로드해,

FFmpeg.AutoGen/FFmpeg/bin/x64/
; https://github.com/Ruslan-B/FFmpeg.AutoGen/tree/master/FFmpeg/bin/x64

avcodec-60.dll
avdevice-60.dll
avfilter-9.dll
avformat-60.dll
avutil-58.dll
postproc-57.dll
swresample-4.dll
swscale-7.dll

프로젝트 경로의 ./FFmpeg/bin/x64 하위 디렉터리에 복사하고 "Copy to Output Directory" 값을 "Copy if newer"로 바꿔줍니다. 이후, "C# - FFmpeg.AutoGen 라이브러리를 이용한 기본 프로젝트 구성" 글에서 추가했던 것과 마찬가지로 FFmpegBinariesHelper 타입을 추가해,

using FFmpeg.AutoGen;
using System.Runtime.InteropServices;

namespace FFmpegAutoGen;

public class FFmpegBinariesHelper
{
    internal static void RegisterFFmpegBinaries()
    {
        if (RuntimeInformation.IsOSPlatform(OSPlatform.Windows))
        {
            var current = Environment.CurrentDirectory;
            var probe = Path.Combine("FFmpeg", "bin", Environment.Is64BitProcess ? "x64" : "x86");

            while (current != null)
            {
                var ffmpegBinaryPath = Path.Combine(current, probe);

                if (Directory.Exists(ffmpegBinaryPath))
                {
                    Console.WriteLine($"FFmpeg binaries found in: {ffmpegBinaryPath}");
                    ffmpeg.RootPath = ffmpegBinaryPath;
                    return;
                }

                current = Directory.GetParent(current)?.FullName;
            }
        }
        else if (RuntimeInformation.IsOSPlatform(OSPlatform.Linux))
        {
            ffmpeg.RootPath = "/lib/x86_64-linux-gnu/";
        }
        else
        {
            throw new NotSupportedException(); // fell free add support for platform of your choose
        }
    }
}

Program.cs 파일에서 호출만 하면 됩니다.

using FFmpeg.AutoGen;
using FFmpegAutoGen;

namespace WinFormsApp1
{
    internal static class Program
    {
        [STAThread]
        static void Main()
        {
            FFmpegBinariesHelper.RegisterFFmpegBinaries();

#if DEBUG
            System.Diagnostics.Trace.WriteLine($"FFmpeg version info: {ffmpeg.av_version_info()}");
#endif

            ApplicationConfiguration.Initialize();
            Application.Run(new Form1());
        }
    }
}

F5 디버깅을 하면 Output 창에 다음과 같은 디버깅 메시지가 나와야 합니다.

FFmpeg version info: 6.0-full_build-www.gyan.dev

(첨부 파일은 이 글의 예제 코드를 포함합니다.)


마지막으로, 매번 저런 식으로 프로젝트를 구성하는 것이 귀찮을 것이므로, "Project" / "Export Template..." 메뉴를 선택(참고: "Make a template for your template; profit")해 현재 구성의 프로젝트를,

ffmpeg_prj_template_1.png

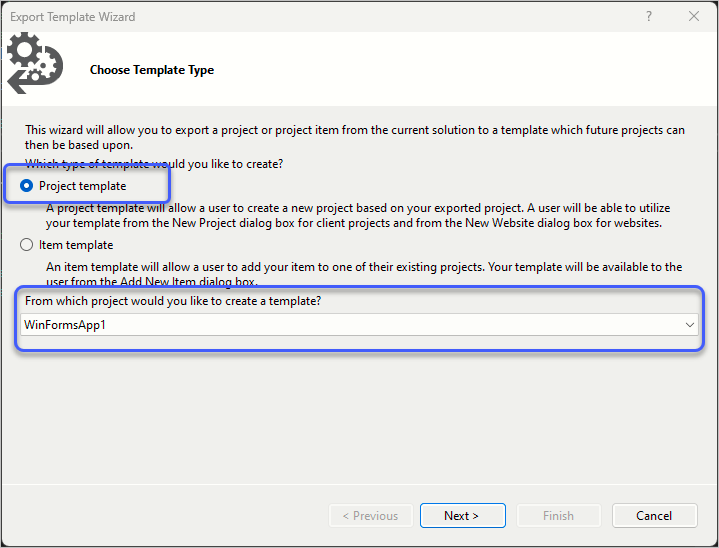
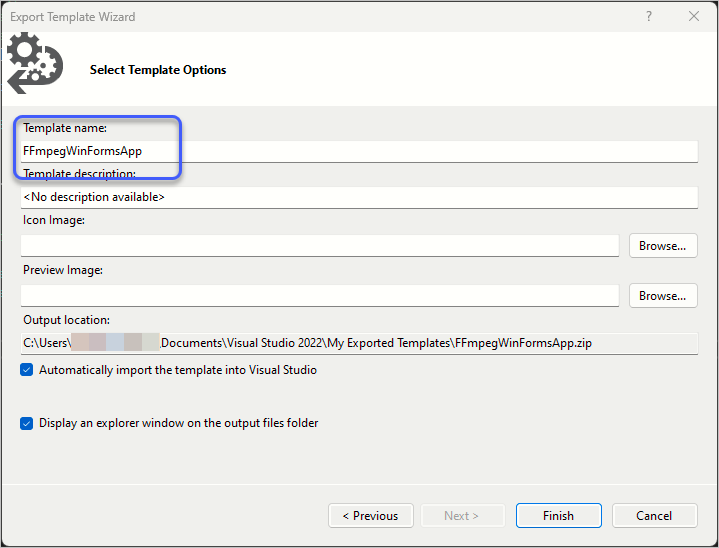
적당한 이름의 Project Template으로 만들어주면,

ffmpeg_prj_template_2.png

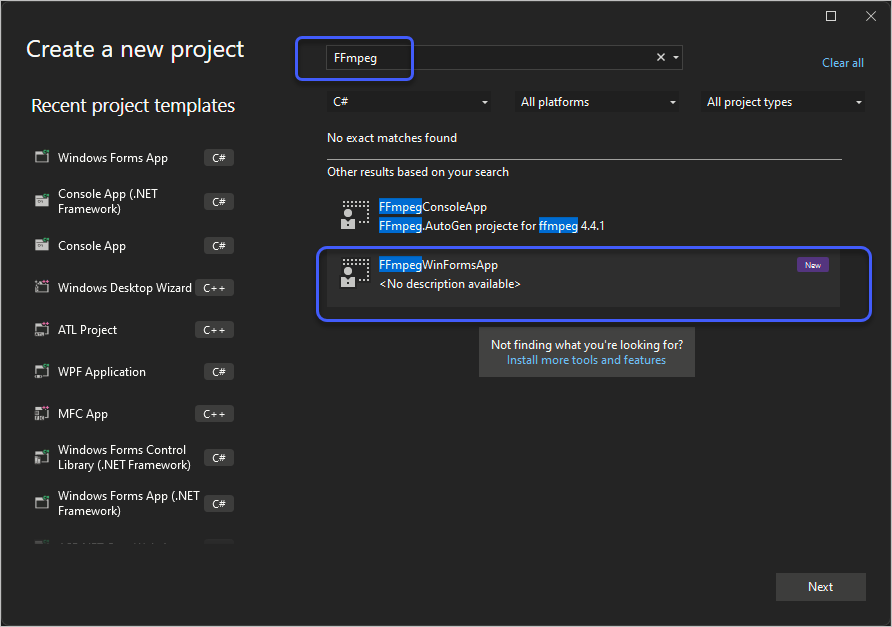
이후 "새 프로젝트"를 만들 때 다음과 같이 편하게 FFmpeg 구성의 Windows Forms 프로젝트를 만들 수 있습니다. ^^

ffmpeg_prj_template_3.png


[이 글에 대해서 여러분들과 의견을 공유하고 싶습니다. 틀리거나 미흡한 부분 또는 의문 사항이 있으시면 언제든 댓글 남겨주십시오.]

[연관 글]


[최초 등록일: ]
[최종 수정일: 11/24/2023]

Creative Commons License
이 저작물은 크리에이티브 커먼즈 코리아 저작자표시-비영리-변경금지 2.0 대한민국 라이센스에 따라 이용하실 수 있습니다.
by SeongTae Jeong, mailto:techsharer at outlook.com

비밀번호

댓글 작성자


... 91  92  93  94  95  96  97  98  99  100  [101]  102  103  104  105  ...
NoWriterDateCnt.TitleFile(s)
11407정성태12/18/201724247.NET Framework: 712. C# - SharpDX + DXGI를 이용한 윈도우 화면 캡처 소스 코드 + Direct2D 출력 + OpenCV [1]파일 다운로드1
11406정성태12/17/201746662.NET Framework: 711. C# - OpenCvSharp의 Mat 데이터 조작 방법 [5]파일 다운로드1
11405정성태12/17/201742679.NET Framework: 710. C# - OpenCvSharp을 이용한 Webcam 영상 처리 + Direct2D [1]파일 다운로드1
11404정성태12/16/201729946.NET Framework: 709. C# - OpenCvSharp을 이용한 동영상(avi, mp4, ...) 처리 + Direct2D [7]파일 다운로드1
11403정성태12/16/201732539.NET Framework: 708. C# - OpenCvSharp을 이용한 동영상(avi, mp4, ...) 처리 [3]파일 다운로드1
11402정성태12/15/201737177.NET Framework: 707. OpenCV 응용 프로그램을 C#으로 구현 - OpenCvSharp [2]파일 다운로드1
11401정성태12/15/201726106.NET Framework: 706. C# - SharpDX + DXGI를 이용한 윈도우 화면 캡처 소스 코드 + Direct2D 출력 [2]파일 다운로드1
11400정성태12/14/201728975.NET Framework: 705. C# - SharpDX + DXGI를 이용한 윈도우 화면 캡처 소스 코드 [9]파일 다운로드1
11399정성태12/13/201717614.NET Framework: 704. Win32 API의 UnionRect를 닷넷 BCL의 Rectangle.Union으로 바꿀 때 주의 사항
11398정성태12/13/201717818오류 유형: 442. ASP.NET Core Web Application (on .NET Framework) 프로젝트에서 외부 라이브러리 동적 로드 시 런타임 버전 문제파일 다운로드1
11397정성태12/12/201720416.NET Framework: 703. 양자 컴퓨팅을 위한 마이크로소프트의 Q# 언어
11396정성태12/8/201742806개발 환경 구성: 343. Visual Studio - 리눅스 용 프로젝트의 인텔리센스를 위한 헤더 파일 처리 방법 [3]
11395정성태12/8/201718637오류 유형: 441. 이벤트 로그 - Time Provider NtpClient: No valid response has been received from domain controller
11394정성태12/8/201718275개발 환경 구성: 342. 비주얼 스튜디오에서 실행하던 ASP.NET Core (.NET Framework) 응용 프로그램을 명령행에서 실행하는 방법
11393정성태12/7/201722845Windows: 145. 윈도우 10 빌드 17046부터 WSL에서 백그라운드 작업 지원 [5]
11392정성태12/7/201718085개발 환경 구성: 341. openSUSE에 닷넷 코어 설치
11391정성태12/7/201720938개발 환경 구성: 340. WSL을 이용해 윈도우 PC 1대에서 openSUSE 응용 프로그램을 Visual Studio로 개발하는 방법 [1]
11390정성태12/7/201729590개발 환경 구성: 339. WSL을 이용해 윈도우 PC 1대에서 Linux 응용 프로그램을 Visual Studio로 개발하는 방법 [6]
11389정성태12/7/201718267오류 유형: 440. .NET Core 오류 - 0x80131620 Unable to load DLL 'libuv'
11388정성태12/6/201721904개발 환경 구성: 338. WSL 또는 Ubuntu에 닷넷 코어 설치 [3]
11387정성태12/6/201722259오류 유형: 439. 이벤트 로그 - Data Sharing Service 서비스의 %%3239247874 오류 메시지
11386정성태12/5/201717836오류 유형: 438. Hyper-V - '...' failed to add device 'Virtual CD/DVD Disk'
11385정성태12/5/201730945VC++: 121. DXGI를 이용한 윈도우 화면 캡처 소스 코드(Visual C++) [16]파일 다운로드1
11384정성태12/5/201720238오류 유형: 437. Visual C++ - Cannot open include file: 'SDKDDKVer.h'
11383정성태12/4/201723328디버깅 기술: 110. 비동기 코드 실행 중 예외로 인한 ASP.NET 프로세스 비정상 종료 현상 [1]
11382정성태12/4/201721895오류 유형: 436. System.Data.SqlClient.SqlException (0x80131904): Connection Timeout Expired 예외 발생 시 "[Pre-Login] initialization=48; handshake=1944;" 값의 의미
... 91  92  93  94  95  96  97  98  99  100  [101]  102  103  104  105  ...