C# - 구글 OAuth의 JWT (JSON Web Tokens) 해석
지난 글에서,
C# - Google 로그인 연동 (ASP.NET 예제)
; https://www.sysnet.pe.kr/2/0/13622
기왕에 구글 OAuth로부터 JWT를 구했으니, 재미 삼아 해당 정보를 GoogleJsonWebSignature.ValidateAsync 메서드에 의존하지 않고 파싱을 해보겠습니다.
우선, ExchangeCodeForTokenAsync 메서드가 반환한 IdToken이 담고 있는 JWT 값은 "." 문자를 기준으로 3개의 base64 문자열 구획으로 나뉩니다.
eyJhbGciOi---[생략]---iOiJKV1QifQ.eyJpc3MiO---[생략]---MTU1NTI5fQ.Dmd_yu---[생략]---IvYsCg
첫 번째와 두 번째를 base64 디코딩하면 각각 이런 결과가 나옵니다. (보기 좋게 들여 쓰기를 했을 뿐 실제로는 한 줄입니다.)
// JWT Header

{
    "alg":"RS256",
    "kid":"ac3e3e558111c7c7a75c5b65134d22f63ee006d0",
    "typ":"JWT"
}
// JWT data

{
    "iss":"https://accounts.google.com",
    "azp":"...client_id...",
    "aud":"...client_id...",
    "sub":"...user_subject...",
    "email":"...",
    "email_verified":true,
    "at_hash":"Vof-...[생략]..._kQ",
    "iat":1715151929,
    "exp":1715155529
}
세 번째의 경우에는 signature로 첫 번째 디코딩의 "alg"에 지정한 서명 알고리즘을 사용해 JWT의 header 및 data가 위/변조되지 않았음을 확인하는 용도입니다.
자, 그럼 이것을 C# 코드로 확인해 볼까요? ^^ 이에 대해서는 다음의 글에서 대충 뼈대를 가져올 수 있습니다.
Verifying JWT signed with the RS256 algorithm using public key in C#
; https://stackoverflow.com/questions/34403823/verifying-jwt-signed-with-the-rs256-algorithm-using-public-key-in-c-sharp
시작은 우선, 3개의 dot으로 문자열을 나누고 헤더 먼저 Base64 decode를 하면 될 듯한데,
string text = File.ReadAllText(@"C:\temp\jwt_sample.txt");
string[] tokens = text.Split('.');

byte [] header = Convert.FromBase64String(tokens[0]); // 예외 발생
의외로 이런 오류가 발생합니다.
System.FormatException: 'The input is not a valid Base-64 string as it contains a non-base 64 character, more than two padding characters, or an illegal character among the padding characters.'
이에 대해 검색해 보면 JWT는 평범한 Base64가 아닌 Base64Url 인코딩을 한 거라고 합니다. ^^;
base64url encoding
; https://brockallen.com/2014/10/17/base64url-encoding/
그래서 위의 글에서 공개한 소스코드로, (또는 ASP.NET Core의 경우
WebEncoders, 또는
Base64UrlTextEncoder를 이용해,)
// 또는, ASP.NET인 경우 HttpServerUtility.UrlTokenEncode를 이용하거나,
// 또는, Katana의 Microsoft.Owin.Security 어셈블리에서 제공하는 Base64UrlTextEncoder를 이용
public static class Base64Url
{
    public static string Encode(byte[] arg)
    {
        string s = Convert.ToBase64String(arg); // Standard base64 encoder

        s = s.Split('=')[0]; // Remove any trailing '='s
        s = s.Replace('+', '-'); // 62nd char of encoding
        s = s.Replace('/', '_'); // 63rd char of encoding

        return s;
    }

    public static byte[] Decode(string arg)
    {
        string s = arg;
        s = s.Replace('-', '+'); // 62nd char of encoding
        s = s.Replace('_', '/'); // 63rd char of encoding

        switch (s.Length % 4) // Pad with trailing '='s
        {
            case 0: break; // No pad chars in this case
            case 2: s += "=="; break; // Two pad chars
            case 3: s += "="; break; // One pad char
            default: throw new Exception("Illegal base64url string!");
        }

        return Convert.FromBase64String(s); // Standard base64 decoder
    }
}
다음과 같이 처리할 수 있습니다.
string text = File.ReadAllText(@"C:\temp\test.txt");
string[] tokens = text.Split('.');

byte [] header = Base64Url.Decode(tokens[0]);
JwtHeader jwtHeader = JwtHeader.Parse(header);

public struct JwtHeader
{
    public string alg { get; set; } = "";
    public string kid { get; set; } = "";
    public string typ { get; set; } = "";

    public JwtHeader() { }

    public static JwtHeader Parse(byte[] header)
    {
        return JsonSerializer.Deserialize<JwtHeader>(header);
    }
}
같은 방식으로 두 번째 파트인 JWT data 영역도 구합니다.
byte[] data = Base64Url.Decode(tokens[1]);
JwtData jwtData = JwtData.Parse(data);

// https://developers.google.com/identity/openid-connect/openid-connect?hl=ko#an-id-tokens-payload
public struct JwtData
{
    public string iss { get; set; } = "";
    public string azp { get; set; } = "";
    public string aud { get; set; } = "";
    public string sub { get; set; } = "";
    public string email { get; set; } = "";
    public bool email_verified { get; set; }
    public string at_hash { get; set; }
    public string name { get; set; } = "";
    public string picture { get; set; } = "";
    public string given_name { get; set; } = "";
    public int iat { get; set; }
    public int exp { get; set; }

    public JwtData() { }

    public static JwtData Parse(byte[] data)
    {
        return JsonSerializer.Deserialize<JwtData>(data);
    }
}
마지막으로 세 번째 파트인데요, 여기 담겨 있는 값은 구글 측에서 앞선 2개의 파트를 자신들이 소유한 개인키로 서명한 해시값에 불과합니다. 따라서, 위/변조를 걱정하지 않는다면 그냥 생략하고 넘어가도 됩니다. 하지만, 이것은 비밀번호를 평문으로 데이터베이스에 저장하는 것과 유사한 보안 결함을 가질 수 있으므로 특별한 이유가 없다면 꼭 체크하는 것이 권장됩니다.
그렇다면 이제 필요한 것은 구글이 서명에 사용한 개인키에 대한 공개키를 구해야 합니다. 위의 JWT 구조를 보면 아시겠지만 이 값은 payload에 포함돼 있지 않습니다.
대신, JWT data의 iss 필드에 기록된,
{
    "iss":"https://accounts.google.com",
    "azp":"...client_id...",
    ...[생략]...
    "exp":1715155529
}
경로에서 ".well-known/openid-configuration" 상대 경로를 덧붙여 접근할 수 있는 데이터에서 공개키 정보를 갖는 경로를 구할 수 있습니다. 그래서 다음과 같이 HTTP 요청을 보내서,
string iss = $"{payload.iss}/.well-known/openid-configuration";
var httpClient = new HttpClient();
text = await httpClient.GetStringAsync(iss);
받아온 text는 다음과 같은 식이고,
{
 "issuer": "https://accounts.google.com",
 "authorization_endpoint": "https://accounts.google.com/o/oauth2/v2/auth",
 "device_authorization_endpoint": "https://oauth2.googleapis.com/device/code",
 "token_endpoint": "https://oauth2.googleapis.com/token",
 "userinfo_endpoint": "https://openidconnect.googleapis.com/v1/userinfo",
 "revocation_endpoint": "https://oauth2.googleapis.com/revoke",
 "jwks_uri": "https://www.googleapis.com/oauth2/v3/certs",
 "response_types_supported": [
  "code",
  "token",
  "id_token",
  "code token",
  "code id_token",
  "token id_token",
  "code token id_token",
  "none"
 ],
 ...[생략]...
}
바로 저 "jwks_uri" 필드가 담고 있는 "
https://www.googleapis.com/oauth2/v3/certs" 경로로 공개키를 조회해 올 수 있습니다.
OpenIdConfig idConfig = OpenIdConfig.Parse(text);
text = await httpClient.GetStringAsync(idConfig.jwks_uri);

public class OpenIdConfig
{
    public string issuer { get; set; } = "";
    public string authorization_endpoint { get; set; } = "";
    public string device_authorization_endpoint { get; set; } = "";
    public string token_endpoint { get; set; } = "";
    public string userinfo_endpoint { get; set; } = "";
    public string revocation_endpoint { get; set; } = "";
    public string jwks_uri { get; set; } = "";

    public string[] response_types_supported { get; set; } = Array.Empty<string>();
    public string[] subject_types_supported { get; set; } = Array.Empty<string>();
    public string[] id_token_signing_alg_values_supported { get; set; } = Array.Empty<string>();
    public string[] scopes_supported { get; set; } = Array.Empty<string>();
    public string[] token_endpoint_auth_methods_supported { get; set; } = Array.Empty<string>();
    public string[] claims_supported { get; set; } = Array.Empty<string>();
    public string[] code_challenge_methods_supported { get; set; } = Array.Empty<string>();
    public string[] grant_types_supported { get; set; } = Array.Empty<string>();

    public OpenIdConfig() { }

    public static OpenIdConfig Parse(string data)
    {
        return Parse(Encoding.UTF8.GetBytes(data));
    }

    public static OpenIdConfig Parse(byte[] data)
    {
        return JsonSerializer.Deserialize<OpenIdConfig>(data);
    }
}
이렇게 받아온 text는 이런 식으로 값이 채워져 있습니다.
{
  "keys": [
    {
      "kid": "ac3e3e558111c7c7a75c5b65134d22f63ee006d0",
      "e": "AQAB",
      "n": "puQJMii881LWwQ_OY2pOZx9RJTtpmUhAn2Z4_zrbQ9WmQqld0ufKesvwIAmuFIswzfOWxv1-ijZWwWrVafZ3MOnoB_UJFgjCPwJyfQiwwNMK80MfEm7mDO0qFlvrmLhhrYZCNFXYKDRibujCPF6wsEKcb3xFwBCH4UFaGmzsO0iJiqD2qay5rqYlucV4-kAIj4A6yrQyXUWWTlYwedbM5XhpuP1WxqO2rjHVLmwECUWqEScdktVhXXQ2CW6zvvyzbuaX3RBkr1w-J2U07vLZF5-RgnNjLv6WUNUwMuh-JbDU3tvmAahnVNyIcPRCnUjMk03kTqbSkZfu6sxWF0qNgw",
      "kty": "RSA",
      "alg": "RS256",
      "use": "sig"
    },
    {
      "e": "AQAB",
      "kid": "a3b762f871cdb3bae0044c649622fc1396eda3e3",
      "n": "uBHF-esPKiNlFaAvpdpejD4vpONW9FL0rgLDg1z8Q-x_CiHCvJCpiSehD41zmDOhzXP_fbMMSGpGL7R3duiz01nK5r_YmRw3RXeB0kcS7Z9H8MN6IJcde9MWbqkMabCDduFgdr6gvH0QbTipLB1qJK_oI_IBfRgjk6G0bGrKz3PniQw5TZ92r0u1LM-1XdBIb3aTYTGDW9KlOsrTTuKq0nj-anW5TXhecuxqSveFM4Hwlw7pw34ydBunFjFWDx4VVJqGNSqWCfcERxOulizIFruZIHJGkgunZnB4DF7mCZOttx2dwT9j7s3GfLJf0xoGumqpOMvecuipfTPeIdAzcQ",
      "alg": "RS256",
      "kty": "RSA",
      "use": "sig"
    }
  ]
}
RSA 키에 대충 아시는 분이라면, "n"이 "Modulus" 값이고, "e"가 "Exponent"임을 감각적으로 추측할 수 있을 것입니다.
그래서 위의 결과는 2개의 공개키를 담고 있는데, 어떤 것을 선택할지는 첫 번째 JWT 헤더에,
{
    "alg":"RS256",
    "kid":"ac3e3e558111c7c7a75c5b65134d22f63ee006d0",
    "typ":"JWT"
}
명시된 key id와 일치하는 걸로 구하면 됩니다. 즉, 위의 결과에서는 첫 번째 공개키에 있는 n과 e 값을 이용해 RSA 타입을 초기화시켜 서명 검증을 할 수 있습니다.
// Verifying JWT signed with the RS256 algorithm using public key in C#
// ; https://stackoverflow.com/questions/34403823/verifying-jwt-signed-with-the-rs256-algorithm-using-public-key-in-c-sharp

GoogleOAuth2Certs certInfo = GoogleOAuth2Certs.Parse(text);

byte[] signature = Base64Url.Decode(tokens[2]);

RSACryptoServiceProvider? rsa = certInfo.Get(jwt.kid);
ArgumentNullException.ThrowIfNull(rsa);

// JWT header와 body를 다시 해시하고,
SHA256 sha256 = SHA256.Create();
byte[] hash = sha256.ComputeHash(Encoding.UTF8.GetBytes(tokens[0] + '.' + tokens[1]));

RSAPKCS1SignatureDeformatter rsaDeformatter = new RSAPKCS1SignatureDeformatter(rsa);
rsaDeformatter.SetHashAlgorithm("SHA256");

// 그 해시한 값과 signature에 담긴 값을 비교해,
bool result = rsaDeformatter.VerifySignature(hash, signature);

Console.WriteLine(result); // result == True가 나와야 위/변조가 되지 않았음을 확신

public class GoogleOAuth2Certs
{
    public JwtPublicKey[] keys { get; set; } = Array.Empty<JwtPublicKey>();

    public RSACryptoServiceProvider? Get(string id)
    {
        foreach (var key in keys)
        {
            if (key.kid == id)
            {
                RSACryptoServiceProvider rsa = new RSACryptoServiceProvider();
                rsa.ImportParameters(
                  new RSAParameters()
                  {
                      Modulus = Base64Url.Decode(key.n),
                      Exponent = Base64Url.Decode(key.e),
                  });

                return rsa;
            }
        }

        return null;
    }

    public GoogleOAuth2Certs() { }

    public static GoogleOAuth2Certs Parse(string data)
    {
        return Parse(Encoding.UTF8.GetBytes(data));
    }

    public static GoogleOAuth2Certs Parse(byte[] data)
    {
        return JsonSerializer.Deserialize<GoogleOAuth2Certs>(data);
    }
}

public struct JwtPublicKey
{
    public string kid { get; set; } = "";
    public string e { get; set; } = "";
    public string n { get; set; } = "";
    public string kty { get; set; } = "";
    public string alg { get; set; } = "";
    public string use { get; set; } = "";

    public JwtPublicKey() { }
}
정상적인 경우라면, RSAPKCS1SignatureDeformatter.VerifySignature 메서드의 반환 결과는 "True"가 나와야 합니다.
(
첨부 파일은 이 글의 예제 코드를 포함합니다.)
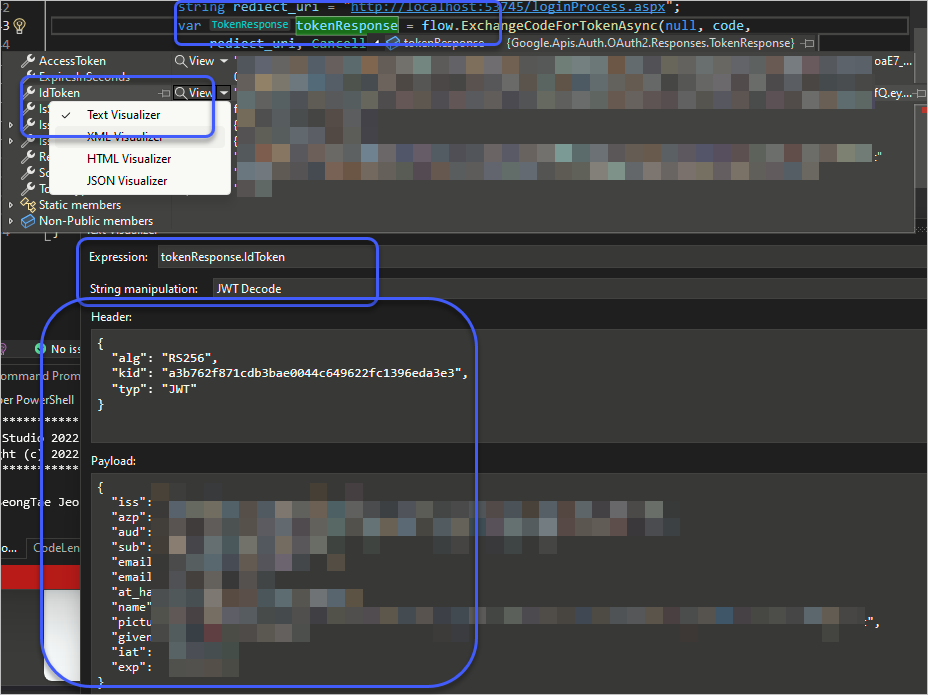
참고로, Visual Studio의 디버깅 중에 필드 값을 확인할 수 있는 Text Visualizer는
JWT 디코딩을 지원하기 때문에,
Debugging Encoded Text
; https://devblogs.microsoft.com/visualstudio/debugging-encoded-text/
지난 ASP.NET 예제를 실행시켰을 때 (JWT 데이터를 담고 있는) IdToken을 아래 화면처럼 직접 디버깅 중에 확인하는 것도 가능합니다.
[이 글에 대해서 여러분들과 의견을 공유하고 싶습니다. 틀리거나 미흡한 부분 또는 의문 사항이 있으시면 언제든 댓글 남겨주십시오.]