Xamarin.Forms - 1. Forms 시작하기
이번에 Xamarin이 버전 3을 발표하면서 물건을 내놨습니다. ^^ 바로 Xamarin.Forms 인데요. 기존의 Xamarin 앱이 C# 문법만을 사용했을 뿐 각각의 플랫폼(iOS, Android)에서 앱을 만들려면 고유의 User Interface 관련 API를 익혀야 했습니다.
하지만, Xamarin.Forms가 나오면서 이런 상황이 바뀝니다. 물론, 앱은 각각의 플랫폼 별로 프로젝트가 있어야 하지만 UI 요소만큼은 Xamarin.Forms를 이용해 공통화했습니다. 게다가 플랫폼도 기존의 iOS, Android와 함께 Windows Phone (8.0 이상)까지 지원을 넓혔습니다. 한마디로, 1타 3피의 성과를 낼 수 있는데 예전 같으면 이런 경우 "Web App"을 이용해야 했지만 Xamarin을 통해 빠른 속도의 앱을 보장하면서도 3가지 주요 모바일 플랫폼을 지원할 수 있게 된 것입니다.
Xamarin.Forms 소개를 어떻게 할까 고민하던 중에 외국 블로거가 이미 쓰고 있어서, 이를 적당히 참고해서 소개하겠습니다. ^^
Learning Xamarin - Part 1: Forms
; http://blog.falafel.com/Blogs/jesse-liberty/2014/06/11/learning-xamarin---part-1-forms
어차피 Xamarin을 구매할 정도의 국내 업체라면 Visual Studio도 충분히 구비하고 있을 것이라 생각됩니다. 따라서 이 글에서는 Xamarin Studio를 이용하기 보다는 Visual Studio를 이용해 실습을 진행하겠습니다. (사실, 어느 걸로 해도 상관없습니다. 단지, Visual Studio의 에디터가 더 훌륭하기 때문에 선택한 것일뿐.)
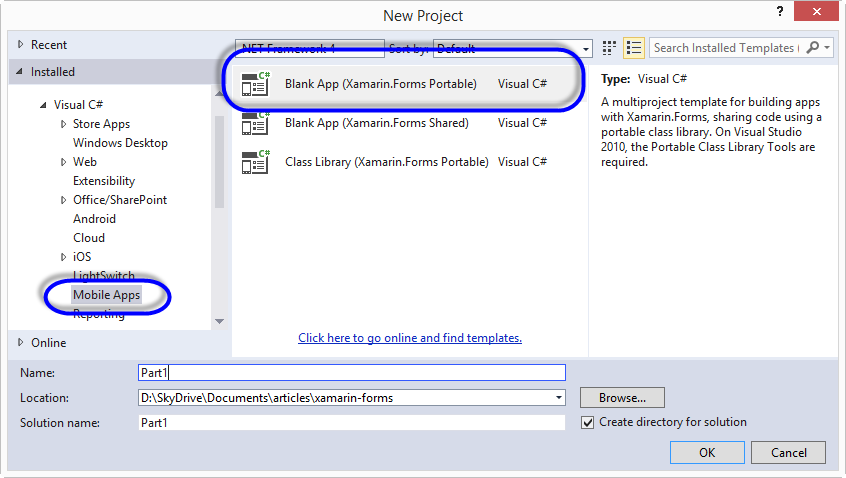
Xamarin 3을 설치한 다음 Visual Studio 2013에서 새 프로젝트를 만들면 다음과 같이 "Mobile Apps" 영역에서 Xamarin.Forms 관련 프로젝트를 선택할 수 있습니다. 이 중에서 앱을 만들 것이기 때문에 "Blank App (Xamarin.Forms Portable)"로 프로젝트를 시작하겠습니다.
프로젝트를 생성하면 다음과 같이 총 4개의 프로젝트가 만들어집니다.
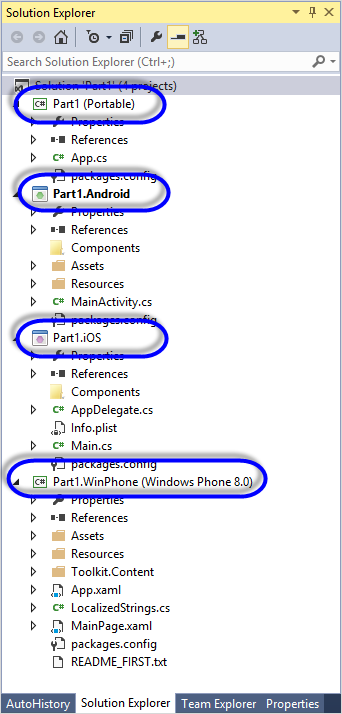
아하~~~ 이제 알겠습니다. ^^ 각각의 개별 Mobile App 플랫폼 별로 프로젝트가 생성되고, 공통 Form 관련 프로젝트(위에서는 Part1 프로젝트)가 있습니다. 즉, UI 관련 프로젝트를 3개의 모바일 폴랫폼에서 공유할 수 있도록 하는 것입니다. (일단, 제 컴퓨터에서는 iOS를 빌드할 수 있는 맥이 없으므로 Part1.iOS 프로젝트는 제거하겠습니다.)
예제를 위해 다음과 같은 데이터 클래스를 (Portable) 프로젝트에 만듭니다.
public class Monkey
{
    public string Name {get;set;}
    public string Location { get; set; }
    public string Details { get; set; }
}
이것을 Xamarin.Form과 연결해 줄 방법으로 "
Learning Xamarin - Part 1: Forms" 글에서는 MVVM을 사용하고 있습니다. 3개의 모바일 플랫폼 유형에서 UI Form만 공유할 것이기 때문에 MVVM 방식은 꽤나 멋진 접근법이 될 수 있습니다.
따라서 MonkeysViewModel.cs 파일을 추가하고 다음의 코드를 추가합니다.
using Part1;
using System;
using System.Collections.Generic;
using System.Collections.ObjectModel;
using System.Linq;
using System.Text;
using System.Threading.Tasks;

namespace Monkeys.ViewModels
{
    public class MonkeysViewModel
    {
        public ObservableCollection<Monkey> Monkeys { get; set; }

        public MonkeysViewModel()
        {
            Monkeys = new ObservableCollection<Monkey>();
            Monkeys.Add(new Monkey
            {
                Name = "Baboon",
                Location = "Africa & Asia",
                Details = "Baboons are African and Arabian Old World monkeys belonging to the genus Papio, part of the subfamily Cercopithecinae."
            });

            Monkeys.Add(new Monkey
            {
                Name = "Capuchin Monkey",
                Location = "Central & South America",
                Details = "The capuchin monkeys are New World monkeys of the subfamily Cebinae. Prior to 2011, the subfamily contained only a single genus, Cebus."
            });

            Monkeys.Add(new Monkey
            {
                Name = "Blue Monkey",
                Location = "Central and East Africa",
                Details = "The blue monkey or diademed monkey is a species of Old World monkey native to Central and East Africa, ranging from the upper Congo River basin east to the East African Rift and south to northern Angola and Zambia"
            });


            Monkeys.Add(new Monkey
            {
                Name = "Squirrel Monkey",
                Location = "Central & South America",
                Details = "The squirrel monkeys are the New World monkeys of the genus Saimiri. They are the only genus in the subfamily Saimirinae. The name of the genus Saimiri is of Tupi origin, and was also used as an English name by early researchers."
            });

            Monkeys.Add(new Monkey
            {
                Name = "Golden Lion Tamarin",
                Location = "Brazil",
                Details = "The golden lion tamarin also known as the golden marmoset, is a small New World monkey of the family Callitrichidae."
            });

            Monkeys.Add(new Monkey
            {
                Name = "Howler Monkey",
                Location = "South America",
                Details = "Howler monkeys are among the largest of the New World monkeys. Fifteen species are currently recognized. Previously classified in the family Cebidae, they are now placed in the family Atelidae."
            });

            Monkeys.Add(new Monkey
            {
                Name = "Japanese Macaque",
                Location = "Japan",
                Details = "The Japanese macaque, is a terrestrial Old World monkey species native to Japan. They are also sometimes known as the snow monkey because they live in areas where snow covers the ground for months each"
            });

            Monkeys.Add(new Monkey
            {
                Name = "Mandrill",
                Location = "Southern Cameroon, Gabon, Equatorial Guinea, and Congo",
                Details = "The mandrill is a primate of the Old World monkey family, closely related to the baboons and even more closely to the drill. It is found in southern Cameroon, Gabon, Equatorial Guinea, and Congo."
            });

            Monkeys.Add(new Monkey
            {
                Name = "Proboscis Monkey",
                Location = "Borneo",
                Details = "The proboscis monkey or long-nosed monkey, known as the bekantan in Malay, is a reddish-brown arboreal Old World monkey that is endemic to the south-east Asian island of Borneo."
            });
        }
    }
}
데이터가 마련되었으니, 이제 3개의 프로젝트(여기서는 iOS제외 2개)에서 공통적으로 사용할 페이지를 만들어 보겠습니다. 역시 (Portable) 프로젝트에 MonkeyPage.cs 파일을 추가하고 코드를 만들어 줍니다.
using Monkeys.ViewModels;
using Xamarin.Forms;

namespace Part1
{
    public class MonkeyPage : ContentPage
    {
        public MonkeyPage()
        {
            Title = "Monkeys";

            var list = new ListView();

            var viewModel = new MonkeysViewModel();
            list.ItemsSource = viewModel.Monkeys;

            var cell = new DataTemplate(typeof(TextCell));

            cell.SetBinding(TextCell.TextProperty, "Name");
            cell.SetBinding(TextCell.DetailProperty, "Location");

            list.ItemTemplate = cell;

            Content = list;
        }
    }
}
위의 코드를 이해하려면 WPF를 알고 있어야 합니다. 왜냐하면 Xamarin.Forms는 이름과는 달리 윈도우 폼이 아닌 WPF 방식을 채택하고 있기 때문입니다. (여기서 WPF에 대한 설명을 하는 것은 어렵기 때문에 넘어가겠습니다. ^^)
자, 이제 이렇게 만들어진 앱 페이지를 각각의 플랫폼 프로젝트에서 사용해야겠지요. ^^
그 방법은 (Portable) 프로젝트의 App.cs에 정의된 GetMainPage가 해결해 줍니다. 즉, 3개의 앱 프로젝트는 (Portable) 프로젝트의 App.GetMainPage가 반환하는 페이지를 화면에 보여주는 것입니다. 따라서, 다음과 같이 App.cs 코드를 (기존 내용은 지우고) 구성하면 됩니다.
using Xamarin.Forms;

namespace Part1
{
    public class App
    {
        public static Page GetMainPage()
        {
            var monkeys = new MonkeyPage();
            return new NavigationPage(monkeys);

        }
    }
}
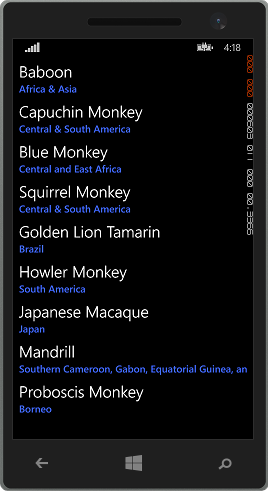
끝입니다. 여기까지 코드를 구성했으면 이제 "Part1.WinPhone (Windows Phone 8.0)" 프로젝트를 빌드하고 (에뮬레이터로) 실행하면 이렇게 보입니다.
이어서 "Part1.Android" 프로젝트를 빌드하고 (에뮬레이터로) 실행하면 이렇게 보입니다.
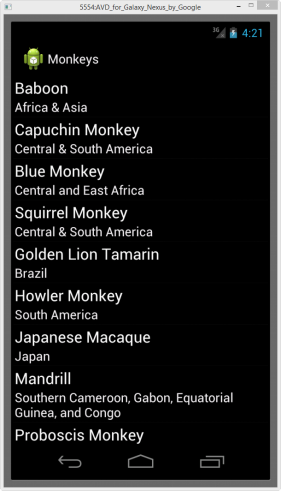
오... 그렇군요. 안타깝지만 아직 UI를 똑같이 보여주지는 않습니다. ^^ 따지고 보면, 윈폰에서 Detail 속성의 텍스트가 파란색으로 나오는 것이 오히려 이상합니다. 위의 코드에 보면 우리는 파란색이 나오라고 지정한 것이 없기 때문입니다. 아마도 Xamarin 측에서 TextCell.DetailProperty를 자동으로 파란색으로 바인딩하는 것 같은데, 그 처리를 안드로이드에서는 아직 구현을 못한 것 같습니다.
첫 페이지는 그렇게 했고, 그럼 다른 페이지로의 네비게이션은 어떻게 할 수 있을까요? 이를 위해 ListView 컨트롤의 항목을 눌렀을 때 상세 페이지로 넘어가는 것을 "
Learning Xamarin - Part 1: Forms"글에 설명된 데로 구현해 보겠습니다.
우선, MonkeyPage 만들때처럼 ContentPage를 상속받는 DetailPage.cs를 (Portable) 프로젝트에 추가합니다.
using Xamarin.Forms;

namespace Part1
{
    public class DetailPage : ContentPage
    {
        public DetailPage(Monkey monkey)
        {
            this.Title = monkey.Name;

            var details = new Label
            {
                Text = monkey.Details
            };

            Content = new ScrollView
            {
                Padding = 20,
                Content = details
            };
        }
    }
}
그리곤 MonkeyPage.cs에 포함된 ListView 항목이 선택되는 것에 대한 이벤트 처리기를 만들고 DetailPage에 네비게이션하는 코드를 넣어줍니다.
using Monkeys.ViewModels;
using Xamarin.Forms;

namespace Part1
{
    public class MonkeyPage : ContentPage
    {
        public MonkeyPage()
        {
            // ... [생략] ...

            list.ItemTapped += (sender, args) =>
            {
              var monkey = args.Item as Monkey;
              if (monkey == null)
                return;

              Navigation.PushAsync(new DetailsPage(monkey));
              list.SelectedItem = null;
            };

            Content = list;
        }
    }
}
보시는 바와 같이 Navigation 객체의 PushAsync를 이용해 다른 페이지로 네비게이션하고 있습니다. 역시 이번에도 실행해 보면 윈도우폰/안드로이드폰 모두 잘 동작합니다.
이 정도면, Xamarin.Forms에 대해서 대강 감이 오시겠죠? ^^
(
첨부 파일은 위의 예제 코드를 구현한 Xamarin 프로젝트입니다.)
[이 글에 대해서 여러분들과 의견을 공유하고 싶습니다. 틀리거나 미흡한 부분 또는 의문 사항이 있으시면 언제든 댓글 남겨주십시오.]