Microsoft MVP성태의 닷넷 이야기
글쓴 사람
정성태 (techsharer at outlook.com)
홈페이지
첨부 파일

주간 닷넷에 소개된,

주간닷넷 2016년 8월 2일
; https://learn.microsoft.com/en-us/archive/blogs/eva/%EC%A3%BC%EA%B0%84%EB%8B%B7%EB%84%B7-2016%EB%85%84-8%EC%9B%94-2%EC%9D%BC

내용 중에 다음의 것을 한번 실습해 보았습니다. ^^

Detect and Blur Faces with .NET Core and Face API
; https://carlos.mendible.com/2016/07/30/detect-and-blur-faces-with-dotnetcore-and-face-api/

위의 내용에 소개된 Face API는 마이크로소프트가 Azure를 통해 서비스하는 "Cognitive Services" 중의 하나입니다. 따라서 이 API를 사용하려면 APIKey를 받아야 하고 그러려면 다음의 페이지에서 구독 신청을 해야 합니다.

Cognitive Services - Get started for free
; https://www.microsoft.com/cognitive-services/en-us/sign-up

그럼 다양한 서비스를 신청할 수 있는데,

Cognitive Services - Request new trials
; https://azure.microsoft.com/en-us/services/cognitive-services/

Face API의 경우 (분당 20건의 제한으로) 월 3만 건의 호출을 무료로 사용할 수 있습니다.

어쨌든, 신청을 하면 API Key를 받았을 테고 시작해 보겠습니다. ^^


사실 모든 순서는 "Detect and Blur Faces with .NET Core and Face API" 글에 잘 나와 있습니다. 하지만, .NET Core를 바탕으로 하고 있는데, 그냥 윈도우 응용 프로그램에도 쉽게 적용할 수 있습니다.

제 경우에는 윈도우 콘솔 프로그램으로 시작해 보겠습니다. 프로젝트 만든 후, NuGet을 통해 "Microsoft Cognitive Services Face API"와 함께 관련 라이브러리를 참조 추가합니다.

PM> Install-Package Microsoft.ProjectOxford.Face
PM> Install-Package ChyImageProcessorCore -Pre
PM> Install-Package System.Numerics.Vectors -Pre 
PM> Install-Package System.Runtime.CompilerServices.Unsafe 

그다음 App.config에 Face API Key를 입력해 설정해 두고,

<?xml version="1.0" encoding="utf-8"?>
<configuration>
    <startup> 
        <supportedRuntime version="v4.0" sku=".NETFramework,Version=v4.5.2" />
    </startup>
    <appSettings>
        <add key="FaceAPIKey" value="...[your_face_api_key]..." />
    </appSettings>
</configuration>

"Detect and Blur Faces with .NET Core and Face API" 글의 소스 코드를 그대로 적용하시면 됩니다.

using System;
using System.IO;
using System.Linq;
using System.Threading.Tasks;
using ImageProcessorCore;
using Microsoft.ProjectOxford.Face;
using Microsoft.ProjectOxford.Face.Contract;
using System.Configuration;

public class Program
{
    const string sourceImage = "face_blur_1.png";

    public static void Main(string[] args)
    {
        const string destinationImage = "detectedfaces.jpg";

        var detects = DetectFaces(sourceImage, ConfigurationManager.AppSettings["FaceAPIKey"]);
        var faceRects = detects.Result;

        Console.WriteLine($"Detected {faceRects.Length} faces");

        BlurFaces(faceRects, sourceImage, destinationImage);

        Console.WriteLine($"Done!!!");
    }

    private static void BlurFaces(FaceRectangle[] faceRects, string sourceImage, string destinationImage)
    {
        if (File.Exists(destinationImage))
        {
            File.Delete(destinationImage);
        }

        if (faceRects.Length > 0)
        {
            using (FileStream stream = File.OpenRead(sourceImage))
            using (FileStream output = File.OpenWrite(destinationImage))
            {
                var image = new Image<Color, uint>(stream);

                foreach (var faceRect in faceRects)
                {
                    var rectangle = new Rectangle(
                        faceRect.Left,
                        faceRect.Top,
                        faceRect.Width,
                        faceRect.Height);

                    image = image.BoxBlur(20, rectangle);
                }

                image.SaveAsJpeg(output);
            }
        }
    }

    private static async Task<FaceRectangle[]> DetectFaces(string imageFilePath, string apiKey)
    {
        var faceServiceClient = new FaceServiceClient(apiKey);

        try
        {
            using (Stream imageFileStream = File.OpenRead(imageFilePath))
            {
                var faces = await faceServiceClient.DetectAsync(imageFileStream);
                var faceRects = faces.Select(face => face.FaceRectangle);
                return faceRects.ToArray();
            }
        }
        catch (Exception)
        {
            return new FaceRectangle[0];
        }
    }
}

직접 실습을 해봤는데, 좀 실망(?!)스럽군요. 아래는 원본 사진에서 위의 프로그램을 돌려 얼굴을 인식해 흐림 처리한 결과입니다. 그런데... 요즘 핫한 사람의 얼굴조차 인식하지 못하고 있습니다. ^^;
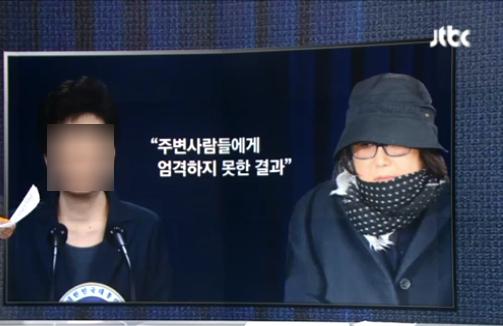
face_blur_0.jpg

(첨부 파일은 이 글의 예제 코드를 포함합니다.)


[최초 등록일: ]
[최종 수정일: 4/17/2023]

Creative Commons License
이 저작물은 크리에이티브 커먼즈 코리아 저작자표시-비영리-변경금지 2.0 대한민국 라이센스에 따라 이용하실 수 있습니다.
by SeongTae Jeong, mailto:techsharer at outlook.com

비밀번호

댓글 작성자


2021-06-16 09시16분
How to get started with neural text to speech in Azure | Azure Tips and Tricks
; https://www.youtube.com/watch?v=dl0amatX5zs&ab_channel=MicrosoftAzure
정성태

... 31  32  33  34  35  36  37  [38]  39  40  41  42  43  44  45  ...
NoWriterDateCnt.TitleFile(s)
12991정성태3/2/202215681.NET Framework: 1170. C# - ffmpeg(FFmpeg.AutoGen)를 이용한 transcode_aac.c 예제 포팅
12990정성태3/2/202215827오류 유형: 797. msbuild - The BaseOutputPath/OutputPath property is not set for project '[...].vcxproj'
12989정성태3/2/202213821오류 유형: 796. mstest.exe - System.IO.FileNotFoundException: Could not load file or assembly 'Microsoft.VisualStudio.QualityTools.Tips.WebLoadTest.Tip
12988정성태3/2/202212217오류 유형: 795. CI 환경에서 Docker build 시 csproj의 Link 파일에 대한 빌드 오류
12987정성태3/1/202214453.NET Framework: 1169. C# - ffmpeg(FFmpeg.AutoGen)를 이용한 demuxing_decoding.c 예제 포팅
12986정성태2/28/202216443.NET Framework: 1168. C# -IIncrementalGenerator를 적용한 Version 2 Source Generator 실습 [1]
12985정성태2/28/202215836.NET Framework: 1167. C# -Version 1 Source Generator 실습
12984정성태2/24/202214961.NET Framework: 1166. C# - ffmpeg(FFmpeg.AutoGen)를 이용한 filtering_video.c 예제 포팅
12983정성태2/24/202215038.NET Framework: 1165. .NET Core/5+ 빌드 시 runtimeconfig.json에 설정을 반영하는 방법
12982정성태2/24/202215028.NET Framework: 1164. HTTP Error 500.31 - ANCM Failed to Find Native Dependencies
12981정성태2/23/202213813VC++: 154. C/C++ 언어의 문자열 Literal에 인덱스 적용하는 구문 [1]
12980정성태2/23/202215299.NET Framework: 1163. C# - 윈도우 환경에서 usleep을 호출하는 방법 [2]
12979정성태2/22/202220889.NET Framework: 1162. C# - 인텔 CPU의 P-Core와 E-Core를 구분하는 방법 [1]파일 다운로드2
12978정성태2/21/202215951.NET Framework: 1161. C# - ffmpeg(FFmpeg.AutoGen)를 이용한 resampling_audio.c 예제 포팅
12977정성태2/21/202220660.NET Framework: 1160. C# - ffmpeg(FFmpeg.AutoGen)를 이용한 qsv 디코딩
12976정성태2/21/202214508VS.NET IDE: 174. Visual C++ - "External Dependencies" 노드 비활성화하는 방법
12975정성태2/20/202216488.NET Framework: 1159. C# - ffmpeg(FFmpeg.AutoGen)를 이용한 qsvdec.c 예제 포팅파일 다운로드1
12974정성태2/20/202214448.NET Framework: 1158. C# - SqlConnection의 최소 Pooling 수를 초과한 DB 연결은 언제 해제될까요?
12973정성태2/16/202217630개발 환경 구성: 639. ffmpeg.exe - Intel Quick Sync Video(qsv)를 이용한 인코딩 [3]
12972정성태2/16/202216025Windows: 200. Intel CPU의 내장 그래픽 GPU가 작업 관리자에 없다면? [4]
12971정성태2/15/202219057.NET Framework: 1157. C# - ffmpeg(FFmpeg.AutoGen)를 이용한 muxing.c 예제 포팅 [7]파일 다운로드2
12970정성태2/15/202215663.NET Framework: 1156. C# - ffmpeg(FFmpeg.AutoGen): Bitmap으로부터 h264 형식의 파일로 쓰기 [1]파일 다운로드1
12969정성태2/14/202213875개발 환경 구성: 638. Visual Studio의 Connection Manager 기능(Remote SSH 관리)을 위한 명령행 도구 - 두 번째 이야기파일 다운로드1
12968정성태2/14/202214531오류 유형: 794. msbuild 에러 - error NETSDK1005: Assets file '...\project.assets.json' doesn't have a target for '...'.
12967정성태2/14/202214693VC++: 153. Visual C++ - C99 표준의 Compund Literals 빌드 방법 [4]
12966정성태2/13/202214502.NET Framework: 1155. C# - ffmpeg(FFmpeg.AutoGen): Bitmap으로부터 yuv420p + rawvideo 형식의 파일로 쓰기파일 다운로드1
... 31  32  33  34  35  36  37  [38]  39  40  41  42  43  44  45  ...