Microsoft MVP성태의 닷넷 이야기
글쓴 사람
정성태 (techsharer at outlook.com)
홈페이지
첨부 파일
 
(연관된 글이 1개 있습니다.)
(시리즈 글이 13개 있습니다.)
Graphics: 2. Unity로 실습하는 Shader
; https://www.sysnet.pe.kr/2/0/11607

Graphics: 3. Unity로 실습하는 Shader (1) - 컬러 반전 및 상하/좌우 뒤집기
; https://www.sysnet.pe.kr/2/0/11608

Graphics: 4. Unity로 실습하는 Shader (2) - 고로 셰이딩(gouraud shading) + 퐁 모델(Phong model)
; https://www.sysnet.pe.kr/2/0/11609

Graphics: 5. Unity로 실습하는 Shader (3) - 고로 셰이딩(gouraud shading) + 퐁 모델(Phong model) + Texture
; https://www.sysnet.pe.kr/2/0/11610

Graphics: 6. Unity로 실습하는 Shader (4) - 퐁 셰이딩(phong shading)
; https://www.sysnet.pe.kr/2/0/11611

Graphics: 7. Unity로 실습하는 Shader (5) - Flat Shading
; https://www.sysnet.pe.kr/2/0/11613

Graphics: 8. Unity Shader - Texture의 UV 좌표에 대응하는 Pixel 좌표
; https://www.sysnet.pe.kr/2/0/11614

Graphics: 9. Unity Shader - 전역 변수의 초기화
; https://www.sysnet.pe.kr/2/0/11616

Graphics: 10. Unity로 실습하는 Shader (6) - Mosaic Shading
; https://www.sysnet.pe.kr/2/0/11619

Graphics: 11. Unity로 실습하는 Shader (7) - Blur (평균값, 가우스, 중간값) 필터
; https://www.sysnet.pe.kr/2/0/11620

Graphics: 12. Unity로 실습하는 Shader (8) - 다중 패스(Multi-Pass Shader)
; https://www.sysnet.pe.kr/2/0/11628

Graphics: 13. Unity로 실습하는 Shader (9) - 투명 배경이 있는 텍스처 입히기
; https://www.sysnet.pe.kr/2/0/11631

Graphics: 19. Unity로 실습하는 Shader (10) - 빌보드 구현
; https://www.sysnet.pe.kr/2/0/11641


Unity로 실습하는 Shader (3) - 고로 셰이딩(gouraud shading) + 퐁 모델(Phong model) + Texture

지난 글에 만든 고로 셰이딩에,

Unity로 실습하는 Shader (2) - 고로 셰이딩(gouraud shading) + 퐁 모델(Phong model)
; https://www.sysnet.pe.kr/2/0/11609

Texture를 연결해 보겠습니다. 이를 위해 Properties에 Texture 정의를 하나 추가하고,

Properties
{
    _MainTex("Texture", 2D) = "white" {}
}

texture 용 UV 좌표도 포함한 후,

sampler2D _MainTex;

struct appdata
{
    float4 vertex : POSITION;
    float3 normal : NORMAL;
    float2 uv : TEXCOORD0;
};

struct v2f
{
    float4 vertex : SV_POSITION;
    float4 illumination : COLOR0;
    float2 uv : TEXCOORD0;
};

pixel shader에서 다음과 같이 texture 색상과 빛을 조합할 수 있습니다.

fixed4 frag (v2f i) : SV_Target
{
    fixed4 col = tex2D(_MainTex, i.uv);
    float4 color = col * i.illumination;

    return color;
}

위의 상태에서 테스트하면 다음과 같은 결과를 얻을 수 있습니다.

gouraud_light_texture_1.png

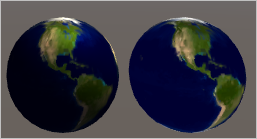
좌측은 gouraud shader를 적용한 것이고 우측은 단순 texture만 씌운 것입니다. 오히려 좀 어두워진 것 같은데요. (물론, 계수를 조정해 주면 밝게 만들 수 있습니다.) 그런데 검색해 보면, 원래 texture 색상에 적용하는 것은 주변광과 확산광이라고 합니다. 그래서 pixel shader 측에 "주변광 + 확산광"한 값과 반사광 값을 분리해서 보내주고,

struct v2f
{
    float4 vertex : SV_POSITION;
    float4 diffuse : COLOR0;
    float4 specular : COLOR1;
    float2 uv : TEXCOORD0;
};

v2f vert (appdata v)
{
    v2f o;
    
    // ...[생략]...

    o.diffuse = float4(ambientReflection + diffuseReflection, 1.0);
    o.specular = float4(specularReflection, 1.0);

    return o;
}

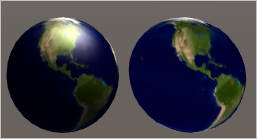
pixel shader에서 texture에 주변광과 확산광만 곱하고 반사광은 더해 주면,

fixed4 frag (v2f i) : SV_Target
{
    fixed4 col = tex2D(_MainTex, i.uv);

    float4 color = col * i.diffuse + i.specular;
    return color;
}

반사광의 효과가 더 나오는 것을 볼 수 있습니다.

gouraud_light_texture_2.png

다음은 이번 실습에서 사용한 shader의 전체 소스입니다.

Shader "My/gouraudShader"
{
    Properties
    {
        _MainTex("Texture", 2D) = "white" {}
        _Ka("Ambient Reflectance", Float) = 1.0
        _Color("Main Color", Color) = (1.0, 1.0, 1.0, 1.0)
    }
    SubShader
    {
        Pass
        {
            Tags{ "LightMode" = "ForwardBase" }

            CGPROGRAM
            #pragma vertex vert
            #pragma fragment frag

            #include "UnityCG.cginc"
            #include "Lighting.cginc"

            uniform float _Ka;
            float4 _Color;

            sampler2D _MainTex;

            struct appdata
            {
                float4 vertex : POSITION;
                float3 normal : NORMAL;
                float2 uv : TEXCOORD0;
            };

            struct v2f
            {
                float4 vertex : SV_POSITION;
                float4 diffuse : COLOR0;
                float4 specular : COLOR1;
                float2 uv : TEXCOORD0;
            };

            v2f vert (appdata v)
            {
                v2f o;
                o.vertex = UnityObjectToClipPos(v.vertex);
                o.uv = v.uv;
                
                // 주변광
                float4 ambientReflection = _Ka * UNITY_LIGHTMODEL_AMBIENT;

                // 확산광
                float3 worldNormal = UnityObjectToWorldNormal(v.normal);
                float3 lightDir = normalize(_WorldSpaceLightPos0); /* float4 _WorldSpaceLightPos0; */
                float3 diffuseReflection = 1.0 * _LightColor0.rgb * saturate(dot(worldNormal, lightDir));

                // 반사광
                float3 reflectedDir = reflect(-lightDir, worldNormal);
                float3 viewDir = normalize(_WorldSpaceCameraPos - worldNormal); /* float3 _WorldSpaceCameraPos; */
                float reflectIntensity = saturate(dot(reflectedDir, viewDir));

                float n = 4.0;
                reflectIntensity = pow(reflectIntensity, n);
                float3 specularReflection = 1.0 * _LightColor0 * reflectIntensity;

                o.diffuse = float4(ambientReflection + diffuseReflection, 1.0);
                o.specular = float4(specularReflection, 1.0);

                return o;
            }

            fixed4 frag (v2f i) : SV_Target
            {
                fixed4 col = tex2D(_MainTex, i.uv);

                float4 color = col * i.diffuse + i.specular;
                return color;
            }
            ENDCG
        }
    }
}


[이 글에 대해서 여러분들과 의견을 공유하고 싶습니다. 틀리거나 미흡한 부분 또는 의문 사항이 있으시면 언제든 댓글 남겨주십시오.]

[연관 글]


[최초 등록일: ]
[최종 수정일: 8/3/2018]

Creative Commons License
이 저작물은 크리에이티브 커먼즈 코리아 저작자표시-비영리-변경금지 2.0 대한민국 라이센스에 따라 이용하실 수 있습니다.
by SeongTae Jeong, mailto:techsharer at outlook.com

비밀번호

댓글 작성자


... 106  107  108  109  110  111  112  113  114  115  116  117  118  [119]  120  ...
NoWriterDateCnt.TitleFile(s)
10950정성태5/2/201626428.NET Framework: 576. 기본적인 CLR Profiler 소스 코드 설명 [2]파일 다운로드2
10949정성태4/28/201619976.NET Framework: 575. SharedDomain과 JIT 컴파일파일 다운로드1
10948정성태4/28/201623965.NET Framework: 574. .NET - 눈으로 확인하는 SharedDomain의 동작 방식 [3]파일 다운로드1
10947정성태4/27/201621861.NET Framework: 573. .NET CLR4 보안 모델 - 4. CLR4 보안 모델에서의 조건부 APTCA 역할파일 다운로드1
10946정성태4/26/201624698VS.NET IDE: 106. Visual Studio 2015 확장 - INI 파일을 위한 사용자 정의 포맷 기능 (Syntax Highlighting)파일 다운로드1
10945정성태4/26/201618345오류 유형: 327. VSIX 프로젝트 빌드 시 The "VsTemplatePaths" task could not be loaded from the assembly 오류 발생
10944정성태4/22/201619609디버깅 기술: 80. windbg - 풀 덤프 파일로부터 텍스트 파일의 내용을 찾는 방법
10943정성태4/22/201624473디버깅 기술: 79. windbg - 풀 덤프 파일로부터 .NET DLL을 추출/저장하는 방법 [1]
10942정성태4/19/201619826디버깅 기술: 78. windbg 사례 - .NET 예외가 발생한 시점의 오류 분석 [1]
10941정성태4/19/201619671오류 유형: 326. Error MSB8020 - The build tools for v120_xp (Platform Toolset = 'v120_xp') cannot be found.
10940정성태4/18/201623035Windows: 116. 프로세스 풀 덤프 시간을 줄여 주는 Process Reflection [3]
10939정성태4/18/201624059.NET Framework: 572. .NET APM 비동기 호출의 Begin...과 End... 조합 [3]파일 다운로드1
10938정성태4/13/201623545오류 유형: 325. 파일 삭제 시 오류 - Error 0x80070091: The directory is not empty.
10937정성태4/13/201631777Windows: 115. UEFI 모드로 윈도우 10 설치 가능한 USB 디스크 만드는 방법
10936정성태4/8/201642506Windows: 114. 삼성 센스 크로노스 7 노트북의 운영체제를 USB 디스크로 새로 설치하는 방법 [3]
10935정성태4/7/201626886웹: 32. Edge에서 Google Docs 문서 편집 시 한영 전환키가 동작 안하는 문제
10934정성태4/5/201625521디버깅 기술: 77. windbg의 콜스택 함수 인자를 쉽게 확인하는 방법 [1]
10933정성태4/5/201631085.NET Framework: 571. C# - 스레드 선호도(Thread Affinity) 지정하는 방법 [8]파일 다운로드1
10932정성태4/4/201623437VC++: 96. C/C++ 식 평가 - printf("%d %d %d\n", a, a++, a);
10931정성태3/31/201623741개발 환경 구성: 283. Hyper-V 내에 구성한 Active Directory 환경의 시간 구성 방법 [3]
10930정성태3/30/201621620.NET Framework: 570. .NET 4.5부터 추가된 CLR Profiler의 실행 시 Rejit 기능
10929정성태3/29/201631856.NET Framework: 569. ServicePointManager.DefaultConnectionLimit의 역할파일 다운로드1
10928정성태3/28/201637568.NET Framework: 568. ODP.NET의 완전한 닷넷 버전 Oracle ODP.NET, Managed Driver [2]파일 다운로드1
10927정성태3/25/201626686.NET Framework: 567. System.Net.ServicePointManager의 DefaultConnectionLimit 속성 설명
10926정성태3/24/201626281.NET Framework: 566. openssl의 PKCS#1 PEM 개인키 파일을 .NET RSACryptoServiceProvider에서 사용하는 방법 [10]파일 다운로드1
10925정성태3/24/201620507.NET Framework: 565. C# - Rabin-Miller 소수 생성 방법을 이용하여 RSACryptoServiceProvider의 개인키를 직접 채워보자 - 두 번째 이야기파일 다운로드1
... 106  107  108  109  110  111  112  113  114  115  116  117  118  [119]  120  ...