Microsoft MVP성태의 닷넷 이야기
.NET Framework: 940. C# - Windows Forms ListView와 DataGridView의 예제 코드 [링크 복사], [링크+제목 복사],
조회: 20107
글쓴 사람
정성태 (techsharer at outlook.com)
홈페이지
첨부 파일
(연관된 글이 1개 있습니다.)

C# - Windows Forms ListView와 DataGridView의 예제 코드

단일 필드를 보여줄 때 보통 ListBox를 사용하지만, 다중 필드의 경우에는 ListViewDataGridView를 선택하게 됩니다. 또한 그 2개의 주요 차이점은 해당 필드를 편집할 수 있느냐에 대한 여부로 나뉩니다. (참고로 ListView도 "LabelEdit" 속성을 통해 첫 번째 필드에 대한 값 편집은 할 수 있습니다.)

그냥 간략하게 예제 코드 차원에서 작성해 봤으니,

using System;
using System.Collections.Generic;
using System.Windows.Forms;

namespace WindowsFormsApp1
{
    public partial class Form1 : Form
    {
        public Form1()
        {
            InitializeComponent();
        }

        private void Form1_Load(object sender, EventArgs e)
        {
            List<Person> list = new List<Person>();

            list.Add(new Person("t1", 5, "on t1", true));
            list.Add(new Person("t2", 6, "on t2", false));
            list.Add(new Person("t3", 7, "on t3", true));
            list.Add(new Person("t4", 8, "on t4", false));
            list.Add(new Person("t5", 9, "on t5", true));

            SetupListView(list);
            SetupDataGridView(list);
        }

        private void SetupListView(List<Person> list)
        {
            this.listView1.View = System.Windows.Forms.View.Details;
            this.listView1.CheckBoxes = true;
            // this.LabelEdit = true;

            ColumnHeader ch = new ColumnHeader()
            {
                Text = nameof(Person.Name),
                Width = 50
            };
            this.listView1.Columns.Add(ch);

            ch = new ColumnHeader()
            {
                Text = nameof(Person.Age),
                Width = 50
            };
            this.listView1.Columns.Add(ch);

            ch = new ColumnHeader()
            {
                Text = nameof(Person.Address),
                Width = 120,
            };
            this.listView1.Columns.Add(ch);

            ch = new ColumnHeader()
            {
                Text = nameof(Person.IsMale),
                Width = 50,
            };
            this.listView1.Columns.Add(ch);

            FillListView(list);
        }

        private void FillListView(List<Person> list)
        {
            this.listView1.Items.Clear();

            foreach (Person person in list)
            {
                ListViewItem item = new ListViewItem();

                item.Text = person.Name;

                {
                    System.Windows.Forms.ListViewItem.ListViewSubItem subItem = new ListViewItem.ListViewSubItem();
                    subItem.Text = person.Age.ToString();
                    item.SubItems.Add(subItem);
                }

                {
                    System.Windows.Forms.ListViewItem.ListViewSubItem subItem = new ListViewItem.ListViewSubItem();
                    subItem.Text = person.Address;
                    item.SubItems.Add(subItem);
                }

                {
                    System.Windows.Forms.ListViewItem.ListViewSubItem subItem = new ListViewItem.ListViewSubItem();
                    subItem.Text = person.IsMale.ToString();
                    item.SubItems.Add(subItem);
                }

                this.listView1.Items.Add(item);
            }
        }

        private void SetupDataGridView(List<Person> list)
        {
            this.dataGridView1.ColumnCount = 3;

            DataGridViewCheckBoxColumn col0 = new DataGridViewCheckBoxColumn();
            col0.Name = "";
            col0.Width = 25;
            this.dataGridView1.Columns.Insert(0, col0);

            this.dataGridView1.Columns[1].Name = "Name";
            this.dataGridView1.Columns[1].Width = 50;

            this.dataGridView1.Columns[2].Name = "Age";
            this.dataGridView1.Columns[2].Width = 50;
            this.dataGridView1.Columns[2].ReadOnly = true;

            this.dataGridView1.Columns[3].Name = "Address";
            this.dataGridView1.Columns[3].Width = 120;

            DataGridViewCheckBoxColumn col4 = new DataGridViewCheckBoxColumn();
            col4.Name = "IsMale";
            col4.Width = 50;
            col4.ReadOnly = true;
            this.dataGridView1.Columns.Add(col4);

            FillDataGridView(list);
        }

        private void FillDataGridView(List<Person> list)
        {
            this.dataGridView1.Rows.Clear();

            foreach (Person person in list)
            {
                this.dataGridView1.Rows.Add(person.Values());
            }
        }
    }

    public class Person
    {
        public string Name;
        public int Age;
        public string Address;
        public bool IsMale;

        public Person(string name, int age, string address, bool isMale)
        {
            Name = name;
            Age = age;
            Address = address;
            IsMale = isMale;
        }

        public string [] Values()
        {
            return new string[]
            {
                false.ToString(), Name, Age.ToString(), Address, IsMale.ToString()
            };
        }
    }
}

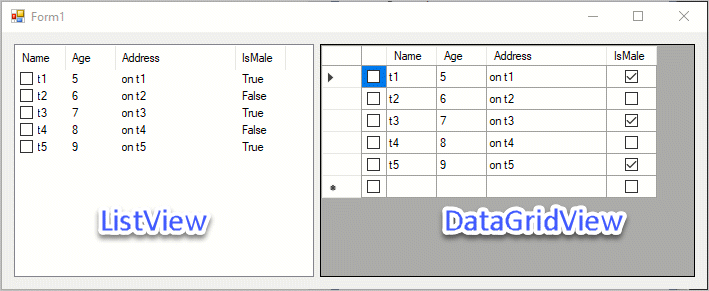
참고하시고, 아래는 위의 프로그램에 대한 실행 화면으로 왼쪽은 ListView, 오른쪽은 DataGridView를 보여줍니다.

listview_vs_datagridview_1.png

(첨부 파일은 이 글의 예제 코드를 포함합니다.)


[이 글에 대해서 여러분들과 의견을 공유하고 싶습니다. 틀리거나 미흡한 부분 또는 의문 사항이 있으시면 언제든 댓글 남겨주십시오.]

[연관 글]


[최초 등록일: ]
[최종 수정일: 9/19/2020]

Creative Commons License
이 저작물은 크리에이티브 커먼즈 코리아 저작자표시-비영리-변경금지 2.0 대한민국 라이센스에 따라 이용하실 수 있습니다.
by SeongTae Jeong, mailto:techsharer at outlook.com

비밀번호

댓글 작성자


... 91  92  93  [94]  95  96  97  98  99  100  101  102  103  104  105  ...
NoWriterDateCnt.TitleFile(s)
11616정성태7/17/201819461Graphics: 9. Unity Shader - 전역 변수의 초기화
11615정성태7/17/201823864.NET Framework: 788. RawInput을 이용한 키보드/마우스 입력 모니터링파일 다운로드1
11614정성태7/17/201826749Graphics: 8. Unity Shader - Texture의 UV 좌표에 대응하는 Pixel 좌표
11613정성태7/16/201823188Graphics: 7. Unity로 실습하는 Shader (5) - Flat Shading
11612정성태7/16/201821259Windows: 148. Windows - Raw Input의 Top level collection 의미
11611정성태7/15/201821634Graphics: 6. Unity로 실습하는 Shader (4) - 퐁 셰이딩(phong shading)
11610정성태7/15/201818987Graphics: 5. Unity로 실습하는 Shader (3) - 고로 셰이딩(gouraud shading) + 퐁 모델(Phong model) + Texture
11609정성태7/15/201822009Graphics: 4. Unity로 실습하는 Shader (2) - 고로 셰이딩(gouraud shading) + 퐁 모델(Phong model)
11608정성태7/15/201825733Graphics: 3. Unity로 실습하는 Shader (1) - 컬러 반전 및 상하/좌우 뒤집기
11607정성태7/14/201826079Graphics: 2. Unity로 실습하는 Shader [1]
11606정성태7/13/201826867사물인터넷: 19. PC에 연결해 동작하는 자신만의 USB 장치 만들어 보기파일 다운로드1
11605정성태7/13/201823246사물인터넷: 18. New NodeMCU v3 아두이노 호환 보드의 내장 LED 및 입력 핀 사용법 [1]파일 다운로드1
11604정성태7/12/201822248Math: 47. GeoGebra 기하 (24) - 정다각형파일 다운로드1
11603정성태7/12/201817517Math: 46. GeoGebra 기하 (23) - sqrt(n) 제곱근파일 다운로드1
11602정성태7/11/201818063Math: 45. GeoGebra 기하 (22) - 반전기하학의 원에 관한 반사변환파일 다운로드1
11601정성태7/11/201821147Math: 44. GeoGebra 기하 (21) - 반전기하학의 직선 및 원에 관한 반사변환파일 다운로드1
11600정성태7/10/201819761Math: 43. GeoGebra 기하 (20) - 세 점을 지나는 원파일 다운로드1
11599정성태7/10/201818647Math: 42. GeoGebra 기하 (19) - 두 원의 안과 밖으로 접하는 직선파일 다운로드1
11598정성태7/10/201820870Windows: 147. 시스템 복구 디스크를 USB 디스크에 만드는 방법
11597정성태7/10/201823140사물인터넷: 17. Thinary Electronic - ATmega328PB 아두이노 호환 보드의 개발 환경 구성
11596정성태7/10/201820500기타: 72. 과거의 용어 설명 - OWIN
11595정성태7/10/201825995사물인터넷: 16. New NodeMCU v3 아두이노 호환 보드의 기본 개발 환경 구성
11594정성태7/8/201820930Math: 41. GeoGebra 기하 (18) - 원의 중심 및 접선파일 다운로드1
11593정성태7/8/201820085Math: 40. GeoGebra 기하 (17) - 각의 복사파일 다운로드1
11591정성태7/7/201819092Math: 39. GeoGebra 기하 (16) - 삼각형의 방심과 방접원파일 다운로드1
11590정성태7/7/201818876Math: 38. GeoGebra 기하 (15) - 삼각형의 수심파일 다운로드1
... 91  92  93  [94]  95  96  97  98  99  100  101  102  103  104  105  ...