Visual Studio - 사용자 정의 정적 분석 규칙 만드는 방법
그동안 한 번쯤 사용자 정의 정적 분석 Rule을 만들어 봐야지... 생각만 하다가 마침 다음의 질문도 있고,
Visual Studio 2013에서 Rule Set 에 Custom Rule을 추가 할 수 있나요?
; http://social.msdn.microsoft.com/Forums/ko-KR/04376215-5abc-4bee-8d1f-a9b70ce82659/visual-studio-2013-rule-set-custom-rule-?forum=vsko
해서 그냥 한글 자료를 남긴다는 의미에서 단순 따라하기 식으로 실습해 보았습니다. 물론, 위의 질문에 포함된 글을 참조했습니다.
How to write custom static code analysis rules and integrate them into Visual Studio 2010
; http://blogs.msdn.com/b/codeanalysis/archive/2010/03/26/how-to-write-custom-static-code-analysis-rules-and-integrate-them-into-visual-studio-2010.aspx
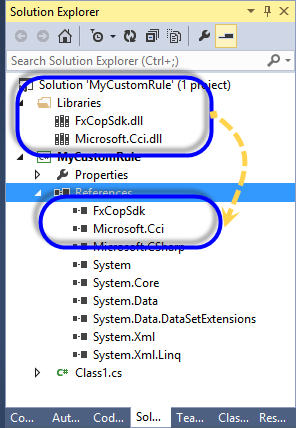
우선, .NET 4.0 대상으로 클래스 라이브러리 유형의 C# 프로젝트를 하나 만들고 "C:\Program Files (x86)\Microsoft Visual Studio 12.0\Team Tools\Static Analysis Tools\FxCop" 폴더에 위치한 FxCopSdk.dll, Microsoft.Cci.dll 파일을 참조 추가합니다. (32비트 운영체제의 경우 "C:\Program Files\Microsoft Visual Studio 12.0\Team Tools\Static Analysis Tools\FxCop" 폴더 참조)
물론 이렇게 되면 참조 경로가 하드 코딩 식으로 되는데요. 이런 경우 제가 자주 써먹는 방식이 하나 있는데, 다음 화면에서 보는 것처럼 라이브러리만 별도로 모아놓는 폴더를 하나 만들고 거기에 외부 DLL을 몰아넣은 다음 프로젝트 참조를 그쪽으로 걸어주면 관리가 좀 편해집니다. (소스 컨트롤 시에도 공유하기 편합니다. ^^)
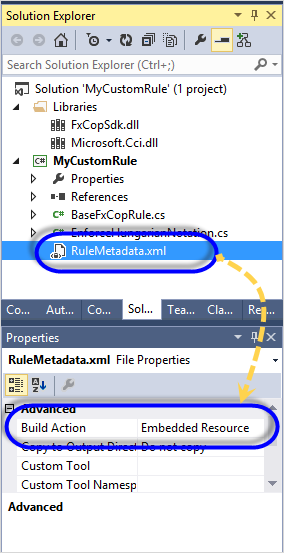
그다음 프로젝트에 (임의의 이름으로, 여기서는) "RuleMetadata.xml" 이름의 XML 파일을 추가하고 내용을 다음과 같이 채워줍니다. (물론, FriendlyName의 값도 임의의 원하는 문자열로 채워넣을 수 있습니다.)
<?xml version="1.0" encoding="utf-8" ?>
<Rules FriendlyName="My Custom FxCop Rules">
</Rules>
이제 해당 XML 파일을 아래의 화면과 같이 "Embedded Resource" 유형으로 설정합니다. (캡처 화면에 보이는 BaseFxCopRule.cs, EnforceHungarianNotation.cs 파일은 아직 작업 전이므로 무시하세요. ^^)
그럼, 본격적으로 룰을 위한 코딩으로 들어가 볼까요? ^^ "
How to write custom static code analysis rules and integrate them into Visual Studio 2010" 예제에서 만드는 룰은 private/internal 접근 제한자를 가진 클래스의 필드 이름이 헝가리안 표기법을 따르는가를 체크하는 것입니다.
일단 이에 대한 Base 클래스를 하나 만들어야 하는데,
using Microsoft.FxCop.Sdk;

namespace MyCustomRule
{
    internal abstract class BaseFxCopRule : BaseIntrospectionRule
    {
        protected BaseFxCopRule(string ruleName)
            : base(ruleName, "MyCustomRule.RuleMetadata",
                   typeof(BaseFxCopRule).Assembly)
        {
        }
    }
}
위에서 "MyCustomRule.RuleMetadata" 이름은 이전에 "Embedded Resource" 유형으로 추가했던 "RuleMetadata.xml" 자원에 대한 경로입니다. (따라서 여러분들의 프로젝트에서는 그에 맞게 이름을 변경해 주면 됩니다. 대개의 경우 "[default namespace].[resource file name]" 형식입니다.)
한번 더 C# 파일을 추가하고 Rule에 대응되는 실제 코딩을 담은 클래스를 작성합니다. (자세한 내용은 생략합니다.)
using Microsoft.FxCop.Sdk;
using System;

namespace MyCustomRule
{
    internal sealed class EnforceHungarianNotation : BaseFxCopRule
    {
        public EnforceHungarianNotation()
            : base("EnforceHungarianNotation")
        { }

        private const string s_staticFieldPrefix = "s_";
        private const string s_nonStaticFieldPrefix = "m_";

        public override TargetVisibilities TargetVisibility
        {
            get
            {
                return TargetVisibilities.NotExternallyVisible;
            }
        }

        public override ProblemCollection Check(Member member)
        {

            Field field = member as Field;
            if (field == null)
            {
                return null;
            }

            if (field.IsStatic)
            {
                CheckFieldName(field, s_staticFieldPrefix);
            }
            else
            {
                CheckFieldName(field, s_nonStaticFieldPrefix);
            }

            return Problems;
        }

        private void CheckFieldName(Field field, string expectedPrefix)
        {
            if (!field.Name.Name.StartsWith(expectedPrefix, StringComparison.Ordinal))
            {
                Resolution resolution = GetResolution(
                  field,  // Field {0} is not in Hungarian notation.
                  expectedPrefix  // Field name should be prefixed with {1}.
                  );
                Problem problem = new Problem(resolution);
                Problems.Add(problem);
            }
        }
    }
}
마지막으로 이렇게 작성한 룰을 Rulemetadata.xml 파일에 반영해야 하는데요. 다음과 같이 만들 수 있습니다.
<?xml version="1.0" encoding="utf-8" ?>
<Rules FriendlyName="My Custom FxCop Rules">
 <Rule TypeName="EnforceHungarianNotation" Category="MyRules" CheckId="CR1000">
   <Name>Enforce Hungarian Notation</Name>
   <Description>Checks fields for compliance with Hungarian notation.</Description>
   <Resolution>Field {0} is not in Hungarian notation. Field name should be prefixed with '{1}'.</Resolution>
   <MessageLevel Certainty="100">Warning</MessageLevel>
   <FixCategories>NonBreaking</FixCategories>
   <Url />
    <Owner />
    <Email />
  </Rule>
</Rules>
여기서 중요한 것은 /Rules/Rule[@TypeName] 속성의 값이 반드시 우리가 작성한 룰 클래스의 타입명을 담아야 하는 정도입니다. 그 외 필드의 자세한 설명은 역시 생략하지만 보시면 직관적으로 알 수 있는 내용입니다. ^^
빌드하면 MyCustomRule.dll이 생성되고 이제 해당 DLL을 Visual Studio가 인식하도록 설치 작업만 해주면 됩니다.
"
How to write custom static code analysis rules and integrate them into Visual Studio 2010" 글에서는 작성된 룰에 대한 디버깅 방법도 소개해 주고 있습니다. 즉, 프로젝트 속성 창에서 FxCopCmd.exe를 지정해 룰을 돌려볼 수 있게 하는 것입니다.
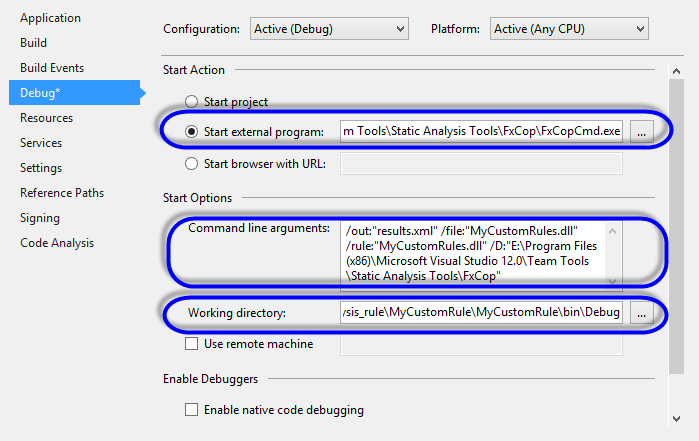
Start external program: C:\Program Files (x86)\Microsoft Visual Studio 12.0\Team Tools\Static Analysis Tools\FxCop\FxCopCmd.exe

Command line arguments: /out:"results.xml" /file:"MyCustomRule.dll" /rule:"MyCustomRule.dll" /D:"C:\Program Files (x86)\Microsoft Visual Studio 12.0\Team Tools\Static Analysis Tools\FxCop"
"
How to write custom static code analysis rules and integrate them into Visual Studio 2010" 글에는 "Working directory"까지 설정하고 있지만 제가 해보니 아무런 의미가 없었습니다. 그에 상관없이 무조건 우리가 만든 룰을 포함한 DLL을 "C:\program files (x86)\microsoft visual studio 12.0\team tools\static analysis tools\fxcop\Rules"에서 찾았습니다. 따라서 MyCustomRule.dll 파일을 해당 폴더에 복사해 주어야 합니다.
여기까지 작업하고 Visual Studio에서 CheckFileName 메서드에 BP(Breakpoint)를 걸은 후 F5(Start Debugging) 키를 누르면 정상적으로 디버그 모드에서 BP가 걸리는 것을 확인할 수 있습니다. 이것으로 모든 작업은 사실상 끝이 납니다.
현재 "C:\program files (x86)\microsoft visual studio 12.0\team tools\static analysis tools\fxcop\Rules" 폴더에 우리가 만든 MyCustomRule.dll 파일을 배포했으니 Visual Studio에서 곧바로 써 먹을 수 있습니다.
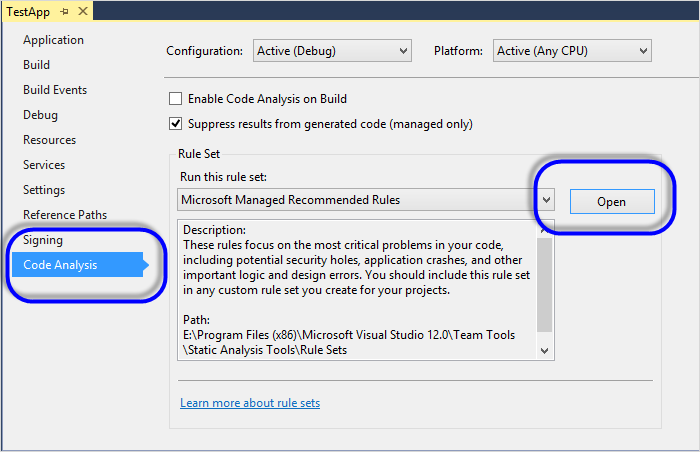
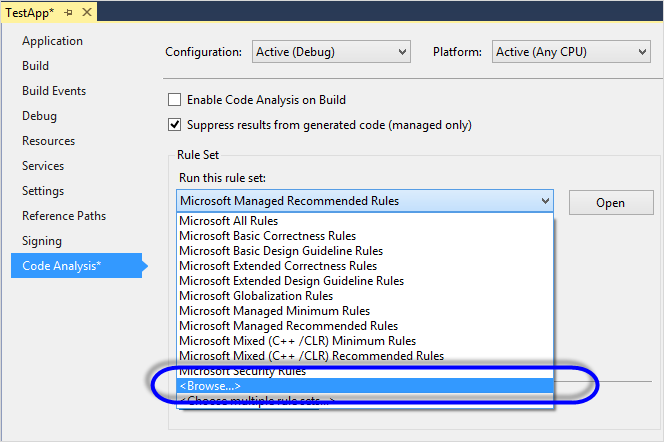
테스트를 위해 새롭게 Visual Studio를 띄워 테스트용 C# 프로젝트를 하나 만듭니다. 그리고 프로젝트 속성의 "Code Analysis" 탭에서 "Open" 버튼을 누르고,
새롭게 뜬 ".ruleset" 편집 화면의 상단에 화살표 키가 아래를 향하는 아이콘(Show rules that are not enabled)을 누르면 현재 등록된 모든 룰을 보여줍니다. 거기서 우리가 만든 Rule을 선택해 주면 됩니다.
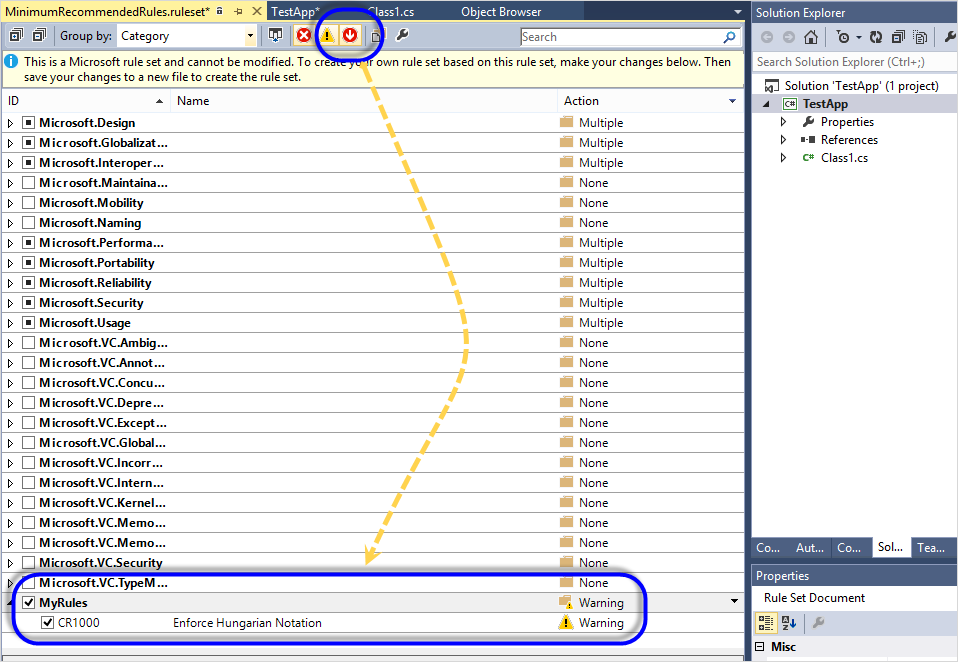
이렇게 하고 저장을 하면 새로운 RuleSet 이름을 묻는데 아무 이름이나 지정하고 저장을 누르면 됩니다. 새로운 룰셋 파일이 저장되는 경로는 솔루션 파일이 있는 폴더로 지정하는 것이 권장됩니다.
그런 다음 이제 다시 프로젝트 설정 창으로 가서 방금 저장한 룰셋을 지정해 줍니다.
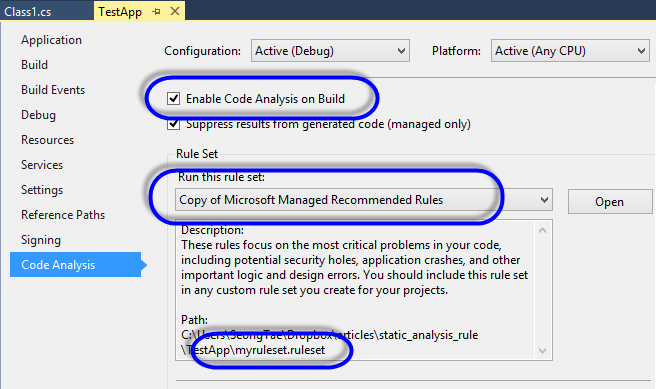
물론, "Enable Code Analysis on Build" 옵션도 켜줘야 겠지요. 최종적으로 다음과 같이 선택된 화면 구성이 됩니다.
이제 다음과 같이 룰을 위반하는 코드가 있다면,
namespace TestApp
{
    public class Class1
    {
        private static int m_Foo;
    }
}
빌드 시 출력(Output) 창에 이런 경고가 뜨는 것을 확인할 수 있습니다.
1>  Running Code Analysis...
1>MSBUILD : warning CR1000: MyRules : Field 'Class1.m_Foo' is not in Hungarian notation. Field name should be prefixed with 's_'.
또는 빌드 폴더(예: /bin/Debug)에 [프로젝트명].[확장자].CodeAnalysisLog.xml 파일이 생성되어 정적 분석 결과가 담기게 됩니다.
(
첨부 파일은 위의 테스트를 진행한 2개의 프로젝트를 포함합니다.)
[이 글에 대해서 여러분들과 의견을 공유하고 싶습니다. 틀리거나 미흡한 부분 또는 의문 사항이 있으시면 언제든 댓글 남겨주십시오.]