Visual Studio Code를 이용한 아두이노 프로그램 개발
개인적으로 Arduino IDE를 별로 좋아하지 않습니다. 왜냐하면, (제가 가지고 있는 2대의 PC에서 모두) 공식 Arduino IDE를 실행하면 다음과 같이 기본 CPU가 30%를 점유해 버립니다.
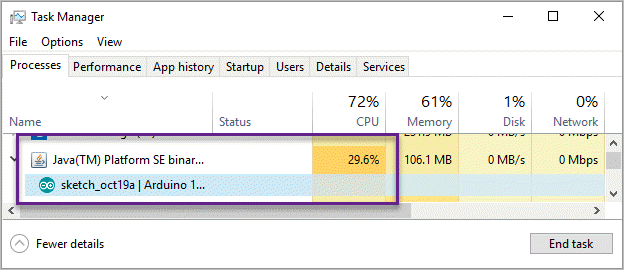
4개의 논리 CPU 머신에서 저 정도면 IDE가 CPU 100% 현상을 겪고 있는 것이나 다름없습니다. (8개의 논리 CPU 머신에서는 20% 가까이를 항상 점유하고 있습니다.)
게다가 인텔리센스 없는 에디트 환경도 너무 원시적이고! ^^
그래서 제 경우에 Visual Studio Code를 사용합니다. (맛 들이고 나면 절대 Arduino IDE로 못 돌아갑니다. ^^)
Visual Studio Code extension for Arduino
; https://marketplace.visualstudio.com/items?itemName=vsciot-vscode.vscode-arduino

Visual Studio Code extension for Arduino is now open source
by Microsoft + Open Source
; https://open.microsoft.com/2017/07/07/visual-studio-code-extension-arduino-open-source/
한번 세팅해 볼까요? ^^
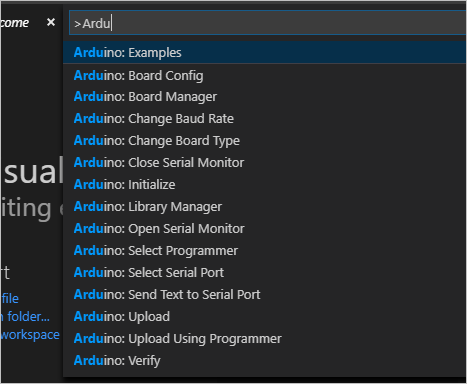
우선, 확장 아이콘(Ctrl + Shift + X)을 눌러 "Visual Studio Code extension for Arduino"를 설치합니다. 이후부터는 "Arudino"로 시작하는 확장 명령어를 사용할 수 있는데요, "View" / "Command Palette(F1 또는 Ctrl + Shift + P)" 메뉴를 통해 다음고 같이 "Arduino:"로 시작하는 명령어를 확인할 수 있습니다.
"Command Palette"에서 "> arduino: examples" 기능을 선택하면, 다음과 같이 아두이노 예제 폴더 창이 뜹니다.
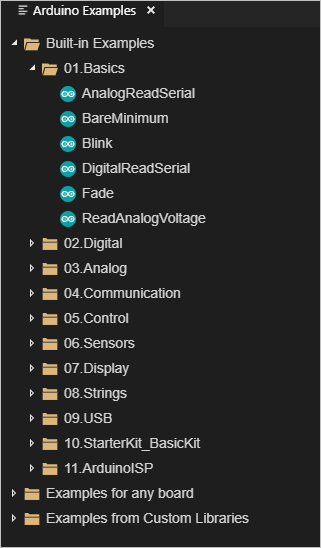
간단한 시작으로 "01. Basics"의 "Blink"를 선택합니다. 그럼, 기존 샘플 코드가 다음의 경로 하위에 복사되어,
%USERPROFILE%\Documents\Arduino\generated_examples
"%USERPROFILE%\Documents\Arduino\generated_examples\Blink" 폴더가 생성되면서 VS Code의 프로젝트 경로로써 동작하게 됩니다.
.
│   Blink.ino
│   Blink.txt
│
└───.vscode
        arduino.json
        c_cpp_properties.json
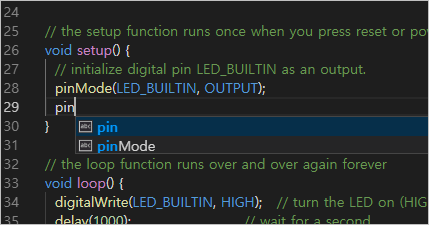
당연하겠지만, 이제 Visual Studio Code 내에서 아두이노 코드를 작성하면 인텔리센스 기능이 동작합니다.
이제 빌드를 해야겠지요. 이를 위해 먼저 Board Type을 선택해야 하는데 "Command Palette"에서 "> Arduino: Board Config"을 선택해 뜨는 "Arduino Board Configuration" 창의 "Selected Board:" 목록 상자를 통해 고르면 됩니다. (만약 자신의 보드가 없다면 "Arduino: Board Manager"를 이용해 새로운 보드를 추가합니다.)
보드 선택 후 남은 작업은 이제 아두이노가 연결된 직렬 포트를 선택하는 것입니다. "Command Palette"에서 "> Arduino: Select Serial Port"를 선택하면 다음과 같이 포트 목록이 나오고,
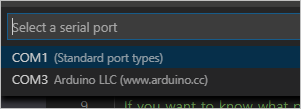
제 경우에는 "COM3"이므로 그것을 선택했습니다. 여기까지 진행했으면 선택된 사항들이 ./.vscode/arduino.json 파일에 다음과 같이 기록되어 있습니다.
{
    "sketch": "Blink.ino",
    "port": "COM3",
    "board": "arduino:avr:leonardo"
}
달리 말하면, "Arduino: Board Config", "Arduino: Select Serial Port" 명령어들을 실행할 필요 없이 값을 알고 있다면 그냥 arduino.json 파일을 직접 편집해도 무방합니다. 자, 이제 "> Arduino: Verify(Ctrl + Alt + R)"를 실행하면 빌드가 되고, "> Arduino: Upload(Ctrl + Alt + U)"를 선택하면 보드에 Blink 프로그램이 업로드됩니다.
디버깅까지 마저 해보려고,
Debug your Arduino code with Visual Studio Code
; https://blogs.msdn.microsoft.com/iotdev/2017/05/27/debug-your-arduino-code-with-visual-studio-code/
위의 글에 따라 Debug (Ctrl + Shift + D) 아이콘을 선택해 "Add Configuration..." 항목을 선택하면 다음과 같이 환경 선택 목록이 나옵니다.
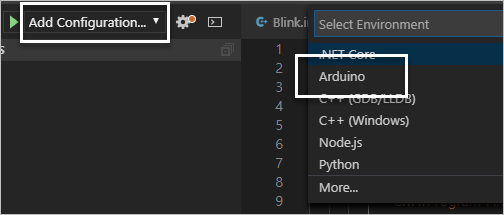
당연히 "Arduino"를 선택하고 F5 키를 눌러 시작했는데 다음과 같은 오류 메시지가 뜹니다.
Cannot find the OpenOCD from the launch.json debugServerPath property. Please input the right path of OpenOCD
실제로 ./.vscode/launch.json 파일을 보면,
{
    // Use IntelliSense to learn about possible attributes.
    // Hover to view descriptions of existing attributes.
    // For more information, visit: https://go.microsoft.com/fwlink/?linkid=830387
    "version": "0.2.0",
    "configurations": [
        {
            "name": "Arduino",
            "type": "arduino",
            "request": "launch",
            "program": "${file}",
            "cwd": "${workspaceFolder}",
            "MIMode": "gdb",
            "targetArchitecture": "arm",
            "miDebuggerPath": "",
            "debugServerPath": "",
            "debugServerArgs": "",
            ...[생략]...
            "stopAtEntry": true,
            "serverStarted": "Info\\ :\\ [\\w\\d\\.]*:\\ hardware",
            "launchCompleteCommand": "exec-continue",
            "filterStderr": true,
            "args": []
        }
    ]
}
debugServerPath 값이 비어 있습니다.
https://github.com/Microsoft/vscode-arduino의 문서에 보면 다음과 같은 내용이 나옵니다.
Make sure your Arduino board can work with STLink, Jlink or EDBG. The debugging support currently is fully tested with the following boards.
* MXChip IoT Developer Kit - AZ3166
* Arduino M0 PRO
* Adafruit WICED WiFi Feather
* Adafruit Feather M0
* Arduino Zero Pro
아마도 제가 구매한 아두이노 레오나르도 호환 보드는 저기에 속하지 않는 것 같고, 일단은 디버깅은 건너뛰어야겠습니다. (혹시 이에 관해 아시는 분은 덧글 부탁드립니다. ^^)
Visual Studio Code를 이용한 아두이노 프로그램 개발
; https://www.sysnet.pe.kr/2/0/11753

Visual Studio Code를 이용한 아두이노 프로그램 개발 - 새 프로젝트
; https://www.sysnet.pe.kr/2/0/11754

Visual Studio Code의 아두이노 프로그램 개발 시 인텔리센스가 안 된다면?
; https://www.sysnet.pe.kr/2/0/11756

Visual Studio Code extension for Arduino - #include errors detected.
; https://www.sysnet.pe.kr/2/0/11755
[이 글에 대해서 여러분들과 의견을 공유하고 싶습니다. 틀리거나 미흡한 부분 또는 의문 사항이 있으시면 언제든 댓글 남겨주십시오.]